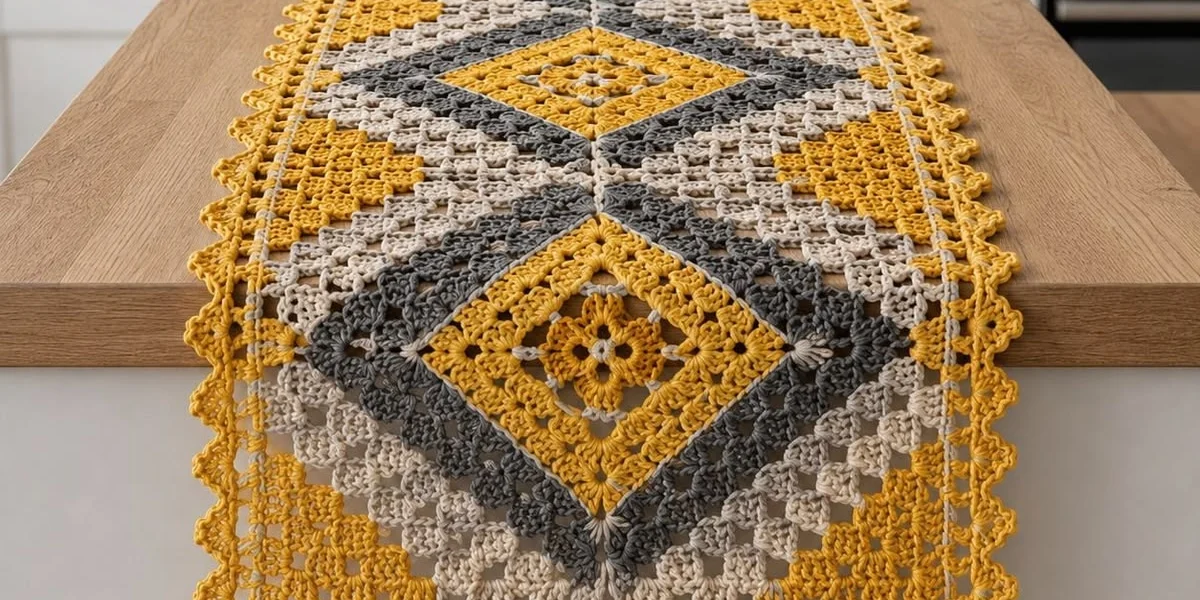
Sundial Diamonds Granny Square Table Runner
The Sundial Diamonds granny square table runner pattern builds a strip of tapestry-crochet diamond motifs into one continuous woven-look runner, finished with a scalloped shell border and a full fringe of hand-tied tassels. Each diamond is worked as its own granny square from a center ring outward in mustard, gray, and cream, then the squares are joined edge to edge before the whole strip gets its border and fringe — the same construction real kilim-style runners use, just in yarn instead of wool weaving.
This is a genuinely advanced project, not because any single motif is hard, but because of the volume and precision: five or more identical diamonds worked in a strict three-color sequence, seamless join-as-you-go assembly, then sixty-plus scallop shells and a full row of tassels along both short ends. Plan on 8 to 10 hours for a standard runner. It suits someone who already has tapestry crochet and granny squares under their belt and wants a big, satisfying home-decor piece rather than a quick gift project.
Materials
- DK weight cotton yarn, mustard yellow ~150 g
- DK weight cotton yarn, charcoal gray ~120 g
- DK weight cotton yarn, cream/ivory ~100 g
- 3.5 mm crochet hook
- Yarn/tapestry needle
- Stitch markers
- Scissors
- Cardboard or tassel-maker, ~10 cm wide
- Blocking mat and pins
Abbreviations
MRmagic ringchchainscsingle crochetdcdouble crochetsl stslip stitchspspacest(s)stitch(es)rnd(s)round(s)Diamond Square (make 5, or as many as your table length needs)
- Rnd 1 (mustard): ch 4, sl st in first ch to form a ring. Ch 3 (counts as first dc), 2 dc in ring, ch 2, *3 dc in ring, ch 2* three more times (4 corner groups total). Join with sl st to top of starting ch-3. Fasten off.
- Rnd 2 (cream): Join in any ch-2 corner space. Ch 3, 2 dc, ch 2, 3 dc in same space (corner made). *Ch 1, 3 dc, ch 2, 3 dc in next corner sp* three more times. Join to top of ch-3. Fasten off.
- Rnd 3 (gray): Join in any corner space. Work corners same as Rnd 2, with 3 dc-ch 1-3 dc in each ch-1 space along the sides between corners. Join. Fasten off.
- Rnd 4 (mustard): Join in any corner space. Work corners same as before, with 3 dc-ch 1-3 dc in each side space along both sides. Join. Fasten off, weave in ends. Square should now measure approximately 15 cm point to point.
Joining the Diamonds into a Strip
- Turn each square so it sits as a diamond (corner at top and bottom, not as a flat-sided square).
- Lay squares point to point in a row, with the right-hand corner of one square touching the left-hand corner of the next.
- Using cream yarn and a tapestry needle, whip stitch the touching corner stitches of adjacent squares together on the wrong side, joining through both loops for a flat, nearly invisible seam.
- Repeat until all diamonds are joined into one continuous strip.
Filling the Side Gaps
- Joining diamonds point to point leaves small triangular gaps along both long edges between each pair of squares.
- With gray yarn, work a partial motif into each gap: join in the nearest corner space of one diamond, ch 3, 3 dc, ch 2, 3 dc into the gap area, then sl st into the corresponding point of the neighboring diamond to close the triangle. Fasten off.
- Repeat for every gap along both long edges of the strip.
Scalloped Border
- With mustard yarn, join in any stitch along the outer edge of the strip.
- Work one full round of sc evenly around the entire runner (all four sides), working 3 sc in each outer point to keep the corners flat. Join with sl st.
- Rnd 2 (shells): ch 1, *skip 2 sts, 5 dc in next st, skip 2 sts, sl st in next st* repeat around all four sides. Join to first ch-1 and fasten off.
Tassels & Fringe
- For each tassel, wrap yarn around a 10 cm piece of cardboard about 25 times, tie off tightly at the top, cut the loops at the bottom, and trim the ends even to about 8 cm long.
- Make enough tassels to place one on every scallop shell along both short ends of the runner only (not the long sides), alternating mustard, gray, and cream in a repeating three-color sequence.
- Attach each tassel by looping its tie strand through the top point of a shell and pulling snug, then trim all tassels to the same finished length once every one is attached.
Finishing
Block the whole runner flat before attaching any tassels — pin it right side up to your final width and length on a blocking mat, spritz with water, and let it dry completely. This step matters more here than on a small motif, since a long strip of many squares tends to have slightly uneven tension between joins, and blocking is what pulls it into one even, flat piece. Weave in every end on the wrong side as you go rather than saving them all for last; with this many separate rounds and motifs, a pile of loose ends left to the end becomes hard to track.
Tips for Success
- Work all squares with the same starting chain tension — a looser or tighter foundation ring on even one square will make it a visibly different size once joined into the strip.
- Lay out all your finished diamonds in a row before joining any of them, so you can adjust the color placement if any square came out slightly different in shade.
- Use a stitch marker in the first stitch of every round on the border — losing your place partway around a long runner border is easy and hard to fix after the fact.
- Weigh your yarn before starting the tassels; fringe uses more yardage than people expect, especially for a runner with tassels on both ends.
- Steam-block the scalloped border separately if it curls after the main blocking, hovering the iron rather than pressing directly on the shells.
Common Mistakes to Avoid
- Joining diamonds with mismatched tension: whip stitch loosely enough that the seam doesn’t pucker, checking every few stitches that the strip is still lying flat.
- Skipping the side-gap triangles: leaving them out results in visible holes along both long edges instead of the solid woven look in the reference photo.
- Uneven scallop spacing: always skip exactly 2 stitches between shells; skipping 1 or 3 will throw off the corner counts and leave the border uneven at the ends.
- Trimming tassels before they’re all attached: cut every tassel a bit long first, attach all of them, then trim as a final pass so they end up perfectly even.
- Underestimating gray yarn: it appears in the diamond squares, every side-gap motif, and a third of the tassels, so it typically runs out first — buy an extra skein if working a long runner.
Ways to Customize This Pattern
- Shorten or lengthen the runner by making fewer or more diamond squares — each square adds about 15 cm to the finished length.
- Swap the color order (gray center, cream rings, mustard outer) for a cooler, more neutral look.
- Skip the tassels entirely and finish with a simple sc border for a cleaner, more minimalist runner.
- Add a fourth accent color as a thin ring in Rnd 3 of the diamond squares for a richer palette.
- Make matching coasters using just the 4-round diamond square motif on its own, unjoined.
Frequently asked questions
How many diamond squares do I need for my table?
Each finished diamond square measures about 15 cm point to point, so measure your table length, subtract about 10 cm for the tapered ends, and divide by 15 to get the number of squares to make.
My runner isn’t lying flat after joining the squares — what went wrong?
This is almost always a tension mismatch between squares or a too-tight join seam. Reblock the whole piece pinned flat to the correct width, and for future squares, check that your foundation chain tension matches across all of them before joining.
Do I have to fill the triangular gaps between diamonds?
You don’t have to, but skipping them leaves visible open triangles along both long edges rather than the solid diamond-tessellation look shown in the photo, so it’s worth the extra short motifs for the finished appearance.
Can I put tassels on the long sides too, not just the short ends?
Yes, though it changes the look considerably — tassels only on the short ends keep the long sides flat against the table, while adding them to all four sides gives a fuller, more fringe-heavy finished piece.
Leave a Reply