Crochet Christmas Tree Doily – Step-by-Step Pattern
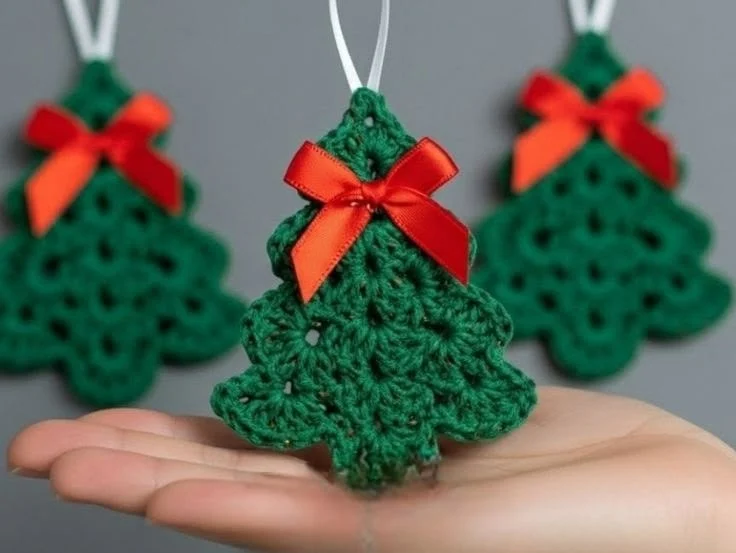
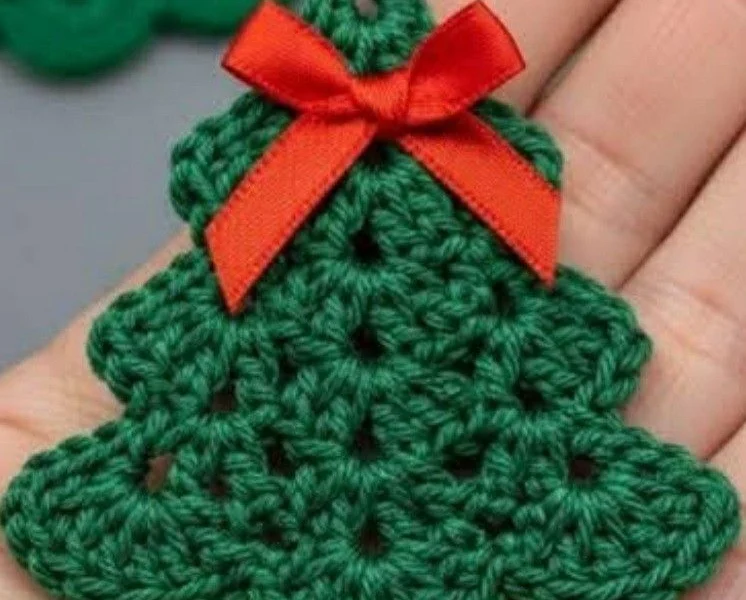
Holly is a christmas tree ornament crochet pattern built as one flat, richly textured panel rather than a stuffed 3D shape — you work a triangle from the tip down, break it into ridged tiers with back-loop rows, then finish every edge in a shell-and-picot scallop that reads as layered branches. It’s the kind of piece that looks far more complicated than it actually is once you understand the ridge trick.
Expect around 3 to 4 hours total, most of that in the edging round rather than the body, since the scallops are worked stitch by stitch around the whole outline. This is a good project for someone who already has dc, shells, and picots comfortably in their hands and wants a satisfying one-sitting finish rather than a multi-piece stuffed toy.
Because there’s no stuffing or safety-eye placement to fuss over, Holly is also a nice palette cleanser between bigger amigurumi projects, or a fast way to make a set of matching ornaments for a tree or garland.
Materials
- Green DK/light worsted yarn ~20g, main color
- Crochet hook 3.5 mm
- Red satin ribbon ~30 cm x 6-10 mm wide, for the bow
- White cotton cord or narrow ribbon ~10 cm, for the hanging loop
- Tapestry needle for weaving in ends and tacking the bow/loop
- Stitch markers 2-3, to flag ridge rows and edge stitches
- Small fabric glue dot (optional) to secure the ribbon knot
Abbreviations
chchainscsingle crochetdcdouble crochetsl stslip stitchst(s)stitch(es)incincrease (2 sts in same st)FLOfront loop onlyBLOback loop onlypicotch 2, sl st in first ch of the 2skskipRS / WSright side / wrong sideTree Body (worked flat, top-down, in turned rows)
- With green, ch 4.
- Row 1 (RS): 3 dc in 4th ch from hook. Turn. (3 sts)
- Row 2 (RS): ch 2 (does not count as a st), inc in first st, dc in next st, inc in last st. Turn. (5 sts)
- Row 3 — ridge row, worked in BLO: ch 2, inc in first st, dc in BLO of each st across to last st, inc in last st. Turn. (7 sts) Work this row a touch looser than the others so the ridge doesn’t pull the fabric.
- Row 4: ch 2, inc in first st, dc across, inc in last st. Turn. (9 sts)
- Row 5: ch 2, inc in first st, dc across, inc in last st. Turn. (11 sts)
- Row 6 — ridge row, worked in BLO: ch 2, inc in first st, dc in BLO of each st across to last st, inc in last st. Turn. (13 sts)
- Row 7: ch 2, inc in first st, dc across, inc in last st. Turn. (15 sts)
- Row 8: ch 2, inc in first st, dc across, inc in last st. Turn. (17 sts)
- Row 9 — ridge row, worked in BLO: ch 2, inc in first st, dc in BLO of each st across to last st, inc in last st. Do not turn. (19 sts) Fasten off, leaving a long tail for seaming the edging start point. This row is the flat base edge of the tree.
Scalloped Edging (worked in one continuous round around the whole outer edge)
- Join green with a sl st at the top point (row 1).
- Down the first diagonal side: work 1 sc in the end of each row, then a picot, into every row-end st down to the base corner (8 row-ends: sc, picot in each).
- Along the base (row 9, 19 sts): *sk 1 st, sl st in next st, 5 dc in next st (shell), sk 1 st, sl st in next st; rep from * across the full base, ending with a sl st in the last st. This creates the wide fan scallops visible along the bottom edge.
- Up the second diagonal side: work 1 sc, picot in each row-end st (8 total), mirroring the first side.
- Sl st to the top point to join. Fasten off and weave in the end using the tail from Row 9.
Hanging Loop
- Cut a 10 cm length of white cotton cord (or narrow ribbon).
- Fold it in half to form a loop.
- Using the tapestry needle, tack both cut ends to the wrong side of the top point stitch, so the folded loop stands proud above the tree tip.
Finishing
Weave in every remaining yarn end on the wrong side before blocking — the picots pull the edge into shape and hidden tails are much harder to bury afterward. Pin the panel out flat, right side up, and steam-block under a damp cloth; this opens the scallops fully and flattens any curl from the increase rows.
Once the piece is dry, tie the red ribbon into a bow with two loops and short tails, and trim the tail ends to points. Tack the bow’s center knot to the front of the tree, roughly at the row 3–4 ridge line, with a few small stitches through to the wrong side. A tiny dot of fabric glue on the knot keeps it from slipping loose with handling.
Tips for Success
- Go down a hook size from what the yarn band suggests — a denser fabric holds the scallop shape better and won’t gap before blocking.
- Recount stitches at the end of every single row for the first 4 rows; a missed increase this early skews the whole triangle.
- Work the three BLO ridge rows slightly loose — a tight ridge row puckers that tier instead of lying flat.
- Block the tree before attaching the bow, not after, so you can pin the scallops out evenly without the ribbon in the way.
- Match the ribbon width to the yarn weight — anything wider than about 10 mm will overwhelm a DK-weight tree this size.
Common Mistakes to Avoid
- Forgetting to switch to BLO on rows 3, 6, and 9 — mark those three rows on a sticky note before you start so you don’t default to both loops out of habit.
- Increasing one stitch in from the edge instead of in the very first/last stitch — this rounds off the point instead of keeping it sharp. Rip back to the last correct row if it drifts.
- Skipping the picots on the diagonal sides and just working plain sc — this flattens the fringed-branch look; even a picot every other stitch keeps the texture.
- Sewing the ribbon bow on before blocking, which leaves it sitting crooked once the panel relaxes. Block first, then attach.
- Cutting the hanging loop cord too short — under 8 cm folded, the tree tends to hang tipped forward on an ornament hook.
Ways to Customize This Pattern
- Work each of the three tiers in a different shade of green, dark at the base fading to light at the tip, for an ombre pine effect.
- Swap the ribbon bow for a small bobble-stitch star tacked to the top point instead.
- Chain several finished trees together through their hanging loops to make a garland.
- Add a few seed beads or tiny pom-poms after blocking to look like ornaments on the branches.
- Add two more increase rows (Row 10 and 11) before starting the edging for a tree roughly a third larger, which also works well as a coaster.
Frequently asked questions
Is Holly stuffed, or does it lie flat like the photo?
It’s worked as a single flat panel with no stuffing — the dimensional look comes entirely from the BLO ridge rows and the shell-and-picot edging, not from shaping in the round.
What size will my finished tree end up?
With DK yarn and a 3.5 mm hook you should land around 9-10 cm tall and 8 cm wide at the base, small enough to sit in your palm as shown.
Can I use acrylic instead of cotton DK?
Yes — any smooth DK or light worsted yarn works fine; cotton just tends to hold the picot points a little crisper after steam blocking.
My scalloped edge is curling instead of lying flat — what went wrong?
This is almost always tension on the shell stitches or a skipped blocking step. Pin the piece out flat under a damp cloth and steam it; the curl should relax right out.
Leave a Reply