Vintage Floral lace crochet bedspread pattern
Beginner Friendly
Perfect for those just starting their crochet journey, with clear instructions and simple techniques
Single-Day Project
A satisfying project you can complete in a single afternoon or evening.
Handmade Gift
A beautiful keepsake — free forever. Read online or print at home.
About This Vintage Floral lace crochet bedspread pattern
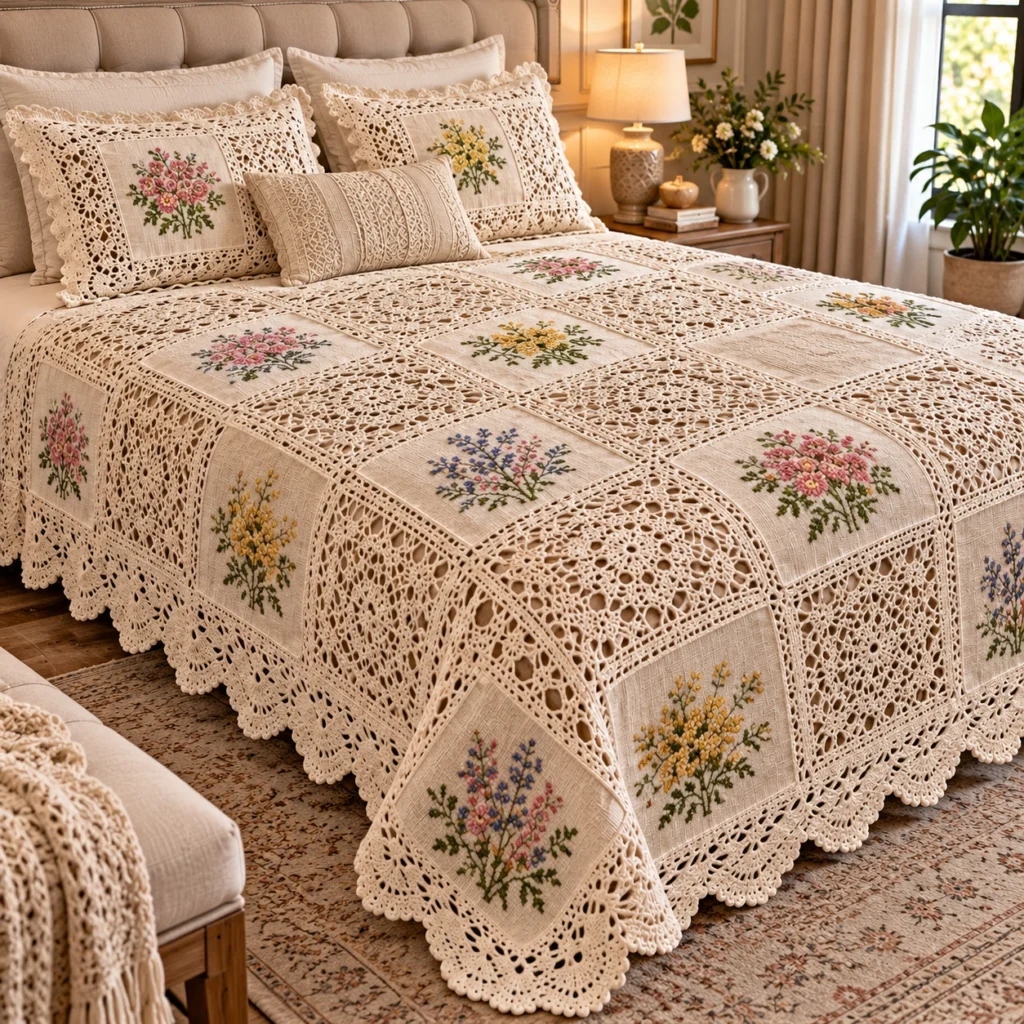
This crochet lace throw pattern combines two kinds of blocks in a checkerboard: small squares of linen embroidered with pink, yellow and blue flower bouquets, each framed in cream cotton lace, and all-lace medallions that sit between them. A deep shell edge finishes the whole piece. It is inspired by vintage lace bedspreads, but scaled down to a lap or sofa throw you can actually finish.
What makes the design distinctive is that the crochet is worked straight onto the embroidered fabric. You hem and punch each linen square, crochet the first round through the holes, then build the frame outward. Every block, whether framed linen or lace medallion, ends with the same 120-stitch round, so they join edge to edge without any fiddly adjustments. The border is calculated to fit the grid exactly, with a shell centered on every corner.
Plan on 70 to 90 hours in total, including the embroidery. That is a long project, but it is made of small blocks you can finish in an evening each. It is an advanced pattern because of the combined sewing and crochet, the lace shaping, and the careful stitch counting required for the pieces to fit together. It suits crocheters who are comfortable with double crochet, working in the round, and basic embroidery, and who enjoy a slow heirloom project.
Materials
- Worsted cotton yarn, Cream about 1,400 m / 1,530 yd (roughly 700 g)
- Linen or linen-blend fabric, natural or cream about 50 x 75 cm; cut 23 squares of 12 cm
- Embroidery floss, 6-strand cotton pink, dusty rose, golden yellow, periwinkle blue, lavender, olive green and sage green; 1-2 skeins each
- 3.5 mm crochet hook adjust so your test block measures 14-15 cm
- Embroidery needle (crewel size 7) and tapestry needle
- Embroidery hoop 10-12 cm
- Awl or large blunt needle for punching holes in the hem
- Fabric marker or tailor’s chalk, and a clear ruler
- Sewing thread, matching for tacking hems
- Stitch markers at least 8
- Blocking mats and pins essential
Abbreviations
chchainsl stslip stitchscsingle crochetdcdouble crochetsc2togsingle crochet 2 togetherskskipst(s)stitch(es)spspaceRround[ ]repeat the instructions inside as directedcorner centerthe middle sc of a 3-sc corner group, or the ch-3 space in a cornerEmbroidered Linen Squares (make 23)
- Pre-wash and press the linen. Cut 23 squares, each 12 cm x 12 cm, and finish the raw edges with a zigzag stitch or fray preventer.
- Using chalk, mark a centered 7 cm x 7 cm square on each piece. Keep all embroidery inside it so the frame never covers the flowers.
- Embroider each square in a hoop with 2 strands of floss, following the Floral Embroidery section below. Make 8 pink, 8 yellow and 7 blue bouquets.
- Press each square face down on a towel. Fold every edge 1 cm to the wrong side, miter the corners and tack the hem down with sewing thread. The finished square should measure 10 cm x 10 cm.
- On the hem, mark 15 holes along each side, counting the corner holes, spaced evenly about 6.5 mm apart and 5 mm in from the folded edge. The corner holes are shared by two sides, so each square has 56 holes in total.
- Punch every hole with the awl, pushing the fibers apart rather than cutting them. The hook has to pass through both layers of fabric.
Floral Embroidery
- Pink bouquet (8): Stem stitch 3 olive green stems that fan out from a point 1.5 cm above the bottom of the 7 cm area. Add sage green leaves along the stems in lazy daisy stitch.
- Pink bouquet, flowers: Work 7 small blossoms, each with 5 straight-stitch petals in pink or dusty rose and a golden yellow French knot in the center.
- Yellow bouquet (8): Stem stitch 3 curving olive stems and add sage lazy daisy leaves. Fill the top third of each stem with 20-25 closely packed French knots (2 wraps) in two shades of golden yellow, for a mimosa look.
- Blue bouquet (7): Stem stitch 3 upright stems with a few lazy daisy leaves. Cover the upper half of each stem with periwinkle and lavender lazy daisy buds and single French knots, getting smaller toward the tip.
- Add 2 or 3 pink French knots at the base of the blue bouquets to tie the colors back to the pink and yellow squares.
- Keep the stitch tension relaxed. Puckering distorts the square and will pull the crocheted frame out of line.
Lace Frame Block (make 23)
- R1: With Cream, pull up a loop through any corner hole of a prepared linen square. Ch 1, 3 sc in the same hole. Sc in each of the next 13 holes, then 3 sc in the corner hole. Repeat for all 4 sides, working through both layers of the hem. Sl st to the first sc. (64 sc: 13 per side plus 3 in each corner)
- R2: Sl st in the next sc, which is the corner center. Ch 3 (counts as dc), ch 3, dc in the same st. *[Ch 1, sk 1 sc, dc in next sc] x7, ch 1, sk 1 sc. (Dc, ch 3, dc) in the next corner center sc.* Repeat from * to * 2 more times, then work the 4th side the same way. Sl st to the top of the beginning ch 3. (36 dc, 32 ch-1 sps, 4 ch-3 corner sps)
- R3: Sl st in the first ch-3 corner sp. Ch 1, 3 sc in the same sp. *Sc in each of the next 17 sts (every dc and every ch-1 sp), 3 sc in the next ch-3 corner sp.* Repeat from * to * 2 more times, sc in each of the next 17 sts, sl st to the first sc. (80 sc: 17 per side plus 3 in each corner) Place a marker in the center sc of each corner.
- R4: Sl st in the next sc (corner center). Ch 1, sc in the same st. *Ch 5, sk 3 sc, sc in the next sc.* Repeat from * to * 18 more times, ch 5, sk 3 sc, sl st in the first sc. (20 ch-5 arches, 5 per side). Every 5th arch ends in a corner center sc.
- R5: Ch 1, 5 sc in the first ch-5 arch. *Sc in the next sc, 5 sc in the next arch.* Repeat from * to * 18 more times, sc in the last sc (the starting corner sc). Sl st to the first sc and fasten off. (120 sc: 20 arches of 5 sc plus 20 single sc) Every 30th st is a corner st, so each side measures 31 sts from corner st to corner st, counting both.
- Weave in ends, then block to 14-15 cm square, pinning the corners square.
Lace Medallion Block (make 22)
- M1: With Cream, ch 6 and sl st to the first ch to make a ring. Ch 3 (counts as dc), 11 dc in the ring. Sl st to the top of ch 3. (12 dc)
- M2: Ch 3 (counts as dc), dc in the same st, then 2 dc in each of the next 11 sts. Sl st to the top of ch 3. (24 dc)
- M3: Ch 1, sc in the same st. *Ch 5, sk 1 dc, sc in the next dc.* Repeat from * to * 10 more times, ch 5, sk the last dc, sl st to the first sc. (12 sc, 12 ch-5 arches)
- M4: Ch 1, 5 sc in the first ch-5 arch and 6 sc in the same arch? No: work exactly 6 sc in each arch, starting with the first one after the join. Do not work into the sc between the arches. Sl st to the first sc. (72 sc)
- M5 (squaring round): Ch 1. *3 sc in the next sc, sc in each of the next 17 sc.* Repeat from * to * 3 more times. Sl st to the first sc. (80 sc: 17 per side plus 3 in each corner) Place a marker in the center sc of each corner. This round now matches R3 of the Frame Block.
- M6: Work exactly as R4 of the Frame Block. (20 ch-5 arches)
- M7: Work exactly as R5 of the Frame Block. (120 sc, 31 sts per side corner to corner) Fasten off, weave in the ends and block to 14-15 cm square.
Joining the Blocks
- Lay out 5 blocks across and 9 down in a checkerboard. Put a Frame Block in the top left corner. Frame Blocks go wherever the row number and column number add up to an even number. That gives 23 Frame Blocks and 22 Medallion Blocks.
- Hold two neighboring blocks with right sides together, match the corner sts, and whipstitch with Cream through the back loops only. Work all 31 sts of each edge, corner st to corner st.
- Join the blocks into 9 rows of 5, then join the rows. Where four corners meet, stitch through all four corner sts several times so the join is firm.
- Pin the finished piece flat and steam lightly.
Shell Border
- R1: Join Cream with a sl st in the outer corner st of any corner block. Ch 1, 3 sc in the corner st. Sc in each st along the edge. At each seam, sc2tog over the two adjacent block corner sts (one from each block). 3 sc in each outer corner st of the throw.
- R1 counts: each short edge has 151 sts and each long edge has 271 sts, counting the corner sts at each end. The round totals 848 sc. Place a marker in the center sc of each 3-sc corner.
- R2: Join Cream in the center sc of any corner. Ch 3 (counts as dc), 6 dc in the same st. *Sk 3 sts, sl st in the next st, sk 3 sts, 7 dc in the next st.* Repeat from * to * 104 more times, then sk 3 sts, sl st in the next st, sk 3 sts and sl st to the top of the beginning ch 3. (106 shells of 7 dc)
- The border is designed so the distance between corner centers is a multiple of 8 on every edge, so each corner lands exactly on a shell. Fasten off, weave in the ends and pin the shells open to block.
Finishing
Check that every embroidered square sits flat inside its frame and that no hem edge shows through the first round. If a hem peeks out, tuck it back with a few small stitches in the same color as the linen. Weave in all the ends on the wrong side, going through the stitches in two directions so they stay put in a washable item.
Wet block the whole throw on a large padded surface, shaping the shells and pinning the corners of every block square. Leave it to dry fully. Cotton lace holds its shape well once blocked, so this step is what gives the throw its crisp, flat finish. Expect a finished size of about 80 x 140 cm.
Tips for Success
- Use a firm, round cotton yarn. It keeps the lace crisp and does not split when you work through the linen holes.
- Punch all the holes at one time with a ruler template so every square is identical. Uneven hole spacing is the main cause of puckered frames.
- Mark the corner center stitch on R3 and R5 of every block. The arches and the joining both depend on finding those corners.
- Block every block before joining. Blocks of exactly the same size make the checkerboard fit with no stretching.
- Make the blocks in batches: embroider a few squares, crochet a few medallions and alternate. It keeps a long project interesting.
Common Mistakes to Avoid
- Putting the wrong number of sc in R1. Count the holes on each side before you start. The round must total 64 sc or R2 will not line up with the corners.
- Working the 3-sc corners in the wrong stitch. If a corner looks round or loose, check that all 3 sc are in the same corner hole or ch-3 space.
- Forgetting to leave the sc between the arches alone in M4. They are not worked into, and including them would give you 84 sts instead of 72.
- Pulling floss too tight, so the linen puckers inside the lace. Fix it by loosening the stitches or steaming the square before it is framed.
- Joining blocks stitch for stitch with one block rotated. Both block types are symmetrical, but check that corner sts line up at every seam.
Ways to Customize This Pattern
- Change the number of blocks. The border fits when the number of blocks across, minus 1, is divisible by 4. Good sizes are 1, 5, 9 or 13 blocks per side, so a single framed square becomes a pillow front and 5 x 5 blocks becomes a table topper.
- Use a different color for the lace, such as soft white or pale sage, and embroider matching flowers.
- Embroider a monogram, a date or a small bird in place of a bouquet on a few squares for a gift.
- Make every square a Lace Medallion Block for a light, open throw with no sewing at all.
- Swap some of the embroidered squares for plain linen with white-on-white embroidery for a quieter look.
Frequently asked questions
Yes. The folded hem makes the edge strong enough to crochet through and keeps the fabric from fraying inside the lace. Without it the holes will tear and the frame will pull away from the square.
Keep the same 5-across or 9-across structure for the border to work, using 1, 5, 9 or 13 blocks per side. A 9 x 9 grid gives a square throw of about 135 cm, and a 13 x 13 grid makes a bedspread of about 190 cm, though it needs 169 blocks.
Test the floss for colorfastness before you start. Hand wash in cool water with a mild soap, press out the water in a towel without wringing, and lay it flat to dry. Re-pin the shells and the block corners while it is damp to restore the lace.
The stitch counts and the 6.5 mm hole spacing are designed for worsted cotton. Finer thread would need holes closer together and recalculated rounds, so use worsted cotton unless you are prepared to redesign the blocks.
The finished Vintage Floral lace crochet bedspread pattern