Winter Wonderland Crochet Bedspread — Gorgeous 3D Snowflakes in Snow White & Icy Blue
Beginner Friendly
Perfect for those just starting their crochet journey, with clear instructions and simple techniques
Single-Day Project
A satisfying project you can complete in a single afternoon or evening.
Handmade Gift
A beautiful keepsake — free forever. Read online or print at home.
About This Winter Wonderland Crochet Bedspread — Gorgeous 3D Snowflakes in Snow White & Icy Blue
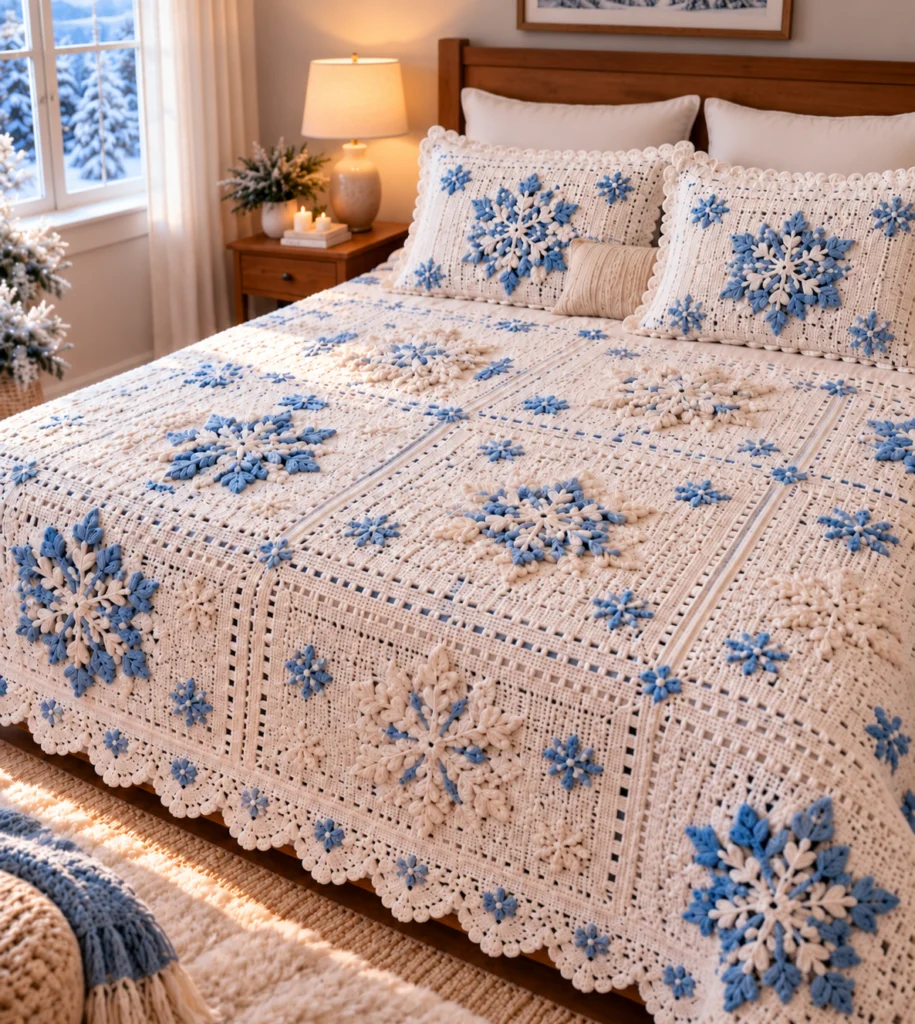
This crochet snowflake bedspread pattern builds a winter heirloom from twelve large cream panels, each worked in rounds of solid double crochet, open mesh and a raised post-stitch ridge, then topped with a layered 3D snowflake in cornflower blue and cream. Small blue snowflakes with cream knot centers are scattered across the panels and along the scalloped border, and thin blue lines worked through the mesh frame every panel. Two matching pillow shams repeat the mesh, the snowflakes and the scallops.
The snowflakes are what give the piece its depth. Each large one has two layers: a base snowflake with leaf-shaped branches and a smaller top snowflake with bobble tips, turned so its arms sit between the arms below, with a stuffed bead at the center. Because every snowflake is sewn on before the panels are joined, you only ever handle one 60 cm panel at a time until the very end.
This is a long project, roughly 180 to 220 hours in total, most of it in the panels. It suits experienced crocheters who are comfortable keeping corner counts accurate over many rounds and who enjoy a project that breaks into satisfying portable pieces: panels, snowflakes and pillow shams.
Materials
- Worsted / aran weight cotton or cotton-blend yarn, cream about 5,200 g / 9,600 m (panels, border, shams, cream snowflake layers)
- Worsted / aran weight cotton or cotton-blend yarn, cornflower blue about 650 g / 1,200 m (snowflakes and accent lines)
- 5 mm (H-8) crochet hook
- Polyester fiberfill a small handful, for the snowflake center beads
- Two pillow inserts 50 x 75 cm
- Stitch markers at least 4, for panel corners
- Tapestry needle
- Blocking mats, rust-proof pins and a spray bottle
- Measuring tape and scissors
Abbreviations
MRmagic ringchchainsl stslip stitchscsingle crochethdchalf double crochetdcdouble crochettrtreble crochetFPdcfront post double crochetclcluster: 3 dc in the same st, each left unfinished, then yarn over and pull through all 4 loopsinc2 sc in the same stitchdecinvisible decrease (sc 2 together through front loops)sc2togsingle crochet 2 togetherBLOback loop onlypicotch 3, sl st in 3rd ch from hookskskipspspacetcturning chainst(s)stitch(es)RSright sideMesh Panel: Round Types
- Every round starts in a corner ch-2 sp and is joined with a sl st to the top of the beginning ch-3. The ch-3 always counts as a dc, and ch-1 sps count as stitches when counting sides.
- Solid round: Sl st into the next corner ch-2 sp, ch 3, (dc, ch 2, 2 dc) in the same sp. *Dc in each st and each ch-1 sp along the side, (2 dc, ch 2, 2 dc) in the next corner sp* around, ending with the last side. Each side grows by 4 sts.
- Mesh round: Corners as in a solid round. Along each side, dc in the first st, then *ch 1, sk 1, dc in next st* to the end of the side. Every side count is odd, so each side starts and ends with a dc. Each side grows by 4 sts.
- Ridge round: Corners as in a solid round. Along each side, work FPdc around each st of the previous round. Each side grows by 4 sts.
Mesh Panel: Round by Round (make 12, cream)
- R1: Make a MR. Ch 3 (counts as dc), 2 dc in the ring, ch 2, (3 dc, ch 2) 3 times. Join. (3 sts per side, 4 corner sps)
- R2–R12: Work 11 solid rounds. (Side counts: 7, 11, 15, 19, 23, 27, 31, 35, 39, 43, 47) This solid center is where the large snowflake sits.
- R13: Mesh round. (51 per side)
- R14: Solid round. (55)
- R15: Mesh round. (59)
- R16–R17: Solid rounds. (63, 67)
- R18: Mesh round. (71)
- R19: Solid round. (75)
- R20: Ridge round. (79)
- R21: Mesh round. (83)
- R22: Solid round. (87)
- R23: Mesh round. (91) This is the round for the blue accent line.
- R24: Solid round. (95)
- R25: Sl st into the corner sp, ch 1, (2 sc, ch 2, 2 sc) in the same sp, *sc in each st along the side, (2 sc, ch 2, 2 sc) in the next corner sp* around. Join with sl st to first sc. (99 sts per side) Fasten off, weave in ends, and block to 60 x 60 cm.
Large Snowflake: Base Layer (make 14: 10 blue, 4 cream)
- R1: Make a MR, ch 1, 12 sc in the ring. Join with sl st to first sc. (12 sts)
- R2: *Sl st in next st, work 1 Arm, sl st in next st* 6 times. (6 arms) Fasten off.
- Arm, spine: Ch 14.
- Arm, tip leaf: Ch 6, sl st in 2nd ch from hook, sc in next ch, hdc in next ch, dc in next 2 ch. (5 sts)
- Arm, down the spine: Sl st in next 3 spine ch. Medium leaf pair: (ch 6, sl st in 2nd ch from hook, sc in next ch, hdc in next ch, dc in next 2 ch, sl st in the same spine ch) twice.
- Sl st in next 4 spine ch. Large leaf pair: (ch 7, sl st in 2nd ch from hook, sc in next ch, hdc in next ch, dc in next 2 ch, tr in next ch, sl st in the same spine ch) twice.
- Sl st in next 3 spine ch. Small leaf pair: (ch 5, sl st in 2nd ch from hook, sc in next ch, hdc in next ch, dc in next ch, sl st in the same spine ch) twice.
- Sl st in next 4 spine ch, back to the center. (3 + 4 + 3 + 4 = 14 spine ch)
- Pin the snowflake out with each leaf pair spread to opposite sides of its spine, mist and let dry. It measures about 23 cm across.
Large Snowflake: Top Layer (make 14: 10 cream, 4 blue)
- R1: Make a MR, ch 1, 12 sc in the ring. Join. (12 sts)
- R2: *Sl st in next st, work 1 Top Arm, sl st in next st* 6 times. Fasten off, leaving a 40 cm tail.
- Top Arm, spine: Ch 9.
- Top Arm, bobble tip: Ch 4, cl in 4th ch from hook, ch 3, sl st in the same ch at the base of the cl.
- Sl st in next 3 spine ch. Small leaf pair: (ch 5, sl st in 2nd ch from hook, sc in next ch, hdc in next ch, dc in next ch, sl st in the same spine ch) twice.
- Sl st in next 6 spine ch, back to the center. (3 + 6 = 9 spine ch)
- Pair each top layer with a base layer of the other color: cream tops on blue bases, blue tops on cream bases.
Snowflake Center Beads (make 14: 10 cream, 4 blue)
- R1: 6 sc in MR. (6)
- R2: inc 6 times. (12)
- R3: sc in each st. (12)
- R4: dec 6 times. (6) Stuff firmly, close the opening and leave a 30 cm tail. Use cream beads on blue-based snowflakes and blue beads on cream-based ones.
Small Snowflakes (make about 100, blue with cream centers)
- R1 (cream): 6 sc in MR. Join with sl st to first sc and fasten off. (6)
- R2 (blue): Join blue in any st. *Sc in next st, ch 6, sl st in 3rd ch from hook, (ch 3, sl st in the same ch) twice, sl st in next 3 ch back to the center* 6 times. Join and fasten off. (6 arms with 3-picot tips)
- With cream, embroider a French knot (yarn wrapped 4 times) in the center of each small snowflake.
- You need 48 for the panels (4 each), 40 for the border and 12 for the shams (6 each).
Blue Accent Lines and Appliqué Placement
- Accent line: With RS of a blocked panel facing, join blue at a corner of R23. Surface sl st along R23, inserting the hook through each ch-1 sp and carrying the yarn loosely behind each dc, so the line shows as blue dashes. Work all the way around and join. Repeat on every panel.
- Center the base layer of a large snowflake on the solid center of the panel and sew it down at the center ring and at the tip of every leaf with matching yarn.
- Place the top layer over it, turned so its arms sit between the base arms, and sew it down at the center ring only, so the arms lift away from the base for a 3D look.
- Sew the center bead over both rings, stitching through all layers several times.
- Sew 4 small snowflakes into the mesh band, one on the diagonal toward each corner of the panel, between R14 and R19.
Joining the Panels
- Lay the panels out 3 wide by 4 long. Alternate the 10 blue-based and 4 cream-based snowflakes; place the cream-based ones in the two center panels of the second and third rows, or wherever you prefer.
- With cream, hold two panels RS together. Sl st through both corner ch-2 sps, then through the back loops of each matching pair of sts (99 sl sts), then through the next pair of corner sps. Continue onto the next pair of panels without fastening off.
- Join all the short seams first to make 4 strips of 3 panels, then join the strips with long seams. At each point where four panels meet, sl st through all the corner sps together.
Scalloped Border
- R1 (cream, RS facing): Join in an outer corner sp, ch 1, sc in the sp (corner st). Along each short side, sc in each st of each panel and sc2tog over the two ch-2 sps at each seam (3 x 99 + 2 = 299 sts). Along each long side, sc in each st, 1 sc in each ch-2 sp at the two outer seams, and sc2tog over the ch-2 sps at the center seam (4 x 99 + 4 + 1 = 401 sts). Work 1 sc in each outer corner sp. Join.
- R2: Ch 3 (counts as dc), ch 3, dc in the same corner st. *Along the side, dc in the first st, (ch 1, sk 1, dc in next st) to the end of the side, (dc, ch 3, dc) in the next corner st* around. Join to top of ch-3.
- R3: Ch 1. Sc in each dc and each ch-1 sp along the sides, including the dc at each end, and 1 sc in each corner ch-3 sp (corner st). Join. (301 sts per short side, 403 per long side, plus 4 corner sts)
- R4: Sl st to a corner st. 9 dc in the corner st. *Along the side, sc in first st, (sk 2, 7 dc in next st, sk 2, sc in next st) to the end of the side (50 times on short sides, 67 on long sides), 9 dc in the next corner st* around. Join.
- R5: Sl st in first 4 dc of the corner fan. *(Sc, picot, sc) in the center dc of each shell and corner fan, sc in each remaining dc of the shells, sl st in each sc between shells* around. Join and fasten off.
- Sew the 40 border snowflakes along the R2–R3 band, spaced evenly about every 6th shell, with one centered at each corner.
Pillow Sham Front (make 2, cream)
- Ch 113. Row 1: Dc in 4th ch from hook and in each ch across. Turn. (111 sts; the skipped ch counts as the first dc)
- Rows 2–3: Ch 3 (counts as dc), dc in each st across, ending with dc in top of tc. Turn. (111)
- Row 4 (mesh): Ch 3, dc in next st, *ch 1, sk 1, dc in next st* to the last st, dc in top of tc. Turn. (111, counting each ch-1 as a st)
- Row 5: Ch 3, dc in each dc and each ch-1 sp across. Turn. (111)
- Rows 6–40: Alternate one mesh row and one solid row, starting and ending with a mesh row. (18 mesh rows, 17 solid rows)
- Row 41: Solid row. Row 42: Mesh row. Rows 43–45: Solid rows. Fasten off. (45 rows, about 50 x 75 cm)
- Surface sl st a blue accent line through the ch-1 sps of Rows 4 and 42. Sew one large snowflake (blue base) in the center with its top layer and bead, and 6 small snowflakes around it: one near each corner and one centered on each long side.
Pillow Sham Back and Assembly (make 2)
- Back: Ch 113, work Row 1 as for the front, then work Rows 2–45 as solid rows. Fasten off. (111 sts, 45 rows)
- Joining round: Hold front and back WS together, front facing you. Join cream at a corner and work through both layers. Along each long side, sc in each st, working sc2tog twice, spaced evenly (109 sts). Along each short side, 2 sc in each row end, with 3 sc in the 23rd row end (91 sts). Work 1 extra sc at each corner as the corner st.
- Join three sides, insert the pillow form, then close the fourth side. Join with sl st to first sc.
- Scallop round: 9 dc in each corner st; along each side, sc in first st, (sk 2, 7 dc in next st, sk 2, sc in next st) to the end of the side (18 times on long sides, 15 on short sides). Join.
- Picot round: Work as Border R5. Fasten off and hide the tail inside the sham.
Finishing
Lay the bedspread flat on a clean floor or a bed. Mist the border, pull each scallop into an even curve, and pin it out if you can, letting it dry fully. Run your hand over every seam; if a seam pulls tighter than the panels, a little steam held just above it will relax it.
Lift the arms of each top snowflake layer gently with your fingers so they stand away from the base, and check that every bead and leaf tip is secure. Weave any remaining ends into the solid rounds behind the appliqués, where they are hidden. For washing, use a gentle cold cycle inside a large mesh bag or wash by hand, then dry flat so the snowflakes keep their shape.
Tips for Success
- Write the side counts on a card and tick each round as you finish it. One extra stitch per side on a 25-round panel makes the joining seams wander.
- Keep the mesh rounds slightly firm; loose ch-1 sps stretch out of shape over a full-size bedspread.
- Work the snowflakes in batches by size and color while watching something, and block a whole batch at once.
- Sew every snowflake before joining. Attaching appliqués to a finished bedspread means wrestling several kilos of cotton on your lap.
- Leave the surface sl st accent lines loose enough that the panel still stretches the same as the mesh around it.
Common Mistakes to Avoid
- Not counting the ch-1 sps as stitches: your side counts come up short and the next mesh round no longer starts and ends with a dc. Every ch-1 sp counts as one stitch.
- Working the large leaf pairs into a different spine ch from the sl st before them: the leaves sit unevenly on the arm. Always anchor both leaves of a pair in the same spine ch.
- Sewing the top snowflake layer down at its arm tips: it flattens and loses the 3D effect. Sew it only at the center ring.
- Skipping the sc2tog at the seams in Border R1: the scallops will not fit evenly and you will end with a half shell before a corner. Check that R3 has 301 sts on each short side and 403 on each long side.
- Blocking the panels after the snowflakes are sewn on: wet appliqués can stretch the panel unevenly. Block the bare panel first, then add snowflakes.
Ways to Customize This Pattern
- Change the size: 2 x 3 panels plus the border makes a throw of about 134 x 194 cm, and 4 x 4 panels makes a king bedspread.
- Use a silver-gray or icy pale blue instead of cornflower for a softer, frosted look.
- Make every large snowflake blue-based for a bolder pattern, or every one cream-based for a subtle, tone-on-tone bedspread.
- Turn a single panel with its snowflake into a cushion cover or a table topper to match the bedspread.
- Add a cream fringe or tassels at each corner fan of the border instead of a plain scallop.
Frequently asked questions
No. The panels look complete with their 4 small snowflakes each, and the border snowflakes are a finishing touch. You can leave them off the border, or add them gradually after the bedspread is in use, since they are sewn on rather than worked in.
A single snowflake lies flat on the panel. The second, smaller layer, sewn only at the center and turned so its arms fall between the arms below, stands slightly away from the base and casts small shadows. That is what gives the snowflakes their raised, 3D look in the photo.
The stitch counts stay the same at any size, so the border and seams will still fit, but the bedspread grows by the same amount on every panel and you will need more yarn. A panel 5 cm too large makes the bedspread about 15 cm wider and 20 cm longer, so go down a hook size if that is more than you want.
Yes. Work the back as two overlapping panels instead of one: two pieces of 26 rows each, overlapped by about 7 rows in the middle. Join the sham all the way around through the overlap, and the pillow slips in and out through the opening.
The finished Winter Wonderland Crochet Bedspread — Gorgeous 3D Snowflakes in Snow White & Icy Blue