Sunflower brooch pattern
Beginner Friendly
Perfect for those just starting their crochet journey, with clear instructions and simple techniques
Single-Day Project
A satisfying project you can complete in a single afternoon or evening.
Handmade Gift
A beautiful keepsake — free forever. Read online or print at home.
About This Sunflower brooch pattern
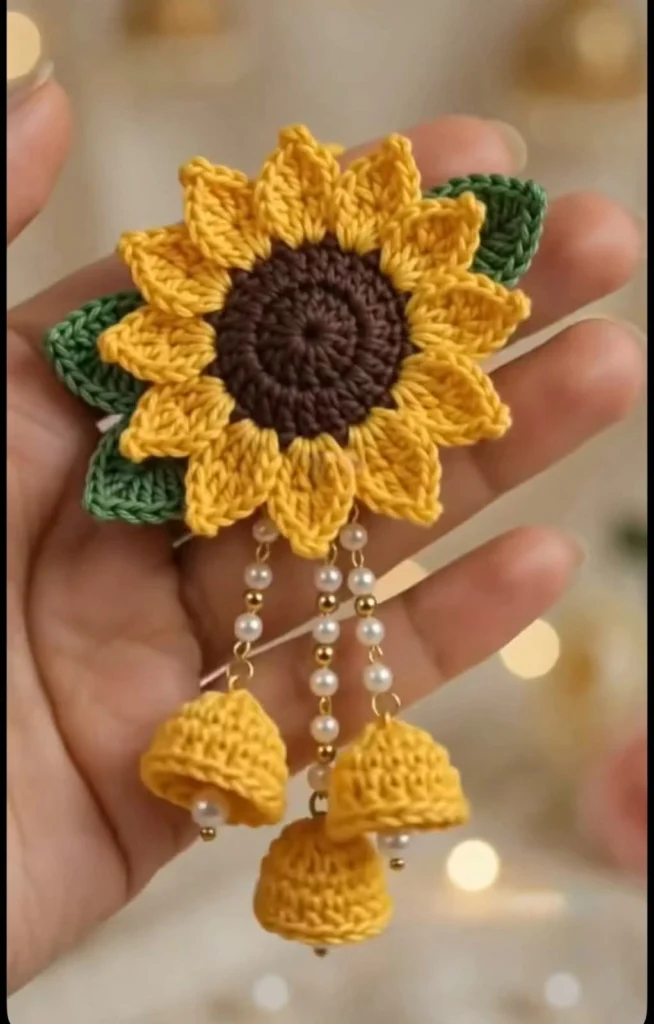
This crochet sunflower brooch pattern builds a small, richly textured flower from a dark brown center, twelve pointed golden petals and two green leaves, then adds three strands of pearls that end in tiny crocheted jhumka bells. The petals are worked in turned rows, so each one has the raised, knitted-looking texture you see in the finished piece. The bells swing when you move, which makes it a lovely statement piece for a coat, a bag or a headscarf.
It is an advanced pattern because it is made of several separate parts: the center disc, a petal ring, two leaves, three bells and the beaded strands. Each part is small, but they have to fit together neatly. You will crochet with fine cotton and a 2.0 mm hook, shape every petal with increases and decreases, and do some simple bead and wire assembly at the end.
Plan on four to six hours in total. It suits crocheters who are comfortable with tiny stitches, turning rows and working into a ring of stitches. It also makes a good gift, because the whole project uses very little yarn.
Materials
- Mercerized cotton, fingering / 4-ply, golden yellow about 10 g
- Mercerized cotton, fingering / 4-ply, dark chocolate brown about 5 g
- Mercerized cotton, fingering / 4-ply, leaf green about 3 g
- 2.0 mm crochet hook
- Faux pearl beads, 5 mm 15 pieces
- Faux pearl beads, 6 mm 3 pieces, for the bell clappers
- Gold spacer beads, 3 mm 15 pieces
- Gold headpins, about 5 cm 3 pieces
- Gold jump rings, 4 mm 6 pieces
- Beading thread or 0.3 mm beading wire, with 6 crimp beads
- Felt circle, about 3.5 cm, and a 3 cm brooch pin back
- Tapestry needle, round-nose and flat-nose pliers, wire cutters, fabric glue
Abbreviations
MRmagic ringchchainsl stslip stitchscsingle crochetinc2 sc in the same stitchsc2togsingle crochet 2 stitches togethersc3togsingle crochet 3 stitches togetherst(s)stitch(es)FOfasten offCenter Disc (dark brown)
- Round 1: 6 sc in MR. Pull the ring tight. (6)
- Round 2: inc in each st around. (12)
- Round 3: (sc, inc) x 6. (18)
- Round 4: (2 sc, inc) x 6. (24)
- Round 5: (3 sc, inc) x 6. (30)
- Round 6: (4 sc, inc) x 6. (36)
- Round 7: sc in each st around. Sl st to join and FO brown, weaving in the tail. (36)
Yellow Ring (base for the petals)
- Round 8: Join yellow with a sl st in any st of Round 7. Ch 1, sc in each st around, then sl st to the first sc. Do not FO. (36)
Petals (make 12, yellow)
Each petal is worked in turned rows over 3 stitches of the Round 8 ring. Start every row with ch 1 (it does not count as a stitch), then turn. Make all 12 petals one after another around the ring.
- Row 1: sc in the next 3 unworked sts of the ring. Turn. (3)
- Row 2: ch 1, inc, sc, inc. Turn. (5)
- Row 3: ch 1, sc in each of the 5 sts. Turn. (5)
- Row 4: ch 1, inc, 3 sc, inc. Turn. (7)
- Row 5: ch 1, sc2tog, 3 sc, sc2tog. Turn. (5)
- Row 6: ch 1, sc2tog, sc, sc2tog. Turn. (3)
- Row 7: ch 1, sc3tog. (1)
- Ch 1, then sl st evenly down the right edge of the petal (about 6 sl sts) until you reach the ring again. Begin the next petal in the next unworked st of the ring.
- After the 12th petal, sl st down its edge and sl st to the base of the first petal. FO, leaving a 15 cm tail for sewing.
Leaves (make 2, green)
- Ch 10. Starting in the 2nd ch from the hook: sc in the next 8 chs, then 3 sc in the last ch. Turn your work to the other side of the chain and sc in the next 8 loops. (19)
- Round 2: sc in each of the next 8 sts, sc in the next st, 3 sc in the next st (this is the leaf tip), sc in the next st, sc in each of the last 8 sts. (21)
- Sl st in the next st. FO, leaving a 20 cm tail for sewing.
Jhumka Bells (make 3, yellow)
- Round 1: 6 sc in MR. (6)
- Round 2: inc in each st around. (12)
- Round 3: (sc, inc) x 6. (18)
- Rounds 4-5: sc in each st around. (18)
- Round 6: (2 sc, inc) x 6. (24)
- Rounds 7-8: sc in each st around. (24)
- Round 9: (3 sc, inc) x 6. This flares the rim. (30)
- Round 10: sc in each st around. Sl st to join and FO. Weave in the tail. (30)
Beaded Strands
- Strand A (short): thread 4 pearls (5 mm) alternating with 3 gold spacers, starting and ending with a pearl.
- Strand B (long): thread 6 pearls (5 mm) alternating with 5 gold spacers, starting and ending with a pearl.
- Strand C (medium): thread 5 pearls (5 mm) alternating with 4 gold spacers, starting and ending with a pearl.
- For each strand, use beading wire and a crimp bead at each end to make a small loop, and cut off any extra wire.
- Make each bell clapper: on a headpin, thread one gold spacer and one 6 mm pearl. From the inside of a bell, push the pin up through the center top, where the magic ring closes. Trim the pin to about 8 mm above the bell and turn an eye loop with the round-nose pliers.
- Join each bell to the bottom loop of one strand with a jump ring. The clapper pearl should hang just below the bell rim.
Finishing
Sew the petal ring to the center disc if you did not join it as you went, using the yellow tail and tiny stitches along the edge of Round 7, so no gap shows between brown and yellow. Lay the two leaves under the flower at roughly ten and four o’clock, tilting them outward, and sew them to the back of the petals with their tails.
Use a jump ring on each strand’s top loop and attach the three strands behind the lowest petals, spaced about 1 cm apart, by passing the ring through a stitch at the back of the petal ring. Close the rings firmly with the pliers. Glue the felt circle over the back to cover all the stitching and loops, then sew the pin back to the felt, near the top. Let the glue dry completely before wearing it.
Tips for Success
- Use mercerized cotton. It has a slight sheen and keeps the petal points crisp, where acrylic would look fuzzy and soft.
- Count the 36 stitches of the ring before starting the petals. Twelve petals of 3 stitches each only fit if the ring is exactly right.
- Sl st down the petal edge loosely. A tight edge will pull the tip of the petal sideways.
- Make the three bells in the same sitting so their tension and size match.
- Test the strand lengths against the flower before crimping, and adjust until the bells hang at different heights.
Common Mistakes to Avoid
- Petals that curl forward: this means your edge sl sts are too tight. Redo them with a looser hand.
- A gap between the brown center and the yellow ring: join in both loops of Round 7 and sew the edge down firmly before adding the leaves.
- Bells that look flat or collapse: work Rounds 4-8 tightly and finish with the rim round so the flare holds its shape.
- Strands that tangle or twist: use beading wire instead of thread, and keep the beads in the same order on every strand.
- Heavy dangles that tilt the brooch: attach the felt backing and sew the pin back near the top edge, not the middle.
Ways to Customize This Pattern
- Make it into a pair of earrings by shrinking the center to 5 rounds and using one strand per earring on a hook.
- Change the colors: orange petals with a black center look like a different flower, and white petals with a gold center look like a daisy.
- Embroider a ring of dark brown French knots on Round 4 of the center for a seeded look.
- Use matching bells in the leaf green for a more playful look, or add a small bead at the tip of each bell.
- Make the flower alone, without the strands, and use it as a hair clip or a bag charm.
Frequently asked questions
Yes, but stay with fine cotton. Thread-weight cotton with a 1.5 mm hook gives a smaller brooch, and DK cotton with a 2.5 mm hook gives a larger one. Beads and bells may need resizing to match.
Turned rows give each petal its own flat, pointed shape with a clear texture, and let you shape the sides with increases and decreases. Working in the round would make a rounded, cupped petal instead.
Work tightly, and the 30-stitch flared rim will hold the shape by itself. If your bells still sag, stiffen them lightly with a thin coat of fabric stiffener and let them dry upside down over a small bead.
The beads and wire add weight, so pin it through a sturdy fabric such as a coat, a bag strap or a scarf rather than thin knitwear, and use a locking pin back if you can.
The finished Sunflower brooch pattern