Spiral Garden Crochet Bedspread Pattern
Beginner Friendly
Perfect for those just starting their crochet journey, with clear instructions and simple techniques
Single-Day Project
A satisfying project you can complete in a single afternoon or evening.
Handmade Gift
A beautiful keepsake — free forever. Read online or print at home.
About This Spiral Garden Crochet Bedspread Pattern
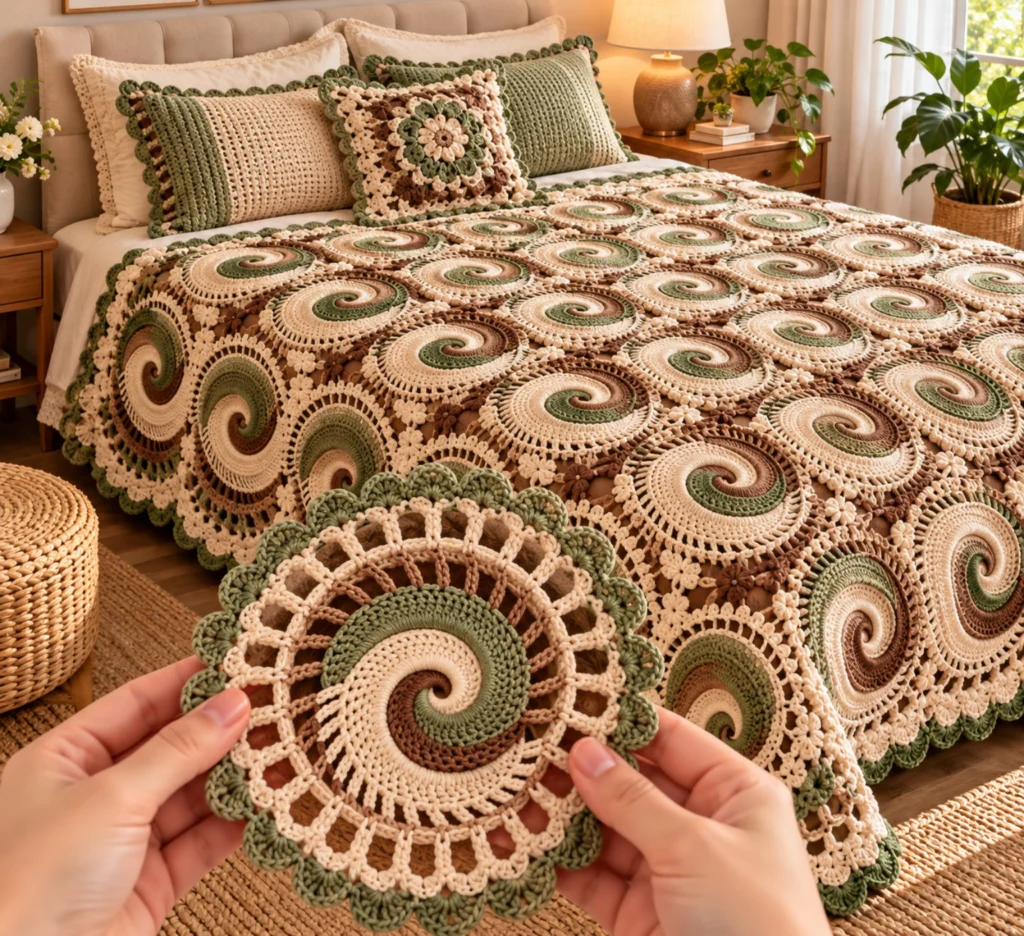
This spiral crochet bedspread pattern is built from round motifs, each one with a three-color swirl at its heart. Cream, sage green and chocolate brown wind around each other from the center out, then the swirl is framed by two lacy rings of spokes and finished with a scalloped green edge. Small cream flowers with brown centers fill the gaps between motifs, so the finished bedspread reads as a field of swirls with a garden scattered through it.
The spiral is the part that makes this design advanced. You work all three colors at once, each one carrying its own live loop, and each color climbs over the next one in turn. At the end, each color tapers down through shorter stitches, and a levelling round turns the spiral into a clean circle for the lace rings. Once you have made two or three motifs, the rhythm settles in. Each motif takes about an hour and a quarter, and the whole bedspread comes in at roughly 100 to 130 hours, including flowers, border and blocking.
This is a good project for a crocheter who is comfortable working in the round, can read stitch counts, and wants a long, portable project. Every motif is joined as you go, so there is no big seaming session at the end, and the pattern scales easily: a single motif makes a table mat, four make a cushion, and twenty make a throw.
Materials
- Sport or light DK mercerized cotton, Color A, cream about 1250 g
- Sport or light DK mercerized cotton, Color B, sage green about 700 g
- Sport or light DK mercerized cotton, Color C, chocolate brown about 450 g
- 3.5 mm crochet hook
- 3 locking stitch markers one per color, to hold the dropped loops in the spiral
- Tapestry needle
- Scissors
- Blocking mats and rust-proof pins to block motifs flat
- Spray bottle for wet blocking
Abbreviations
MRmagic ringchchainsl stslip stitchscsingle crochethdchalf double crochetdcdouble crochettrtreble crochet3-tr cl3-treble cluster: (yo twice, insert hook, pull up a loop, [yo, pull through 2] twice) 3 times in the same st, yo and pull through all 4 loopsrev screverse single crochet (crab stitch)skskipspspacest(s)stitch(es)Spiral Center (Rounds 1-8)
- How the spiral works: all three colors stay attached. Each color works only across the next color’s stitches from the previous round, then you drop it onto a marker and pick up the next color. Never work past the next color’s live loop.
- Round 1: With A, make a MR, ch 1, work sc, hdc, 2 dc into the ring. Remove hook and place A’s loop on a marker. Join B to the ring: ch 1, sc, hdc, 2 dc into the ring, drop B onto a marker. Join C the same way: ch 1, sc, hdc, 2 dc, drop C onto a marker. Pull the ring closed. (12 sts: 4 per color; ch-1s do not count)
- Round 2: Pick up A. Working across the next 4 sts (the B stitches), 2 dc in each st, drop A. Pick up B and work 2 dc in each of the next 4 sts (the C stitches), drop B. Pick up C and work 2 dc in each of the next 4 sts (the first A stitches), drop C. (24 sts: 8 per color)
- Round 3: With each color in turn, work (dc in next st, 2 dc in next st) 4 times, then drop it and pick up the next color. (36 sts: 12 per color)
- Round 4: With each color in turn, work (dc in next 2 sts, 2 dc in next st) 4 times. (48 sts: 16 per color)
- Round 5: With each color in turn, work (dc in next 3 sts, 2 dc in next st) 4 times. (60 sts: 20 per color)
- Round 6: With each color in turn, work (dc in next 4 sts, 2 dc in next st) 4 times. (72 sts: 24 per color)
- Round 7 (taper): With each color in turn, working across the next 24 sts: dc in next 5 sts, 2 dc in next st, hdc in next 5 sts, 2 hdc in next st, sc in next 5 sts, 2 sc in next st, sc in next st, 2 sc in next st, sl st in next 4 sts. Fasten off that color before picking up the next. (84 sts: 28 per color section)
- Round 8 (levelling): Join A in the first dc of any taper section. Working each 28-st section the same way: sc in next 7 sts, hdc in next 7 sts, dc in next 10 sts, tr in next 4 sts (working the tr into the sl sts). Repeat for the other two sections and join with a sl st to the first sc. (84 sts) Do not fasten off.
Lace Rings (Rounds 9-13)
- Round 9: With A, ch 1, (sc in next 6 sts, 2 sc in next st) 12 times, join with a sl st to the first sc. (96 sts) Fasten off A.
- Round 10: Join C in any st. Ch 5 (counts as dc and ch 2), sk 1, (dc in next st, ch 2, sk 1) 47 times, join with a sl st to the 3rd ch of the beginning ch-5. (48 dc, 48 ch-2 sps) Fasten off C.
- Round 11: Join A in any ch-2 sp. Ch 1, (2 sc in each of next 3 ch-2 sps, 3 sc in next ch-2 sp) 12 times, join with a sl st to the first sc. (108 sts) Fasten off A.
- Round 12: Join C in any st. Ch 6 (counts as tr and ch 2), sk 2, (tr in next st, ch 2, sk 2) 35 times, join with a sl st to the 4th ch of the beginning ch-6. (36 tr, 36 ch-2 sps) Fasten off C.
- Round 13: Join A in any tr. Ch 1, sc in same tr, 2 sc in next ch-2 sp, sc in next tr, 3 sc in next ch-2 sp, then (sc in next tr, 2 sc in next ch-2 sp, sc in next tr, 3 sc in next ch-2 sp) 17 times, join with a sl st to the first sc. (126 sts) Fasten off A.
Scalloped Edge and Join-As-You-Go (Round 14)
- First motif, Round 14: Join B in any st. Ch 1, sc in same st, (sk 2, 7 dc in next st, sk 2, sc in next st) 20 times, sk 2, 7 dc in next st, sk 2, join with a sl st to the first sc. (21 scallops) Fasten off B.
- Number the scallops 1 to 21 clockwise and lay the motif with scallop 1 pointing up. Scallop 6 points right, scallop 11 points down and scallop 17 points left. Keep every motif in this same orientation so the swirls all turn the same way.
- Joining scallop: work 3 dc, then 1 dc, sl st into the center (4th) dc of the facing scallop on the neighboring motif, then work the remaining 3 dc. The scallop still has 7 dc.
- Joining to the left: work scallop 17 of the new motif as a joining scallop into scallop 6 of the motif to its left.
- Joining upward: work scallop 1 of the new motif as a joining scallop into scallop 11 of the motif above it.
- Work across rows from left to right, top to bottom, until you have 8 motifs across and 9 motifs down. (72 motifs)
Filler Flowers
- Make one flower for every diamond-shaped gap where four motifs meet. (56 flowers for an 8 x 9 layout)
- Round 1: With C, make a MR, ch 1, 8 sc into the ring, join with a sl st to the first sc. (8 sts) Fasten off C.
- Round 2, plain petal: Join A in any sc. (Ch 3, 3-tr cl in same sc, ch 3, sl st in same sc, sl st in next sc). This makes one petal.
- Round 2, joining petal: Ch 3, 3-tr cl in same sc, ch 1, sl st into the center dc of the designated scallop, ch 2, sl st in same sc, sl st in next sc.
- Make all 8 petals as joining petals, two per motif, working around the gap in order. Use these scallops: scallops 3 and 4 of the upper-left motif, scallops 19 and 20 of the upper-right motif, scallops 14 and 15 of the lower-right motif, scallops 8 and 9 of the lower-left motif. Join with a sl st to the base of the first petal. (8 petals) Fasten off A.
Border
- Round 1: Join B in the first dc of any free scallop on the outer edge. Sc in each st of every free outer scallop and in the sc between them. Where two motifs meet along the edge, ch 5 to bridge the gap and continue on the next motif. Join with a sl st to the first sc.
- Round 2: With B, ch 1, rev sc in each sc around and work 5 rev sc over each ch-5 bridge. Join with a sl st to the first st and fasten off.
Finishing
Weave in every end as you go. With around six ends per motif and two per flower, leaving them all for the end turns into a week of sewing, so weave each motif’s ends before you join the next one. On the spiral, weave each color’s tail back through its own color so nothing shows through the lace.
Wet block the finished bedspread in sections. Spray it until damp, pin each motif into a flat circle with the scallops spread evenly, and let it dry completely before moving to the next section. Mercerized cotton holds its shape well once blocked, and the spirals will look crisper and the lace rings more open. If you prefer, block each motif before joining, which makes the final blocking much faster.
Tips for Success
- Use a different colored marker for each color’s dropped loop, so you can always see which yarn comes next. Turn the motif clockwise and untwist the three strands after each round, not at the end.
- Count each color’s section at the end of every spiral round, not just the total. If one color has 20 stitches and another has 21, the spiral will lean, and you will only notice when the taper does not line up.
- In Round 8, work the treble stitches into the front loop of the slip stitches if the full stitch is too tight. The point of this round is to fill the dip, so make those trebles slightly loose.
- Wind small balls of cream and brown for the flowers before you start joining, so you can pull one out whenever you finish a row of motifs.
- Lay out every new row of motifs before you join it and check that scallop 1 is pointing up on each one. A rotated motif is easy to miss until the flowers no longer line up.
Common Mistakes to Avoid
- Working past the next color’s live loop. If a color crosses over another color’s loop, the spiral is broken in that spot. Always stop on the stitch just before the next dropped loop.
- A cupped or wavy center. If Rounds 1 to 6 are cupping, your tension is tight on the increases. If they ruffle, you are working too loosely or added an extra increase. Measure the center at 12 cm across before moving on.
- Fastening off before the taper is finished. Each color has to taper down to the slip stitches before you cut it. If you cut early, the next color’s tall stitches will leave a step in the circle that Round 8 cannot fill.
- Pulling the ch-5 bridges tight in the border. If the bridges are short, the edge of the bedspread will draw in between motifs. Keep them relaxed and the same length all the way around.
- Skipping blocking. Unblocked spirals look lumpy and the lace rings look closed. Blocking is what makes the finished piece look like the photo.
Ways to Customize This Pattern
- Make a matching cushion from four motifs and one flower in the center, then work a sc border around and sew it to a fabric back or a crocheted back panel.
- Change the size by changing the layout. Five by six motifs makes a throw of about 130 x 155 cm, and four by five makes a baby blanket of about 105 x 130 cm.
- Work a two-color spiral. Start each color with 6 sts in Round 1 (sc, hdc, 4 dc) and keep the same increases, so the totals stay at 12, 24, 36 and so on.
- Swap the palette for a seasonal version: rust, mustard and cream for autumn, or navy, slate and white for a coastal bedroom.
- Make a single motif as a table mat or coaster set. Stop after Round 14 and skip the joining.
Frequently asked questions
Yes, but the spirals will look softer and less defined. Mercerized cotton shows the stitch heights in the taper much more clearly. If you use acrylic, steam block instead of wet blocking, and expect the motifs to be slightly larger.
Round 7 leaves three steps where each color tapers down, and Round 8 is designed to fill them. If the circle still looks uneven, check that each taper section has exactly 28 stitches and that you worked trebles over the slip stitches in Round 8.
Each blocked motif measures about 26 cm. Measure the top of your bed plus the drop you want on each side, and divide by 26 to get the number of motifs across and down. You need one flower for every gap where four motifs meet.
The flowers hold the motifs together at the corners, so without them the gaps will stretch open. If you want a simpler look, replace each flower with a ch-5 ring joined to the same eight scallops.
The finished Spiral Garden Crochet Bedspread Pattern