Spider Web Coaster Crochet Pattern
Beginner Friendly
Perfect for those just starting their crochet journey, with clear instructions and simple techniques
Single-Day Project
A satisfying project you can complete in a single afternoon or evening.
Handmade Gift
A beautiful keepsake — free forever. Read online or print at home.
About This Spider Web Coaster Crochet Pattern
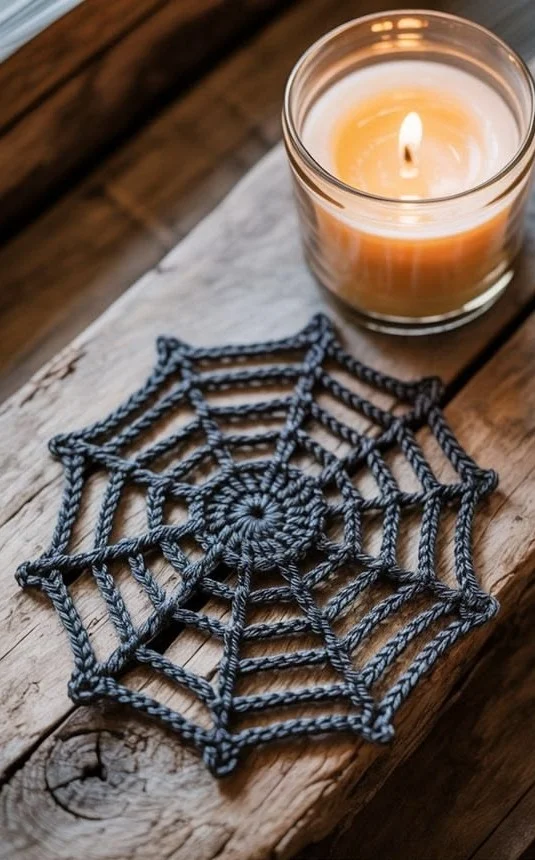
This crochet spider web coaster pattern makes a dark, lacy web with eight braided spokes and four chain rings around a small woven center. It looks best in charcoal or slate, and the open lace shows off whatever table it sits on. A candle beside it, as in the photo, makes it look properly spooky.
The web is built in stages rather than in one continuous spiral. You work a tight center disc, grow eight slip-stitch spokes from it, then join chain rings across the spokes one level at a time. Expect about three to four hours. It suits crocheters who are comfortable with slip stitch and chain work and want a Halloween project that is quick but has real structure.
Because the piece is mostly chains, it needs blocking to hold its shape. A light coat of fabric stiffener or starch turns it into a firm coaster or wall hanging. The pattern is worked in cotton, which stays crisp and takes heat from a warm mug better than acrylic.
Materials
- Cotton yarn, DK or light worsted charcoal / slate blue-gray, about 25 g (60 m)
- Crochet hook 3.0 mm
- Locking stitch markers 4 to 6
- Yarn needle for weaving in ends
- Scissors
- Blocking mat and pins rust-proof
- Fabric stiffener or spray starch optional but recommended
Abbreviations
MRmagic ringchchainscsingle crochetsl stslip stitchst(s)stitch(es)Center Disc
- Round 1: 8 sc in MR, then pull the ring tight and join with a sl st to the first sc. (8)
- Round 2: 2 sc in each st around. (16)
- Round 3: *sc in next st, 2 sc in next st*, repeat from * to * 8 times. (24)
Spokes
- Round 4, spoke 1: sc in next st, ch 21. Starting in the 2nd ch from the hook, sl st in each of the 20 chains back to the disc. Sl st 20 (the last one) sits right next to the disc. Sl st 1 is the tip.
- Continue Round 4: sc in each of the next 2 sts of the disc. That is 3 disc sts used for this spoke.
- Repeat steps 1 and 2 seven more times, for 8 spokes in total. Every 3 disc sts (1 spoke sc + 2 sc) carry one spoke, so all 24 sts are used. (24 sc, 8 spokes)
- Join with a sl st to the first sc of Round 4. Fasten off and weave in the beginning tail only. Keep the working yarn for the rings by joining a new strand for each ring.
Ring 1 (inner ring)
- Join yarn with a sl st in the 5th sl st from the disc on any spoke. This is the ring 1 level.
- *Ch 7, sl st in the ring 1 level of the next spoke*, repeat from * to * 7 times. (7 arcs)
- Ch 7 and sl st in the first join to close the eighth arc. (8 arcs of ch 7)
- Fasten off and weave in the ends.
Ring 2
- Join yarn with a sl st in the 10th sl st from the disc on any spoke.
- *Ch 11, sl st in the same level of the next spoke*, repeat from * to * 7 times. (7 arcs)
- Ch 11 and sl st in the first join. (8 arcs of ch 11)
- Fasten off and weave in the ends.
Ring 3
- Join yarn with a sl st in the 15th sl st from the disc on any spoke.
- *Ch 15, sl st in the same level of the next spoke*, repeat from * to * 7 times. (7 arcs)
- Ch 15 and sl st in the first join. (8 arcs of ch 15)
- Fasten off and weave in the ends.
Ring 4 (outer edge)
- Join yarn with a sl st in the tip (20th sl st) of any spoke.
- *Ch 19, sl st in the tip of the next spoke*, repeat from * to * 7 times. (7 arcs)
- Ch 19 and sl st in the first join. (8 arcs of ch 19)
- Work 2 extra sl sts around each spoke tip to build small pointed corners, as in the photo.
- Fasten off and weave in the ends.
Finishing
Weave in every tail along a spoke or ring, going back on yourself once to lock it in. Pin the web out on a blocking mat, stretching the spokes straight and pulling each ring into a neat octagon with a pin at every spoke tip. Spray with starch or brush on fabric stiffener, then let it dry completely before unpinning. Blocking is what turns a floppy web into a flat, crisp coaster.
Tips for Success
- Chain loosely for the spokes and slip stitch back with the same relaxed tension. Tight spokes curl the whole web into a bowl.
- Use a hook one size smaller if your chains look floppy. Firm chains give a crisper web.
- Work each ring with a fresh strand of yarn. Carrying yarn across the web shows through the open lace.
- Mark one spoke as your first spoke before you start the rings. It makes counting to close each ring much easier.
- Choose a dark yarn with a slight sheen or a tight twist. Fuzzy yarns hide the braided spoke texture.
Common Mistakes to Avoid
- Joining a ring at different levels on different spokes makes the octagon lopsided. Recount from the disc on every spoke and match your markers.
- Skipping the 2 sc between spokes in Round 4 leaves gaps or bunches in the disc. Always use exactly 3 disc sts per spoke.
- Chaining the rings too tight pulls the spokes together like a drawstring. Use the exact chain counts, and add one chain to every ring if you crochet tightly.
- Leaving the web unblocked makes the arcs sag between spokes. Pin and starch it, or stiffen it with fabric stiffener.
Ways to Customize This Pattern
- Make a larger centerpiece by adding a fifth ring and lengthening each spoke by 5 sl sts. Add 4 chains to the ring 5 arc for each extra level.
- Turn it into an ornament by using thin crochet cotton and a 1.75 mm hook, then stiffen it and hang it from a loop.
- Use white or silver metallic thread for a frosted look. It also looks striking in deep purple or orange for Halloween.
- Sew a small amigurumi spider to one ring, or dangle one from a chain at a spoke tip.
- Change the number of spokes to 6 by working 4 disc sts per spoke, or to 12 by working 2 sts per spoke.
Frequently asked questions
With DK cotton and a 3.0 mm hook it measures about 16 cm across, tip to tip. Use a heavier yarn and a larger hook for a bigger web.
For a coaster that stays flat, yes. Unstiffened cotton will still work as a decoration, but the arcs will sag, and starch or fabric stiffener keeps the web crisp and holds its shape.
You can, but cotton holds its shape and stiffener better, and it copes better with a warm mug. If you use acrylic, use it only for decoration rather than as a coaster, and block it gently with steam rather than heat.
Uneven spokes usually come from inconsistent tension when slip stitching back along the chain. Keep the chains loose and make each slip stitch in the back bump of the chain, and they will match.
The finished Spider Web Coaster Crochet Pattern