Red and White Swirl Crochet Bedspread Pattern
Beginner Friendly
Perfect for those just starting their crochet journey, with clear instructions and simple techniques
Single-Day Project
A satisfying project you can complete in a single afternoon or evening.
Handmade Gift
A beautiful keepsake — free forever. Read online or print at home.
About This Red and White Swirl Crochet Bedspread Pattern
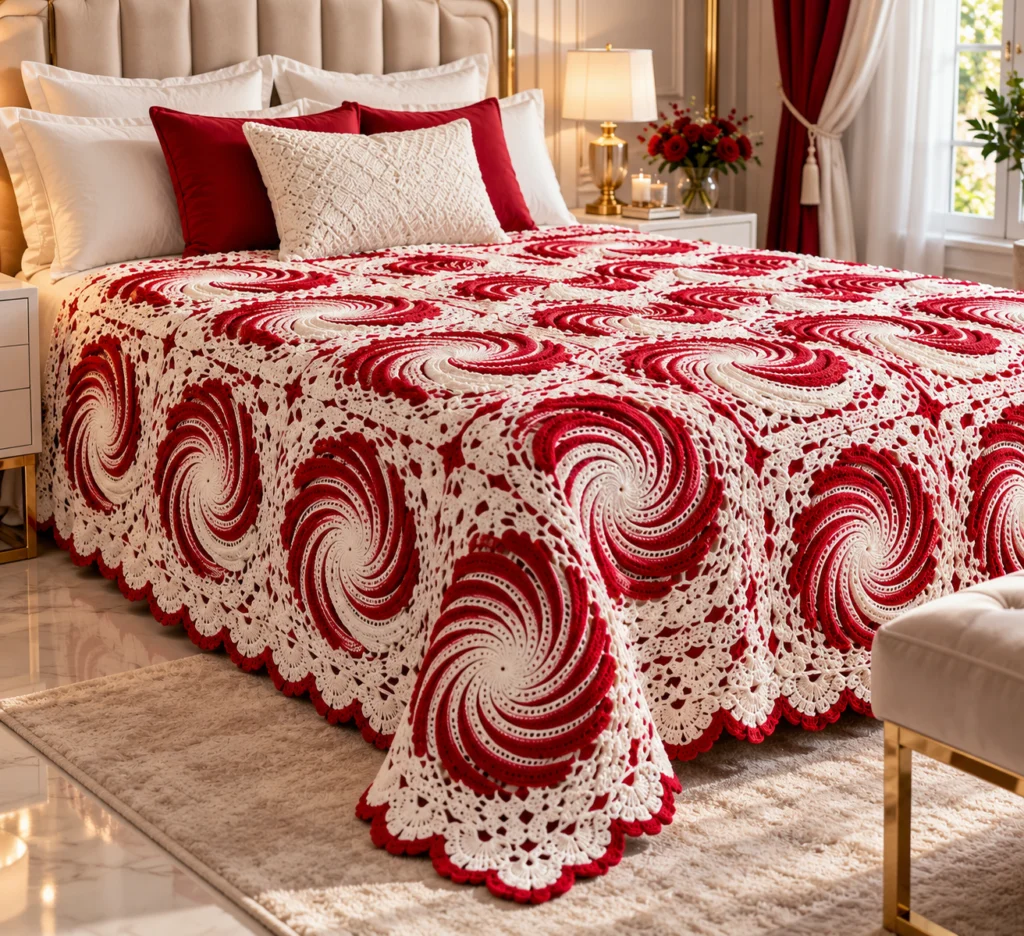
This crochet swirl bedspread pattern is built from 56 large square motifs. Each one has a red and white spiral at its center that looks like it is spinning. The spiral is not made by changing colors on every round. It is worked with eight strands at once, four red and four white, and each strand steps forward one section every time it is picked up. That stepping is what bends the stripes into a natural curve. Around each spiral, a frame of white lace with a red squaring round turns the circle into a square. A scalloped fan border edged in red finishes the whole bedspread.
The motifs are joined as you go on their final round, so there is no long seaming session at the end. Each motif takes about two and a half to three hours once you know the rhythm. The full queen-size bedspread, border included, comes to roughly 170 to 200 hours. It is a long project, but every motif is a complete little piece, so it is easy to work on a bit at a time.
This pattern is for crocheters who are confident with lace rounds, standing stitches and keeping several yarns in order without tangling. If you have never worked with more than one strand at a time, make one practice spiral before committing to the full set. Once the first spiral clicks, the rest go quickly.
Materials
- DK weight mercerized cotton, white about 2100 g (around 42 balls of 50 g)
- DK weight mercerized cotton, deep red about 900 g (around 18 balls of 50 g)
- 3.5 mm crochet hook
- 8 yarn bobbins or small zip bags for winding the spiral strands for each motif
- Locking stitch markers at least 8, ideally 4 in each of two colors
- Tapestry needle
- Blocking mats and rust-proof pins
- Color catcher sheets for the first wash, so the red cannot stain the white
Abbreviations
MRmagic ringchchainsl stslip stitchscsingle crochethdchalf double crochetdcdouble crochettrtreble crochetrev screverse single crochet (crab stitch)sp(s)space(s)skskipst(s)stitch(es)begbeginningRndroundJAYGOjoin as you goFOfasten offSwirl Center (Rnds 1–14, eight strands)
- Rnd 1 (setup): Make a MR with R1. Ch 1 (does not count), then work (sc, hdc) in the ring. Remove the hook and put the live loop on a marker. With W1, insert the hook in the ring and pull up a loop. Ch 1, work (sc, hdc) in the ring and put the loop on a marker. Repeat with R2, W2, R3, W3, R4 and W4, then pull the ring closed. (16 sts: 8 sections of 2)
- Rnd 2: Pick up the R1 loop. It sits at the start of W1’s section. Work 2 hdc in the first st and hdc in the next st (3 sts), and you will end right at the W1 loop. Put R1 back on its marker. Pick up W1 and work the same way over R2’s section. Continue around in strand order. (24 sts: 8 sections of 3)
- Rnd 3: With each strand in order, work 2 hdc in the first st of the next section, then hdc in each remaining st of that section. (32 sts: 8 sections of 4)
- Rnds 4–13: Repeat Rnd 3. Each section grows by 1 st per round, so the total grows by 8 per round. Rnd 4 = 40, Rnd 5 = 48, and so on to Rnd 13 = 112 (8 sections of 14). Every strand should finish exactly where the next live loop sits. If one stops early or runs over, recount that section before going on.
- Rnd 14 (taper): With each strand in order, work over the next section with no increase: hdc in next 9 sts, sc in next 3 sts, sl st in next 2 sts (14 sts). FO that strand before picking up the next one. (112 sts) The spiral should now measure about 21 cm across.
Swirl Accent Lines (white surface stitching)
- Hold white yarn behind the motif. Insert the hook from the front at the inner end of one red arm, about 2 cm from the center.
- Work surface slip stitches outward along the middle of that red arm, following its curve, and stop 1 cm before the edge of Rnd 14. This adds the thin white line that runs through each red stripe.
- FO on the back. Repeat on all 4 red arms, then weave in every tail from the spiral before moving on.
Lace Frame (Rnds 15–19)
- Rnd 15 (white): Join with a standing sc in any st. Sc in each st around and join with a sl st to the first sc. (112 sc)
- Rnd 16 (white): Ch 5 (counts as dc and ch 2). Sk 1 st, then *dc in next st, ch 2, sk 1 st* around. Join to the 3rd ch of the beg ch-5. FO. (56 dc, 56 ch-2 sps)
- Rnd 17 (red, squaring round): Join in any ch-2 sp. Ch 4 (counts as tr), then work 2 tr, ch 3 and 3 tr in the same sp for the first corner. *Work 3 dc in each of next 2 sps, 3 hdc in each of next 2 sps, 3 sc in each of next 5 sps, 3 hdc in each of next 2 sps and 3 dc in each of next 2 sps. Then work (3 tr, ch 3, 3 tr) in the next sp for the corner.* Repeat from * twice more, then work the side sequence once more without the final corner. Join to the top of the beg ch-4. FO. (180 sts: 45 per side, plus 4 corner ch-3 sps)
- Rnd 18 (white): Join in any corner ch-3 sp. Ch 3 (counts as dc), then work 2 dc, ch 3 and 3 dc in the same sp. *Work (ch 2, sk 2 sts, dc in next st) x15, then (3 dc, ch 3, 3 dc) in the corner sp.* Repeat from * around, omitting the last corner, and join to the top of the beg ch-3. (15 ch-2 sps per side)
- Rnd 19 (white): Sl st in the next 2 dc and into the corner sp. Ch 3 (counts as dc), then work 2 dc, ch 3 and 3 dc in the same sp. *Ch 1, then work [sc in next ch-2 sp, 5 dc in next ch-2 sp] x7. Sc in the next ch-2 sp, ch 1, then work (3 dc, ch 3, 3 dc) in the corner sp.* Repeat from * around, omitting the last corner, and join. (7 fans and 8 sc per side)
Final Round and Join-As-You-Go (Rnd 20)
- Rnd 20, first motif (white): Sl st in the next 2 dc and into the corner sp. Ch 1, then work (2 sc, ch 2, 2 sc) in the corner sp. *Ch 3, sc in the first sc of the side, ch 3, then work [sc in 3rd dc of next fan, ch 3, sc in next sc, ch 3] x7. Work (2 sc, ch 2, 2 sc) in the corner sp.* Repeat from * around, omitting the last corner, and join. FO. (16 ch-3 sps per side) The motif should measure about 32 cm square.
- Joining motifs: Work Rnd 20 as above until you reach a side that meets a finished motif. Hold the two motifs wrong sides together. At the corner, replace the ch 2 with ch 1, sl st in the neighbor’s corner sp, ch 1.
- Along the shared side, replace each ch 3 with ch 1, sl st in the matching ch-3 sp of the neighbor, ch 1. Every shared side has exactly 16 joins.
- Where four motifs meet, sl st into the existing join at the center point instead of into a corner sp, so all four corners lock together in one spot.
- Layout: Join 7 motifs across and 8 down, for 56 motifs in total. Work row by row so that each new motif joins on one or two sides.
Scalloped Border
- Rnd 1 (white): Join in an outer corner sp of the bedspread. Work (sc, ch 2, sc) in each outer corner sp. On every motif side, work 3 sc in each ch-3 sp. Where two motifs meet, work 1 sc in the corner sp of each motif and skip the joining sl st. Each motif side gives 50 sts, so each long side has 400 sts and each short side has 350. (1500 sts plus 4 corner ch-2 sps)
- Rnd 2 (white): Sl st into a corner ch-2 sp and work (sc, 9 dc) in it. *Along the side, work [sc in next st, sk 4 sts, 9 dc in next st, sk 4 sts] across. That is 5 repeats per motif side, and you end right before the next corner sp. Work (sc, 9 dc) in that corner sp.* Repeat from * around and join to the first sc. (154 fans, each separated by 1 sc)
- Rnd 3 (white): Join with a standing sc in the sc before any fan. *Work (dc in next dc, ch 1) x8, dc in next dc, sc in next sc.* Repeat from * around, omitting the last sc, and join to the first sc. FO. (Each fan now has 9 dc and 8 ch-1 sps.)
- Rnd 4 (red): Join with a sl st in any separating sc. *Work (sc in next dc, sc in next ch-1 sp) x8, sc in next dc, then sl st in next sc.* Repeat from * around. (17 sc per fan)
- Rnd 5 (red): Ch 1. Work rev sc in each sc around, skipping the sl sts, and join. FO.
Finishing
Weave in all remaining ends along the back of stitches of the same color. Hide red tails only under red stitches, because cotton red shows clearly through white lace. Trim close once each tail has run at least 5 cm in two directions.
Wash the bedspread by hand or on a gentle cold cycle, with two or three color catcher sheets in the water. Roll it in towels to remove as much water as you can. Do not wring it. Block it in sections on mats or a clean carpet covered with a sheet. Pin each motif square and pin every border fan into a rounded scallop. Leave it to dry completely before unpinning. Blocking opens up the lace frame and evens out any spirals that pulled slightly tighter than the others.
Tips for Success
- Keep the eight bobbins in a muffin tin or an egg carton, one per cup, in strand order. Turn the motif, not the bobbins, as you move from strand to strand, and the yarns will stay untwisted.
- Make a gauge motif first and measure the spiral after Rnd 14. If it is wider than 22 cm, go down to a 3.25 mm hook; if it is under 20 cm, go up to a 3.75 mm hook. Small differences multiply across 56 motifs.
- Test your red yarn for colorfastness before buying the whole amount. Soak a red swatch knotted to a white one in warm water for an hour. If the white picks up color, choose another red.
- Stitch the white accent lines on each spiral right after Rnd 14, while the back is still easy to reach. Doing them after joining means working them on a heavy, half-finished bedspread.
- Make a batch of finished spirals (Rnds 1–19) before starting any joining. Then use Rnd 20 as relaxing joining sessions, so you don’t keep switching between two kinds of work.
Common Mistakes to Avoid
- Picking up strands out of order, so two reds or two whites end up side by side and one arm of the swirl breaks. Before each pass, check that the loop you pick up is the opposite color of the section you are about to cover.
- A spiral that ruffles or cups. Ruffling usually means you put the increase in the last st of a section instead of the first. Cupping usually means hdc stitches pulled too tight on the white strands. Keep the increase on the first st and try to match tension between the colors.
- Miscounting the ch-3 sps when joining, which leaves a bump or pucker at the corners. Every side has exactly 16 joins. Place a marker at the 8th join on long sessions so you can check halfway.
- Running a red tail under white stitches when weaving in ends. It looks hidden while dry and shows through after washing. Always weave each color under its own color.
- Fans in the border that flare or cup. Flaring means the 4-st skips crept down to 3. Cupping means you skipped more than 4. Count the 10-st repeats carefully along each motif side.
Ways to Customize This Pattern
- Change the palette: try navy and white for a nautical look, sage and cream for a softer cottage bedroom, or two shades of ivory for an all-neutral heirloom.
- Resize the bedspread by changing the motif grid. Use 5 x 7 motifs for a twin, 8 x 8 for a king, or 4 x 5 for a generous sofa throw. The border repeat works for any size, because every motif side always gives 50 stitches.
- Make matching accessories from single motifs. Two motifs joined back to back with Rnd 20 around a 32 cm pillow form make a cushion cover, and a strip of 2 x 6 motifs makes a table runner.
- Make a swirl-only throw by stopping each motif after Rnd 16, then joining the circles with small filler motifs in the gaps for a lacier look.
- For a festive holiday version, add a third color: work Rnd 17 in green instead of red, and keep the red spirals and the red edge.
Frequently asked questions
Yes, if you want the curved stripes. Each strand moves forward by one section on every round, and that movement is what creates the spiral. Changing colors within a single strand gives straight wedges instead. The strands are short, about 5 m each, so they are easier to manage than they sound.
Yes. With worsted yarn and a 4.5 mm hook, each motif will measure about 38 cm. A 6 x 7 grid then gives roughly the same queen size with fewer motifs. The lace will look chunkier, and the bedspread will be noticeably heavier, so a cotton blend is a better choice than pure cotton at that weight.
Use a gentle cold cycle or a hand wash with color catcher sheets, then dry it flat. Never tumble dry. The heat shrinks cotton unevenly and pulls the lace frames out of square. Re-pin the border scallops while it is damp if they lose their shape.
You can. Work Rnd 20 complete on every motif and whipstitch the motifs together through the matching ch-3 sps afterward. The seams will be slightly firmer and more visible than the join-as-you-go method, but the stitch counts and the border stay exactly the same.
The finished Red and White Swirl Crochet Bedspread Pattern