Olive Leaf Pineapple Crochet Table Runner Pattern
Beginner Friendly
Perfect for those just starting their crochet journey, with clear instructions and simple techniques
Single-Day Project
A satisfying project you can complete in a single afternoon or evening.
Handmade Gift
A beautiful keepsake — free forever. Read online or print at home.
About This Olive Leaf Pineapple Crochet Table Runner Pattern
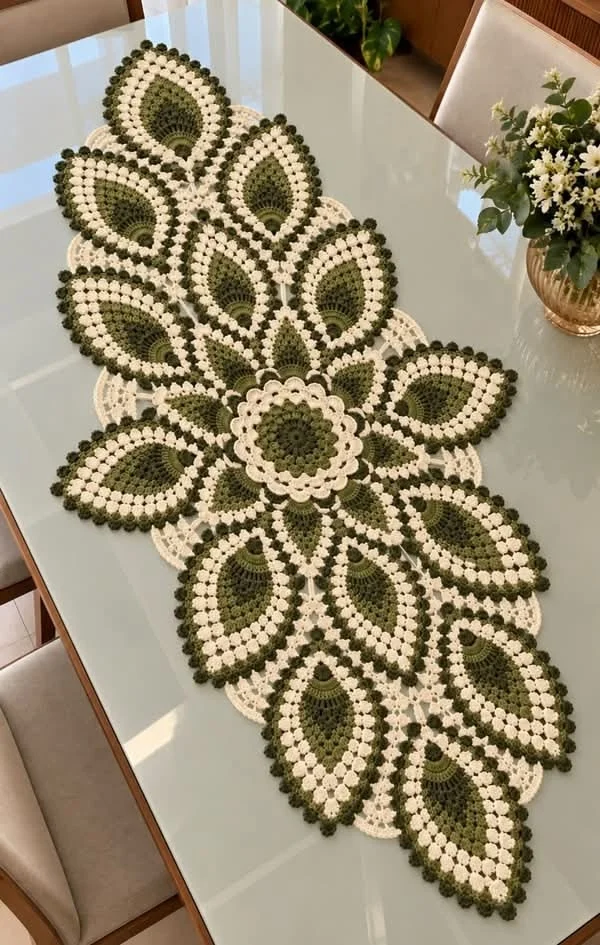
This pineapple crochet table runner pattern builds a long, lacy centerpiece out of pointed leaf motifs in olive green and cream. Each leaf has a textured green puff-stitch heart, a band of cream puffs, and a raised green popcorn edge, and they all radiate out from a layered flower medallion with two rings of cream petals. The result reads like a giant stylized blossom stretched across the table.
The runner is made from separate pieces: one flower medallion, 12 small leaves joined around it, and 16 large leaves joined to each other as you go. A cream chain-mesh filler and small scalloped fans tie everything together at the end, so the runner holds its shape without looking heavy. Plan on 35 to 45 hours, most of it spent on the large leaves, which you can carry around and work one at a time.
This is a pattern for crocheters who are comfortable with puff stitches, popcorns, working into front and back loops, and joining motifs as they go. If you have made a doily or a motif blanket before, you have every skill you need here. The leaves are repetitive in a good way: once the first one is done, the rest go quickly.
Materials
- Size 3 mercerized cotton crochet thread, cream approx. 825 m / 900 yd (about 6 balls of 150 yd)
- Size 3 mercerized cotton crochet thread, olive green approx. 690 m / 750 yd (about 5 balls of 150 yd)
- 2.25 mm crochet hook go up or down a size to match the leaf measurement below
- Tapestry needle for weaving in ends
- Stitch markers to mark join points on the large leaves
- Blocking mats and rust-proof pins large enough to lay out the whole runner, or work in sections
- Fabric stiffener or spray starch optional, for crisp leaf points
Abbreviations
MRmagic ringchchainsl stslip stitchscsingle crochetdcdouble crochetpuff[yo, insert hook, pull up a loop] 3 times in the same st or sp, yo, pull through all 7 loopsbeg puffch 2, then work a puff in the same st or sppcpopcorn: 4 dc in the same st, drop the loop, insert hook front to back through the first dc, pick up the dropped loop and pull it throughskskipspspaceFLOfront loop onlyBLOback loop onlyst(s)stitch(es)rndroundreprepeatJAYGjoin as you goFlower Medallion (make 1)
- Rnd 1 (green): MR, ch 3 (counts as dc), 11 dc in ring, join with sl st to top of ch-3. (12 dc)
- Rnd 2: Ch 3, dc in same st, 2 dc in each st around, join. (24 dc)
- Rnd 3: Beg puff in same st, ch 1, *(puff, ch 1) in next st* 23 times, join to top of beg puff. (24 puffs, 24 ch-1 sps)
- Rnd 4: Ch 1, sc in same puff, sc in next ch-1 sp, *sc in next puff, sc in next ch-1 sp* 23 times, join to first sc. (48 sc) Fasten off green.
- Rnd 5 (cream, front petals, worked in FLO of Rnd 4): Join cream in FLO of any st. Ch 1, sc in same st, *sk 1, 5 dc in next st, sk 1, sc in next st* 11 times, sk 1, 5 dc in next st, sk 1, join to first sc. (12 shells, 12 sc)
- Rnd 6 (back layer, worked in the unused BLO of Rnd 4): Fold the front petals toward you. Sl st into the BLO of any Rnd 4 st behind the petals. Ch 1, *sc in BLO of next 3 sts, 2 sc in BLO of next st* 12 times, join. (60 sc)
- Rnd 7 (back petals): Ch 1, sc in same st, sc in next st, *sk 1, 7 dc in next st, sk 1, sc in next 2 sts* 11 times, sk 1, 7 dc in next st, sk 1, join to first sc. (12 shells, 24 sc)
- Rnd 8 (joining loops): Sl st in next sc and next 4 dc, so you sit in the center dc of the first shell. Ch 1, sc in same st, *ch 5, sc in the sp between the next 2 sc, ch 5, sc in the center (4th) dc of the next shell* 11 times, ch 5, sc in the sp between the next 2 sc, ch 5, join to first sc. (24 ch-5 loops) Fasten off.
Small Leaves (make 12, joined around the medallion)
- Rnd 1 (green): Ch 8. Sc in 2nd ch from hook and in each ch across (7 sc), ch 2 for tip B. Working in the free loops on the other side of the chain, sc in each ch across (7 sc), ch 2 for tip A, join to first sc. (14 sc, 2 ch-2 tip sps)
- Rnd 2: Sl st into tip A sp. Ch 3 (counts as dc), (dc, ch 2, 2 dc) in same sp, dc in each of next 7 sc, (2 dc, ch 2, 2 dc) in tip B sp, dc in each of next 7 sc, join to top of ch-3. (22 dc, 11 per side between tip sps)
- Rnd 3: Sl st in next dc and into tip A sp. (Beg puff, ch 2, puff) in same sp, ch 1, sk 1 dc, *puff in next dc, ch 1, sk next dc* 5 times, (puff, ch 2, puff) in tip B sp, ch 1, sk 1 dc, rep from * 5 times, join to top of beg puff. (14 puffs, 12 ch-1 sps, 2 ch-2 tip sps) Fasten off green.
- Rnd 4 (cream, first leaf only): Join cream in tip A sp. Ch 1, (sc, ch 3, sc) in same sp, 2 sc in each of next 6 ch-1 sps, (sc, ch 3, sc) in tip B sp, 2 sc in each of next 6 ch-1 sps, join. (28 sc, 2 ch-3 tips) Tip A is the inner tip; tip B points outward.
- Rnd 4 JAYG (cream, every leaf): Work as above, but at tip A replace the ch 3 with ch 1, sl st into a ch-5 loop of medallion Rnd 8, ch 1. Use every other loop, so 12 leaves sit on 24 loops with one free loop between each pair.
- Side join (leaves 2 to 12): On the side facing the previous leaf, after the 6th sc, ch 2, sl st into the 6th sc of the matching side of the previous leaf, ch 2, then continue. The joining chains are not counted. On leaf 12, also join its other side to leaf 1 the same way. Fasten off and weave in ends.
Large Leaves (make 16)
- Rnd 1 (green): Ch 14. Sc in 2nd ch from hook and in each ch across (13 sc), ch 2 for tip B. Working in the free loops, sc in each ch across (13 sc), ch 2 for tip A, join to first sc. (26 sc, 2 ch-2 tip sps)
- Rnd 2: Sl st into tip A sp. Ch 3 (counts as dc), (dc, ch 2, 2 dc) in same sp, dc in each of next 13 sc, (2 dc, ch 2, 2 dc) in tip B sp, dc in each of next 13 sc, join to top of ch-3. (34 dc, 17 per side between tip sps)
- Rnd 3: Sl st in next dc and into tip A sp. (Beg puff, ch 2, puff) in same sp, ch 1, sk 1 dc, *puff in next dc, ch 1, sk next dc* 8 times, (puff, ch 2, puff) in tip B sp, ch 1, sk 1 dc, rep from * 8 times, join to top of beg puff. (20 puffs, 18 ch-1 sps, 2 ch-2 tip sps) Fasten off green.
- Rnd 4 (cream): Join cream in tip A sp. Ch 3 (counts as dc), (2 dc, ch 2, 3 dc) in same sp, 2 dc in each of next 9 ch-1 sps, (3 dc, ch 2, 3 dc) in tip B sp, 2 dc in each of next 9 ch-1 sps, join to top of ch-3. (48 dc, 24 per side between tip sps)
- Rnd 5: Sl st in next 2 dc and into tip A sp. (Beg puff, ch 3, puff) in same sp, *ch 2, puff in the sp between the next two dc groups* 10 times, ch 2, (puff, ch 3, puff) in tip B sp, rep from * 10 times, ch 2, join to top of beg puff. (24 puffs, 22 ch-2 sps, 2 ch-3 tip sps)
- Rnd 6: Sl st into tip A sp. Ch 3 (counts as dc), (2 dc, ch 3, 3 dc) in same sp, 3 dc in each of next 11 ch-2 sps, (3 dc, ch 3, 3 dc) in tip B sp, 3 dc in each of next 11 ch-2 sps, join. (78 dc, 39 per side between tip sps) Fasten off cream.
- Rnd 7 (green popcorn edge, first leaf only): Join green in tip A sp. Ch 1, (sc, ch 3, sc) in same sp, *sc in next dc, pc in next dc, sc in next dc* 13 times, (sc, ch 3, sc) in tip B sp, rep from * 13 times, join to first sc. (26 pc, 56 sc, 2 ch-3 tips) Fasten off and weave in ends.
Joining the Large Leaves (Rnd 7 JAYG)
- Lay out the medallion with its small-leaf ring and plan the large leaves around it: a ring of 8 leaves with their tip A pointing toward the center, plus 4 leaves at each short end, fanned outward to stretch the runner to its long oval shape. Pin paper templates or finished leaves in place before you start joining.
- Ring leaves: Work Rnd 7 on each new ring leaf as written. On the side that touches the previous ring leaf, join at the 3 popcorns closest to tip A: after completing each of those popcorns, sl st into the top of the matching popcorn on the previous leaf, then continue with the next sc. The joining sl sts are not counted.
- Close the ring: on the 8th ring leaf, join both sides, one to leaf 7 and one to leaf 1.
- End leaves: For each end, join 2 leaves into the gaps between ring leaves and 2 more beyond them at the tip of the runner. Join each new leaf to every leaf it touches along 3 popcorns, using the same sl st join, and mark the join points with stitch markers before you work the round so they line up on the board.
- Leave the outer tips (tip B) free; they become the points of the runner’s edge.
Lace Filler and Edge Fans
- Pin the whole joined piece flat on your blocking mats so the gaps between the small-leaf ring and the large leaves are open and even, roughly 1.5 to 3 cm wide.
- Inner mesh (cream): Join cream with a sl st in the ch-3 tip of a small leaf. *Ch 5, sc in the top of the nearest free popcorn on a large leaf, ch 5, sc in the next free sc, ch-3 tip, or free medallion loop on the inner ring*, zigzagging across the gap. Use ch 3 where a gap is under 2 cm and ch 7 where it is over 3 cm, so no loop pulls or sags. Work around the whole inner gap and join to the first sl st.
- Side mesh: Fill any remaining gap between two large leaves that are not joined along their length the same way, zigzagging ch-5 loops between free popcorns on each leaf.
- Edge fans (cream): Where two neighboring large leaves splay apart at the outer edge, join cream in the 4th free popcorn past their join on one leaf. *Ch 6, sc in the opposite popcorn on the other leaf* 3 times, zigzagging outward, so you have 3 ch-6 loops.
- Fan scallops: Turn and work (sc, ch 1, 5 dc, ch 1, sc) in each ch-6 loop back toward the start, sl st into the starting popcorn. Fasten off. Repeat in every outer gap around the runner.
Finishing
Weave in every end along the back of a puff or popcorn row in its own color, so no cream tail shows through the green and no green shows through the cream. Thread this fine tends to slip loose, so weave each end in one direction, then back the other way for a few stitches.
To block, soak the runner in cool water, roll it in a towel to press out the excess, and pin it on your mats in the planned shape. Put a pin in every leaf tip, every edge fan scallop, and the center dc of each front petal on the medallion. Pull the leaves outward so the mesh opens up, then spray with starch or brush on diluted fabric stiffener if you want crisp points. Let it dry completely before you unpin, at least overnight.
Tips for Success
- Pull every puff loop up to the same height, about the height of a dc. Uneven loops make the green leaf hearts look lumpy instead of like neat ridges.
- Make all 16 large leaves through Rnd 6 first, then do the green Rnd 7 edges in one batch. You change colors less often and your popcorns come out the same size.
- Always work Rnd 7 with the right side facing you so the popcorns push to the front. Check the first two before you go on.
- Number the leaves on your layout with stitch markers or paper tags. It is much easier to join leaf 11 correctly when you can see where it goes.
- Keep the ch-5 mesh loops slightly loose. Blocking stretches them, and tight loops will pucker the leaves toward each other.
Common Mistakes to Avoid
- Losing the puff count on Rnd 3 of the leaves. If the last puff before a tip lands right next to the tip sp, you skipped a dc too few; count 17 dc per side on Rnd 2 before starting the puffs.
- Working Rnd 6 of the medallion into the wrong loops. If your back petals sit on top of the front ones, you used the front loops again; go back and work into the unused back loops of Rnd 4.
- Joining large leaves at the wrong popcorns. If the leaves fan unevenly, count the 3 join popcorns from tip A each time, not from where you happened to start the round.
- Blocking before all the mesh is done. The filler needs the leaves held in place to be worked evenly; pin first, fill, then wet-block the whole piece.
Ways to Customize This Pattern
- Change the length: add or remove leaves at each end in pairs. Two extra pairs per end make a runner for a long dining table; skipping the end leaves gives you a round centerpiece doily.
- Swap the palette: dusty rose and ivory, navy and white, or a single natural cotton color all suit the leaf shape. Keep strong contrast between the leaf heart and the cream band so the puff rows read clearly.
- Make a single-color heirloom version in white or ecru for a wedding or holiday table. The puffs and popcorns carry the design on their own.
- Use the large leaf on its own as a coaster or a set of placemats. Work one leaf in DK cotton with a 3.5 mm hook for a larger, thicker piece.
- Use a size 10 thread and a 1.5 mm hook for a finer, smaller runner of about 80 cm long.
Frequently asked questions
Yes. A sport or DK cotton with a 3 to 3.5 mm hook works, but every leaf gets bigger, so the finished runner will be roughly 160 cm long and 70 cm wide. Check that size against your table before you commit, and plan on about twice the yardage.
Sewn joins on popcorn edges tend to show and pull the bobbles out of line. Joining with a slip stitch into the top of a matching popcorn during the last round keeps the edge smooth and lets you see the shape of the runner grow as you work.
Some curl is normal with puffs and popcorns, and pinning each tip during wet blocking flattens it. If a leaf cups heavily, your Rnd 2 or Rnd 4 dc are tight; try going up half a hook size for those rounds only.
Hand wash it in cool water with a mild soap, press the water out in a towel, and pin it flat to dry the same way you blocked it. Mercerized cotton holds its color well, but washing it in a machine can stretch the mesh and soften the leaf points.
The finished Olive Leaf Pineapple Crochet Table Runner Pattern