Floral Table Runner crochet , SEA and Land vibes
Beginner Friendly
Perfect for those just starting their crochet journey, with clear instructions and simple techniques
Single-Day Project
A satisfying project you can complete in a single afternoon or evening.
Handmade Gift
A beautiful keepsake — free forever. Read online or print at home.
About This Floral Table Runner crochet , SEA and Land vibes
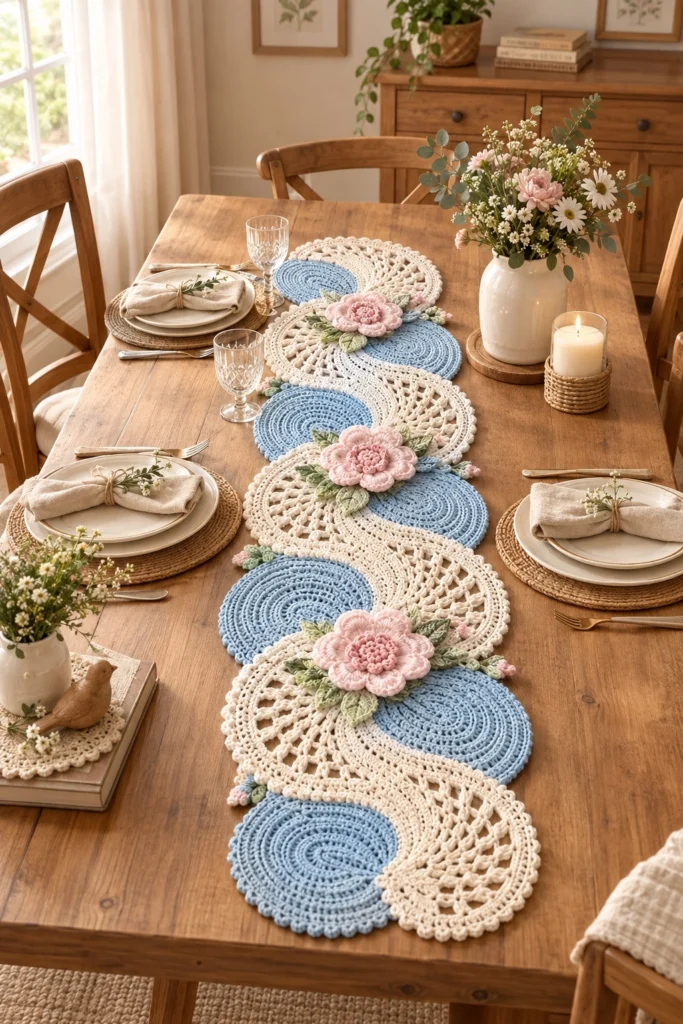
This crochet table runner pattern joins lace medallions and solid textured circles into a flowing S-curve, finished with dimensional crochet roses and hand-shaped leaves. What makes it distinctive is the contrast between the two motif types: dense, ridged solid circles in dusty blue alternate with airy, scalloped cream medallions, and three rose clusters anchor the design at even intervals along the length. It reads as heirloom lace but is built from repeatable, well-defined pieces, which makes it far more approachable than it looks.
Expect to spend 10 to 14 hours on this piece from first stitch to final blocking, most of it in the thirteen individual motifs rather than the assembly. This is not a first-project pattern — you’ll want to be comfortable working in the round, reading standard shell and picot stitches, and managing several separate pieces before you commit to it. It’s a satisfying weekend-into-week project for someone who already has a few amigurumi or motif projects behind them and wants to build tablecloth-and-runner skills.
The finished runner is sized for a standard dining table centerpiece, roughly 85 cm long, and it holds its shape well once blocked, so it works equally well laid flat under a centerpiece or as a table topper for a console.
Materials
- DK weight cotton yarn, dusty blue ~120 g
- DK weight cotton yarn, ivory/cream ~140 g
- DK weight cotton yarn, dusty pink ~40 g
- DK weight cotton yarn, sage green ~25 g
- Small amount of mustard/gold yarn or embroidery floss for flower centers
- 3.5 mm crochet hook
- Yarn needle
- Scissors
- Stitch markers
- Spray starch or fabric stiffener for blocking the lace motifs
- Blocking mat and pins
Abbreviations
MRmagic ringchchainsl stslip stitchscsingle crochethdchalf double crochetdcdouble crochettrtreble crochetBLOback loop onlyincincrease (2 sts in same st)skskipspspacernd(s)round(s)st(s)stitch(es)Solid Circle Motif — Blue (make 7)
- Rnd 1: 6 sc in MR. (6 sts)
- Rnd 2: inc in each st around. (12 sts)
- Rnd 3: *sc BLO, inc BLO; rep from * around. (18 sts)
- Rnd 4: *sc BLO in next 2 sts, inc BLO; rep from * around. (24 sts)
- Rnd 5: *sc BLO in next 3 sts, inc BLO; rep from * around. (30 sts)
- Rnd 6: *sc BLO in next 4 sts, inc BLO; rep from * around. (36 sts)
- Rnd 7: *sc BLO in next 5 sts, inc BLO; rep from * around. (42 sts)
- Sl st to close, fasten off leaving a 20 cm tail for joining. Working BLO throughout gives the ridged, ringed texture the finished circle needs.
Lace Medallion — Cream (make 6)
- Rnd 1: ch3 (counts as first dc), 7 dc in MR, sl st to join to top of ch3. (8 sts)
- Rnd 2: ch1, 2 sc in each st around, sl st to join. (16 sts)
- Rnd 3: *ch5, sk 1 st, sl st in next st; rep from * around. (8 ch-5 loops)
- Rnd 4: in each ch-5 loop work (sc, hdc, 3 dc, hdc, sc); sl st to join after each shell. (8 shells)
- Rnd 5 (picot edge): *sl st into first sc of a shell, ch3, sl st in 3rd ch from hook to form a picot, sl st across the rest of the shell to the next loop; rep from * around all 8 shells.
- Fasten off leaving a 20 cm tail for joining. Block this motif before assembly so the picots sit open and even.
Large Rose, Base Layer — Pink (make 3)
- Rnd 1: ch2, 10 hdc in 2nd ch from hook, sl st to join. (10 sts)
- Rnd 2: *ch3, sk next st, sl st in next st; rep from * around 5 times. (5 ch-3 loops)
- Rnd 3 (petals): in each ch-3 loop work (sc, hdc, 3 dc, hdc, sc); sl st to join. (5 petals)
- Fasten off leaving a long tail for stacking and sewing.
Large Rose, Top Layer — Lighter Pink (make 3)
- Rnd 1: 6 sc in MR. (6 sts)
- Rnd 2: *ch2, sk next st, sl st in next st; rep from * around 3 times. (3 ch-2 loops)
- Rnd 3 (petals): in each ch-2 loop work (sc, hdc, dc, hdc, sc); sl st to join. (3 shorter petals)
- Fasten off leaving a tail. Center this smaller layer over the base layer, offsetting the petals, and tack in place through both layers.
- Embroider or tack a small cluster of French knots in gold yarn at the very center of each finished rose.
Leaves (make 9)
- Ch10.
- Starting in 2nd ch from hook: sl st in next ch, sc in next 3 ch, hdc in next 2 ch, dc in next 2 ch, 3 dc in last ch (the leaf tip).
- Continue down the other side of the starting chain: dc in next 2 ch, hdc in next 2 ch, sc in next 3 ch, sl st in last ch.
- Fasten off leaving a 15 cm tail for sewing. Make 3 leaves per rose cluster (9 total).
Assembly
- Block every motif first: pin the blue circles flat and the cream medallions with picots pulled open, spritz with spray starch or stiffener, and let dry fully before joining anything.
- Lay the 7 blue circles and 6 cream medallions out in an alternating S-curve on your blocking mat, overlapping each neighboring pair by about 1–1.5 cm, following the wavy layout of a finished runner.
- Working from one end to the other, whipstitch each overlap together on the wrong side using a strand of matching yarn and a yarn needle, keeping tension loose so the seam doesn’t pucker the lace.
- Stack and tack each rose (base layer, top layer, gold center) as described above, then position one rose cluster at each of the three main overlap points along the runner.
- Tuck 3 leaves under each rose, arranged around its base, and sew through all layers into the seam beneath to secure the whole cluster in one pass.
Finishing
Once every motif is joined and every rose cluster is attached, turn the runner face down and steam lightly from the back to relax any puckering along the seams — don’t press hard, just hover the iron and let the steam do the work. Re-pin the whole runner into its final curved shape on the blocking mat, checking that the picot edges of each cream medallion are open and even, and let it dry completely before unpinning. Weave in any remaining tails along the back of the seams rather than trimming them short, since motif joins are the first place a runner comes apart with handling.
Tips for Success
- Work all blue circle rounds in the back loop only — skipping this is the single biggest reason a finished circle looks flat instead of ridged like the reference photo.
- Block the cream lace medallions before you join anything. Once they’re stitched into the runner, pinning the picots open is much harder.
- Keep a consistent overlap (1–1.5 cm) between every pair of joined motifs, or the finished runner will wave unevenly instead of forming a smooth curve.
- Use a slightly smaller hook than you’d normally choose for DK weight on the solid circles — a tighter gauge keeps them from curling at the edges.
- Sew rose clusters on last, after the whole runner is blocked and dry, so you can reposition them slightly to balance the layout.
Common Mistakes to Avoid
- Forgetting to work BLO on the blue circles — if this happens partway through a motif, it’s faster to frog back to the last correct round than to try to fix the texture afterward.
- Joining motifs before blocking — unblocked lace medallions distort under seaming tension. Always block first, join second.
- Uneven overlap between motifs, which throws off the runner’s curve — dry-lay the whole piece on your blocking mat before you sew a single seam, and adjust spacing there.
- Stacking the two rose layers directly on top of each other with petals aligned — offset the top layer’s petals between the base layer’s petals so the rose reads as full and dimensional.
- Trimming yarn tails too short at motif joins — leave at least 15 cm so you have enough length to weave in securely along a seam that will see regular handling.
Ways to Customize This Pattern
- Swap the dusty blue for a deep terracotta or forest green for a fall table setting.
- Make the runner shorter (5 motifs of each type) for a narrow side table or dresser scarf.
- Replace the roses with simple 5-petal daisies in white and yellow for a more casual, everyday look.
- Use a lightweight lace-weight cotton instead of DK for a finer, more delicate finished piece — expect a smaller finished size and more rounds needed to reach the same motif diameter.
- Add a second, smaller rose cluster at each end of the runner for a fuller, more symmetrical layout.
Frequently asked questions
Yes. Add or remove one blue-and-cream motif pair at a time, keeping the alternating pattern intact, and adjust the rose cluster count so they stay evenly spaced along the new length.
This almost always means the rounds were worked through both loops instead of the back loop only. Check your BLO rounds — the ridge comes specifically from leaving the front loop unworked each round.
Yes, and this step matters more than usual here. The picot edges won’t sit open on their own, and trying to pin them flat after they’re already seamed into the runner is much harder than blocking each one individually first.
A worsted-weight cotton will work with a 4 mm hook, but expect a larger finished size overall — closer to 100 cm rather than 85 cm — since both the motifs and the roses will grow with the heavier yarn.
The finished Floral Table Runner crochet , SEA and Land vibes