Family Love Crochet Bedspread Pattern
Beginner Friendly
Perfect for those just starting their crochet journey, with clear instructions and simple techniques
Single-Day Project
A satisfying project you can complete in a single afternoon or evening.
Handmade Gift
A beautiful keepsake — free forever. Read online or print at home.
About This Family Love Crochet Bedspread Pattern
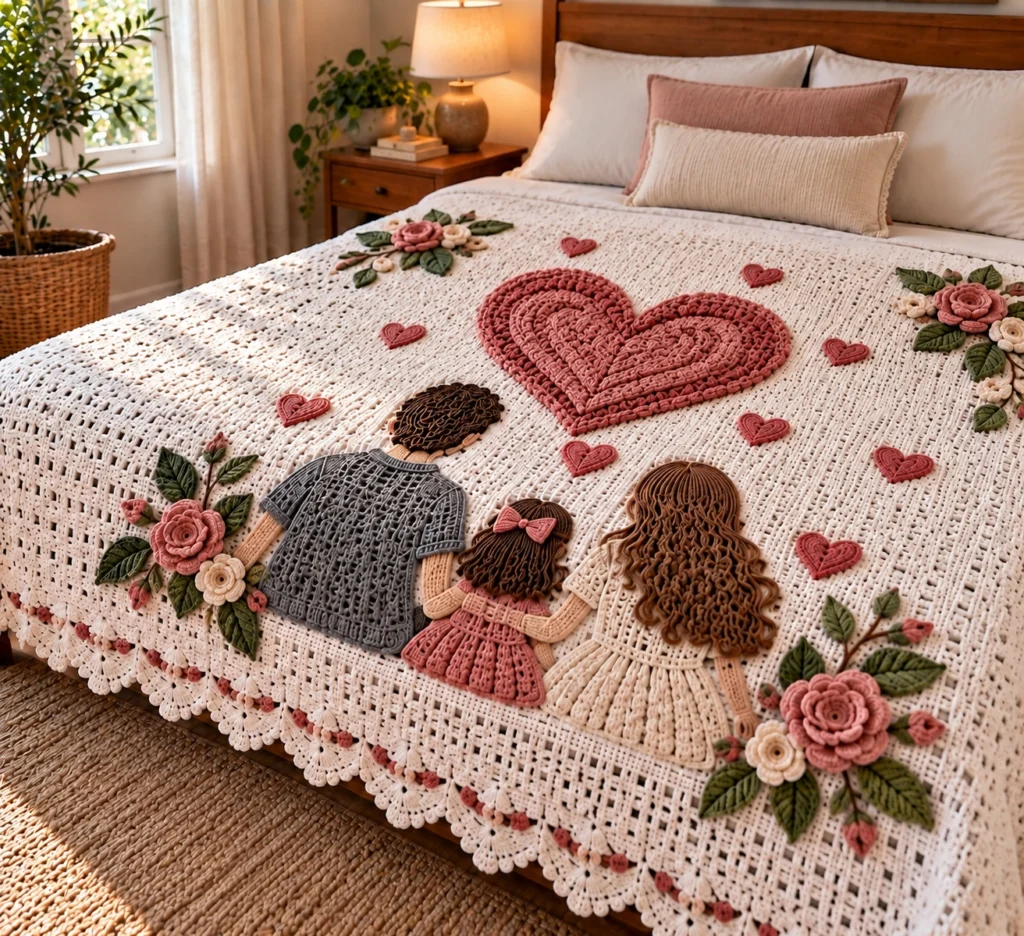
This family crochet bedspread pattern tells a small story across the top of a bed. A father in a gray sweater, a little girl in a pink dress with a bow in her hair, and a mother with long curls walk hand in hand, seen from behind, under a big layered heart. Small hearts float around them, and a spray of pink and cream roses sits in each corner. Everything rests on an open white filet mesh with a scalloped border and a row of pink bobbles.
The base is simple mesh, which makes it relaxing to work and easy to use as a grid when you place the appliqués. The appliqués are where the advanced work is: corkscrew curls and loop-stitch hair, post-stitch ribbing on the sweater, knit-look half double crochet, pleated skirts, rolled roses and layered hearts. Expect about 80 to 100 hours for the base and border and another 30 to 40 hours for the appliqués and sewing.
This pattern suits a crocheter who is comfortable with post stitches and reading stitch counts and wants a meaningful gift: a wedding or anniversary present, or a bedspread for a family’s first home. The figures are easy to change, so you can match hair colors and add or remove family members.
Materials
- DK cotton, Color A, white about 1300 g, for the base and border
- DK cotton, Color B, ivory about 200 g, for the mother’s dress, cream roses and girl’s belt
- DK cotton, Color C1, dusty rose about 200 g, for the large heart, small hearts, girl’s dress, rosebuds and border bobbles
- DK cotton, Color C2, rose pink about 120 g, for the middle heart layer, large roses and bow
- DK cotton, Color C3, light pink about 50 g, for the inner heart layer
- DK cotton, Color D, medium gray about 100 g, for the father’s sweater
- DK cotton, Color E, dark brown about 100 g, for the father’s and girl’s hair
- DK cotton, Color F, light tan about 50 g, for the hands, arms, neck and ears
- DK cotton, Color G, caramel brown about 100 g, for the mother’s hair
- DK cotton, Color H, sage green about 150 g, for leaves, sepals and stems
- 4 mm crochet hook for the base and border
- 3.5 mm crochet hook for all appliqués
- Stitch markers
- Tapestry needle and sewing pins
- Scissors
Abbreviations
MRmagic ringchchainsl stslip stitchscsingle crochethdchalf double crochethdc-3Lhdc worked into the third loop (the horizontal bar behind the back loop), for a knit lookdcdouble crochettrtreble crochetinc2 sc in the same stitchsc2togsingle crochet 2 togethersc3togsingle crochet 3 togetherhdc2toghalf double crochet 2 togetherfpdcfront post double crochetbpdcback post double crochetBLOback loop onlylp stloop stitch: wrap yarn over a finger, insert hook, catch both strands, pull through, yo and pull through all loops; the loop forms on the side away from youV-st(dc, ch 1, dc) in the same stitchbobble(yo, insert hook, pull up a loop, yo, pull through 2) 4 times in the same st, yo, pull through all 5 loopsskskipspspacest(s)stitch(es)RS / WSright side / wrong sideBlanket Base
- With A and the 4 mm hook, ch 404.
- Row 1: Dc in 6th ch from hook (the skipped chs count as a dc and a ch-1 sp), (ch 1, sk 1 ch, dc in next ch) across. (200 mesh squares)
- Rows 2-230: Ch 4 (counts as dc and ch 1), turn, sk first ch-1 sp, dc in next dc, (ch 1, sk next ch-1 sp, dc in next dc) across, working the last dc into the top of the turning ch. (200 mesh squares)
- Fasten off. The base measures about 200 x 230 cm. Row 1 sits at the foot of the bed.
Border
- Round 1: With RS facing, join A at any corner. Ch 1, work 2 sc in each ch-1 sp along the short edges (400 sc per short edge), 2 sc around each row-end post along the long edges (460 sc per long edge), and 3 sc in each corner. Join with a sl st to the first sc. (402 sts between corner sts on each short side, 462 on each long side)
- Round 2: Join C1 in any corner st. (Bobble, ch 2, bobble) in the corner st, *(ch 1, sk 1, bobble in next st) along the side to the next corner st, ch 1, (bobble, ch 2, bobble) in the corner st*; repeat around and join with a sl st to the first bobble. (201 bobbles and 202 ch-1 sps along each short side, 231 bobbles and 232 ch-1 sps along each long side) Fasten off C1.
- Round 3: Join A in any corner ch-2 sp. *9 dc in the corner ch-2 sp, (sc in next ch-1 sp, 5 dc in next ch-1 sp) to the last 2 ch-1 sps of the side, sc in next ch-1 sp, sk last ch-1 sp*; repeat around and join with a sl st to the first dc. (100 shells on each short side, 115 on each long side, plus 4 corner shells)
- Round 4: With A, sl st in each st around, working (sl st, ch 3, sl st) in the 3rd dc of each side shell and the 5th dc of each corner shell. Join and fasten off.
Large Layered Heart
- Use the 3.5 mm hook for all appliqués. Every heart starts at the bottom point and is worked in rows. Ch 1 at the start of each row does not count as a stitch.
- Outer layer (C1), Row 1: Ch 2, 3 sc in 2nd ch from hook. (3)
- Rows 2-40: Ch 1, turn, 2 sc in first st, sc across to last st, 2 sc in last st. (Each row adds 2 sts; Row 40 has 81 sts)
- Rows 41-50: Ch 1, turn, sc across. (81)
- First lobe, Row 51: Ch 1, turn, sc in next 40 sts, leave the rest unworked. (40)
- Rows 52-57: Ch 1, turn, sc across. (40)
- Rows 58-63: Ch 1, turn, sc2tog, sc across to last 2 sts, sc2tog. (38, 36, 34, 32, 30, 28)
- Rows 64-67: Ch 1, turn, sc2tog twice, sc across to last 4 sts, sc2tog twice. (24, 20, 16, 12) Fasten off.
- Second lobe: Sk the center st of Row 50, join C1 in the next st, ch 1, sc in the same st and next 39 sts. (40) Repeat Rows 52-67.
- Edging: Ch 1, sc evenly around the whole heart, working 3 sc in the bottom point and sc3tog at the center dip. Join and fasten off. (About 40 cm wide and 33 cm tall)
- Middle layer (C2): Work Row 1 as above. Rows 2-28: increase as above. (Row 28 has 57 sts) Rows 29-35: sc across. (57) First lobe, Row 36: sc in next 28 sts. (28) Rows 37-40: sc across. (28) Rows 41-44: sc2tog at both ends. (26, 24, 22, 20) Rows 45-46: sc2tog twice at both ends. (16, 12) Fasten off. Sk the center st, work the second lobe the same way, then work the edging.
- Inner layer (C3): Work Row 1 as above. Rows 2-16: increase as above. (Row 16 has 33 sts) Rows 17-20: sc across. (33) First lobe, Row 21: sc in next 16 sts. (16) Rows 22-23: sc across. (16) Rows 24-26: sc2tog at both ends. (14, 12, 10) Row 27: sc2tog twice at both ends. (6) Fasten off. Sk the center st, work the second lobe the same way, then work the edging.
Small Hearts (make 10)
- With C1, Row 1: Ch 2, 3 sc in 2nd ch from hook. (3)
- Rows 2-8: Ch 1, turn, 2 sc in first st, sc across to last st, 2 sc in last st. (Row 8 has 17 sts)
- Rows 9-10: Ch 1, turn, sc across. (17)
- First lobe, Row 11: Ch 1, turn, sc in next 8 sts. (8) Row 12: sc across. (8) Rows 13-14: sc2tog, sc across to last 2 sts, sc2tog. (6, 4) Fasten off.
- Second lobe: Sk the center st, join in the next st and work Rows 11-14 the same way.
- Edging: Ch 1, sc evenly around, with 3 sc in the bottom point and sc3tog at the center dip. Join and fasten off.
- With C2, surface sl st a heart outline two stitches in from the edge. (Each heart is about 8 cm wide)
Father
- Sweater (D), Row 1: Ch 51, dc in 4th ch from hook and each ch across. (49; the skipped ch-3 counts as a st)
- Rows 2-3 (ribbing): Ch 2 (does not count), turn, fpdc in first st, (bpdc in next st, fpdc in next st) across, working the last st into the top of the turning ch. On Row 3, work each st the way it faces you so the ribs stay raised on the RS. (49)
- Row 4: Ch 1, turn, hdc in each st across. (49)
- Rows 5-28: Ch 1, turn, hdc-3L in each st across. (49)
- Rows 29-32 (shoulders): Ch 1, turn, hdc2tog, hdc-3L across to last 2 sts, hdc2tog. (47, 45, 43, 41)
- Rows 33-34: Ch 1, turn, hdc-3L across. (41) Fasten off.
- Sleeves (D, make 2), Row 1: Ch 17, dc in 4th ch from hook and each ch across. (15) Row 2: work ribbing as for the sweater. (15) Row 3: Ch 1, turn, hdc across. (15) Row 4: Ch 1, turn, 2 hdc-3L in first st, hdc-3L across to last st, 2 hdc-3L in last st. (17) Rows 5-7: hdc-3L across. (17) Row 8: increase as in Row 4. (19) Rows 9-12: hdc-3L across. (19) Fasten off.
- Arms (F, make 2), worked in continuous rounds: Round 1: 6 sc in MR. (6) Round 2: inc in each st. (12) Round 3: (sc in next 3 sts, inc) 3 times. (15) Rounds 4-6: sc around. (15) Round 7: (sc in next 3 sts, sc2tog) 3 times. (12) Rounds 8-24: sc around. (12) For the arm that reaches for the girl’s hand, continue to Round 30. Fasten off. Do not stuff; flatten with the hand at the closed end.
- Neck (F), Row 1: Ch 9, sc in 2nd ch from hook and each ch across. (8) Rows 2-6: Ch 1, turn, sc across. (8) Fasten off.
- Ears (F, make 2): Ch 1 into a MR, work 5 hdc in the ring, pull closed and do not join. (5) Fasten off.
- Head and hair (E), worked in continuous rounds. Odd rounds use sc and even rounds use lp st, so the curls form on the side away from you, which is the RS. Round 1: 6 sc in MR. (6) Round 2: 2 lp st in each st. (12) Round 3: (sc in next st, 2 sc in next st) 6 times. (18) Round 4: (lp st in next 2 sts, 2 lp st in next st) 6 times. (24) Rounds 5-11: continue alternating sc and lp st rounds, with one more st between increases each round. (30, 36, 42, 48, 54, 60, 66) Sl st to join and fasten off.
Girl
- Dress bodice (C1), Row 1: Ch 22, sc in 2nd ch from hook and each ch across. (21) Rows 2-10: Ch 1, turn, sc across. (21) Fasten off C1.
- Belt (B), Rows 11-12: Ch 1, turn, sc in BLO across. (21) Fasten off B.
- Skirt (C1), Row 13: Join C1, ch 2 (does not count; same for every skirt row), (dc in next st, 2 dc in next st) 10 times, dc in last st. (31)
- Row 14: Ch 2, turn, dc across. (31)
- Row 15: Ch 2, turn, (dc in next 4 sts, 2 dc in next st) 6 times, dc in last st. (37)
- Rows 16-22 (pleats): Ch 2, turn, (fpdc in next st, dc in next 2 sts) 12 times, fpdc in last st. (37) Keep the pleat ridges raised on the RS: work fpdc around them on RS rows and bpdc around them on WS rows.
- Row 23: Ch 1, turn, sc across. (37) Fasten off.
- Puff sleeves (C1, make 2): Ch 2 into a MR (does not count), 7 dc in the ring, pull closed and do not join. (7) Fasten off.
- Arms (F, make 2), worked in continuous rounds: Round 1: 6 sc in MR. (6) Round 2: (sc in next st, inc) 3 times. (9) Round 3: (sc in next 2 sts, inc) 3 times. (12) Rounds 4-5: sc around. (12) Round 6: (sc in next 2 sts, sc2tog) 3 times. (9) Rounds 7-18: sc around. (9) Fasten off. Do not stuff; flatten.
- Head and hair (E), Round 1: 6 sc in MR. (6) Rounds 2-8: increase 6 sts each round. (12, 18, 24, 30, 36, 42, 48) Do not fasten off.
- Hair panel, Row 9: Ch 1, sc in next 24 sts, turn, leaving the rest unworked. (24) Row 10: Ch 1, sc across. (24) Row 11: Ch 1, turn, 2 sc in first st, sc across to last st, 2 sc in last st. (26) Rows 12-13: sc across. (26) Row 14: increase as in Row 11. (28) Rows 15-16: sc across. (28) Row 17: increase as in Row 11. (30) Row 18: sc across. (30) Do not fasten off.
- Corkscrew curls: Working along the bottom edge of Row 18 and the side edges of Rows 15-18, *ch 16, 2 sc in 2nd ch from hook and each ch across (30 sts; the strip twists into a spiral), sl st to the edge, sl st in next 2 sts*. Repeat until you have 10 curls. Fasten off.
- Bow (C2), Row 1: Ch 13, sc in 2nd ch from hook and each ch across. (12) Rows 2-6: Ch 1, turn, sc across. (12) Fasten off with a long tail and wrap the tail tightly around the center 8 times to pinch it into a bow.
Mother
- Dress bodice (B), Row 1: Ch 32, sc in 2nd ch from hook and each ch across. (31) Rows 2-16: Ch 1, turn, sc across. (31)
- Waistband, Rows 17-18: Ch 1, turn, sc in BLO across. (31)
- Skirt, Row 19: Ch 2 (does not count; same for every skirt row), turn, (dc in next st, 2 dc in next st) 15 times, dc in last st. (46)
- Row 20: Ch 2, turn, dc across. (46)
- Row 21: Ch 2, turn, (dc in next 4 sts, 2 dc in next st) 9 times, dc in last st. (55)
- Rows 22-34 (pleats): Ch 2, turn, (fpdc in next st, dc in next 2 sts) 18 times, fpdc in last st. (55) Keep the ridges raised on the RS as for the girl’s skirt.
- Row 35: Ch 1, turn, sc across. (55) Fasten off.
- Arms (make 2), worked in continuous rounds: With F, Round 1: 6 sc in MR. (6) Round 2: inc in each st. (12) Round 3: (sc in next 3 sts, inc) 3 times. (15) Rounds 4-5: sc around. (15) Round 6: (sc in next 3 sts, sc2tog) 3 times. (12) Change to B. Round 7: sc in BLO around for the cuff edge. (12) Round 8: (sc in next 3 sts, inc) 3 times. (15) Rounds 9-30: sc around. (15) Fasten off. Do not stuff; flatten.
- Head and hair (G), Round 1: 6 sc in MR. (6) Rounds 2-9: increase 6 sts each round. (12, 18, 24, 30, 36, 42, 48, 54) Do not fasten off.
- Hair panel, Row 10: Ch 1, sc in next 27 sts, turn, leaving the rest unworked. (27) Rows 11-12: Ch 1, sc across. (27) Row 13: Ch 1, turn, 2 sc in first st, sc across to last st, 2 sc in last st. (29) Rows 14-16: sc across. (29) Row 17: increase. (31) Rows 18-20: sc across. (31) Row 21: increase. (33) Rows 22-24: sc across. (33) Row 25: increase. (35) Rows 26-28: sc across. (35) Row 29: increase. (37) Row 30: sc across. (37) Do not fasten off.
- Corkscrew curls: Along the bottom edge and the side edges of Rows 22-30, *ch 26, 2 sc in 2nd ch from hook and each ch across (50 sts), sl st to the edge, sl st in next 2 sts*. Repeat until you have 16 curls. Fasten off.
- Extra volume: Make 8 loose corkscrews (ch 21, then 2 sc in 2nd ch from hook and each ch across, 40 sts) and sew them over Rows 20-30 of the panel so the hair looks full and wavy.
Roses, Buds and Leaves (make 4 sprays)
- Each spray uses 1 large rose, 1 cream rose, 3 rosebuds with sepals, 5 large leaves, 3 small leaves and 2 stems.
- Large rose (C2), Row 1: Ch 41, V-st in 5th ch from hook, (sk 2 ch, V-st in next ch) 12 times. (13 V-sts)
- Row 2: Ch 3 (counts as dc), turn, 6 dc in first V-st sp, (sc in next V-st sp, 7 dc in next V-st sp) 3 times, (sc in next V-st sp, 9 tr in next V-st sp) 3 times. (7 petals, 6 sc) Fasten off with a long tail. Roll from the small-petal end into a rose and stitch through the base to hold it.
- Cream rose (B), Row 1: Ch 35, V-st in 5th ch from hook, (sk 2 ch, V-st in next ch) 10 times. (11 V-sts) Row 2: Ch 3 (counts as dc), turn, 6 dc in first V-st sp, (sc in next V-st sp, 7 dc in next V-st sp) 2 times, (sc in next V-st sp, 7 tr in next V-st sp) 3 times. (6 petals, 5 sc) Fasten off and roll as above.
- Rosebud (C1), Row 1: Ch 17, V-st in 5th ch from hook, (sk 2 ch, V-st in next ch) 4 times. (5 V-sts) Row 2: Ch 3 (counts as dc), turn, 6 dc in first V-st sp, (sc in next V-st sp, 7 dc in next V-st sp) 2 times. (3 petals, 2 sc) Fasten off and roll tightly.
- Sepal (H): Ch 1 into a MR, (ch 4, sl st in 2nd ch from hook, sc in next 2 ch, sl st in ring) 5 times. (5 points) Pull closed and sew under a rosebud with the points wrapping up its sides.
- Large leaf (H): Ch 13. Sc in 2nd ch from hook, hdc in next ch, dc in next 2 ch, tr in next 4 ch, dc in next 2 ch, sc in next ch. (11) Work (sc, ch 2, sc) in the last ch for the tip. Working along the other side of the chain: sc in next ch, dc in next 2 ch, tr in next 4 ch, dc in next 2 ch, hdc in next ch, sc in next ch. (11) Sl st to the first sc and fasten off. Surface sl st a vein down the center.
- Small leaf (H): Ch 9. Sc in 2nd ch from hook, hdc in next ch, dc in next ch, tr in next 2 ch, dc in next ch, sc in next ch. (7) Work (sc, ch 2, sc) in the last ch. Along the other side: sc in next ch, dc in next ch, tr in next 2 ch, dc in next ch, hdc in next ch, sc in next ch. (7) Sl st to the first sc and fasten off.
- Stem (H): Ch 25, sl st in the back bump of each ch across. (24) Fasten off.
Layout and Placement
- Lay the base RS up with Row 1 at the foot of the bed. Count mesh columns 1 to 200 from left to right and rows 1 to 230 from the foot. Each square is about 1 cm.
- Father: sweater hem along Row 45, covering columns 56-82. Neck centered at column 69 above the shoulders, head over the top of the neck with its bottom edge 2 cm into the sweater, ears on either side of the head at mid-height. Tuck the top of each arm under a sleeve and sew the sleeves at the shoulders, angling the reaching arm toward the girl.
- Girl: dress hem along Row 45, covering columns 87-105. Puff sleeves at the top corners of the bodice, arms tucked underneath, head and hair over the top of the bodice, bow at the top left of the head.
- Mother: dress hem along Row 45, covering columns 110-140. Arms at the top corners of the bodice, head and hair panel over the bodice and top of the skirt, with the curls falling across the waistband.
- Hands: overlap the girl’s hands with the father’s reaching hand and the mother’s nearest hand.
- Large heart: bottom point at Row 125, centered on column 112. Stack the middle layer on the outer layer, leaving an even border, then the inner layer on top.
- Small hearts, centered at (column, row): (48, 112), (62, 140), (80, 168), (100, 108), (126, 112), (148, 98), (160, 122), (152, 150), (142, 176), (100, 182).
- Rose sprays, centered at (column, row): (35, 65), (165, 55), (55, 205) and (170, 195). Arrange the stems first, then the leaves, then the roses and buds on top.
Finishing
Pin every appliqué in place before you sew anything, then step back and look at the whole bed. It is much easier to move a heart a few squares now than after it is stitched down. Sew each piece with a matching color and a tapestry needle, working small whipstitches through the edge of the appliqué and around the nearest mesh post. Keep the stitches snug but not tight, so the mesh underneath doesn’t pucker.
Sew the layered pieces from the bottom up: arms before sleeves, dress before hair, stems and leaves before roses. On the hair, stitch the panel down along its edges and leave the corkscrews loose below the first few stitches so they move. Embroider finger lines on the hands with a split strand of E. When everything is sewn on, weave in the remaining ends on the WS, lightly steam the base from the back without pressing the appliqués flat, and lay it on the bed.
Tips for Success
- Put a removable marker every 25 squares along the first row and every 25 rows along one edge as you go. Those markers make it much faster to find placement coordinates later.
- Wash a small swatch of each pink and brown with a white scrap before you start. Red and brown cottons sometimes bleed, and the base is white.
- Crochet the loop-stitch hair a little loosely and keep the loops the same length by wrapping the yarn over the same finger every time. If some loops pull short, tug them gently from the RS once the round is done.
- Make corkscrews over a pencil-thin tension: 2 sc in every chain is what forces the twist, so do not skip any chains, and let each curl hang for a minute before you count it.
- Work the appliqués with the smaller 3.5 mm hook. A firmer fabric holds its shape on top of the open mesh and does not sag into the holes.
Common Mistakes to Avoid
- Losing a mesh square at the end of rows. If your row has 199 or 201 squares, you missed or added the dc into the turning chain. Count squares every 10 rows; ripping 10 rows of mesh is far easier than ripping 100.
- Flat or uneven pleats. If the skirt ridges sink on one side, you used fpdc on a WS row. On WS rows, work bpdc around the ridge stitches so they stay raised on the RS.
- Wavy border. If Round 3 ruffles, Round 1 has too many stitches along the edges. Recount to 400 sc per short edge and 460 per long edge before you start the bobbles.
- Lumpy heart lobes. If one lobe is taller than the other, you did not skip the center stitch before joining the second lobe. Both lobes must start with 40, 28 or 16 stitches.
- Sewing the figures too high. The family should sit close to the foot of the bed so the heart has room above them. Measure from Row 45 rather than eyeballing it.
Ways to Customize This Pattern
- Change the family. Add a son by making the father’s sweater pattern with 31 starting stitches and the girl’s arm pattern, or add a second daughter in another dress color.
- Match hair to the real family: use blond, black or red yarn and switch between corkscrews for curly hair and plain sc rows for straight hair.
- Make a throw-size version. Chain 254 for 125 squares and work 150 rows, then place the figures and heart with the same spacing and use two rose sprays instead of four.
- Embroider names or a date in backstitch under the heart, using C1 and the mesh as a guide for even letter spacing.
- Swap the palette to sage, lavender and cream for a softer nursery bedspread.
Frequently asked questions
Yes. The family, heart and roses can be sewn onto a ready-made blanket, a pillow cover or a framed canvas. Just keep the background a lighter color than the figures so they stand out.
Sew through the mesh posts, not the chain spaces, and leave the stitches slightly relaxed. If you lay the base flat on the bed while you pin and sew, the appliqués will sit exactly where they will when the bed is made.
A back view needs no faces, so every family member looks right without careful embroidery, and it gives the scene the feeling of a family walking together toward the heart. It also makes it easy to personalize with hair color alone.
Hand wash in cool water or use a gentle machine cycle in a large laundry bag, then dry flat. The corkscrew curls and rolled roses hold their shape best when they are not tumble dried.
The finished Family Love Crochet Bedspread Pattern