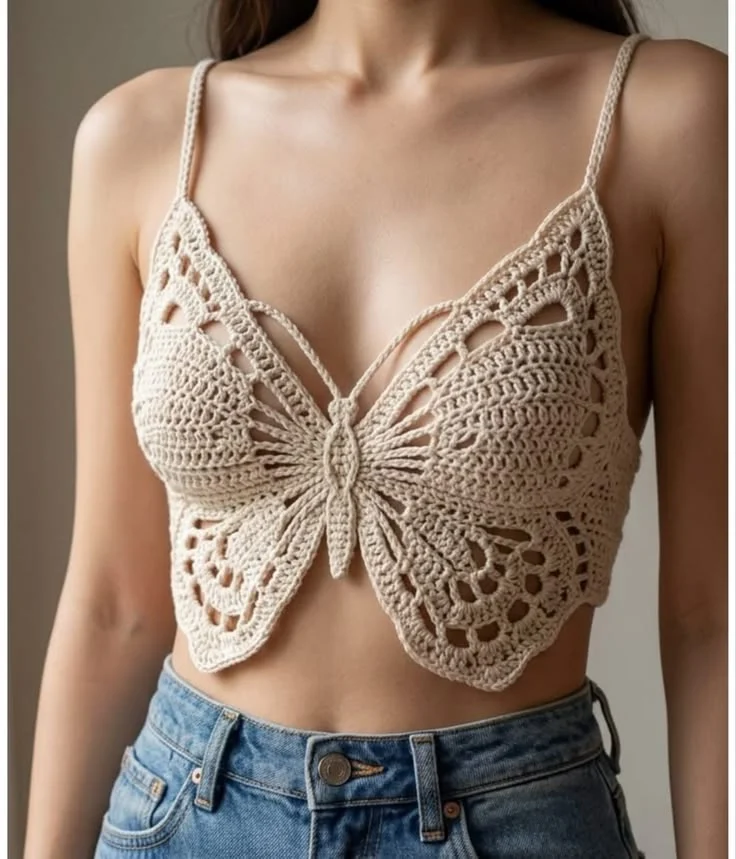
Crochet beige Butterfly top
Beginner Friendly
Perfect for those just starting their crochet journey, with clear instructions and simple techniques
Single-Day Project
A satisfying project you can complete in a single afternoon or evening.
Handmade Gift
A beautiful keepsake — free forever. Read online or print at home.
About This Crochet beige Butterfly top
The Papillon Bralette turns a single crochet motif into a wearable top: two mirrored butterfly wings meet at a solid center body, with lace bands radiating out from a dense inner panel just like real wing veining. It’s the kind of piece that looks complicated on a hanger and then makes total sense once you see how the granny-triangle base builds outward into open shell lace.
Expect to spend most of your time on the wing panels — each one is worked in solid rounds first, then transitions into taller lace stitches and a picot edge, so the increases and stitch heights both have to line up. Budget 8-10 hours total if you’re comfortable with filet-style increases and shell stitches; this isn’t a first-project pattern.
This one is best for someone who already has a few granny motifs or doily projects under their belt and wants to apply that same skill set to a garment. The reward is a top that fits close to the body without a single row of plain single crochet in sight.
Materials
- DK weight cotton yarn, ecru/cream ~250 m (270 yds)
- DK weight cotton yarn, light taupe (for center body accent) ~10 m (11 yds)
- 3 mm (US C/2-D/3) crochet hook
- Tapestry needle
- Stitch markers 4-6
- Sewing pins for blocking and assembly
Abbreviations
chchainsl stslip stitchscsingle crochethdchalf double crochetdcdouble crochettrtreble crochetspspacepicotch 3, sl st in first ch of the 3shell(2 dc, ch 1, 2 dc) in same st/spMRmagic ringst(s)stitch(es)Right Upper Wing (Cup Panel) — make 1
- With cream, ch 6, join with sl st to form a ring.
- Round 1: Ch 3 (counts as first dc), 2 dc in ring, [ch 2, 3 dc in ring] twice, ch 2, join with sl st to top of ch-3. (9 dc, 3 corner ch-2 sps)
- Round 2: Sl st into corner sp, ch 3, (2 dc, ch 2, 3 dc) in same corner sp, dc in each dc across to next corner, *(3 dc, ch 2, 3 dc) in corner sp, dc in each dc across to next corner; repeat from * once more, join. (21 dc, 3 corner ch-2 sps)
- Round 3: Repeat Round 2’s increase pattern, working dc in each dc between corners. (33 dc, 3 corner ch-2 sps)
- Round 4: Repeat once more, working dc in each dc between corners. (45 dc, 3 corner ch-2 sps) This completes the solid center of the wing.
- Round 5 (lace transition): Join taupe in one corner sp. Ch 4 (counts as tr), tr in same sp, ch 1, skip 2 dc, [tr, ch 1, skip 2 dc] across to next corner, (tr, ch 2, tr) in corner sp; repeat around remaining two sides, join to top of ch-4. Fasten off taupe.
- Round 6 (shell lace): Join cream in any ch-1 sp. Ch 1, sc in same sp, *ch 3, shell in next ch-1 sp, ch 3, sc in next ch-1 sp; repeat from * around, working (shell, ch 2, shell) in each corner ch-2 sp to keep the point sharp, join with sl st.
- Round 7 (picot edge): Sl st to nearest shell ch-1 sp, ch 1, sc in same sp, ch 3, picot, ch 3, sc in next ch-1 sp; repeat around all shells, join and fasten off, weaving in the tail along the top strap edge (this edge will hold the strap and underbust tie).
Left Upper Wing (Cup Panel) — make 1
- Work exactly as the Right Upper Wing, Rounds 1-7.
- Do not fasten off the final round’s tail as tightly — leave a 25 cm tail here instead, since this edge will be sewn to the butterfly body first before the right wing is added.
Lower Wings — make 2 (mirror pair)
- With cream, ch 4, join with sl st to form a ring.
- Round 1: Ch 3, 2 dc in ring, [ch 2, 3 dc] twice, ch 2, join. (9 dc, 3 corners)
- Round 2: Increase as for the upper wing (3 dc, ch 2, 3 dc in each corner, dc between). (21 dc, 3 corners)
- Round 3: Increase once more. (33 dc, 3 corners) This is the full solid center for the smaller lower wing.
- Round 4 (lace transition): Join taupe, work tr/ch-1 mesh exactly as Round 5 of the upper wing, all three sides.
- Round 5 (shell lace): Cream, work shells in each ch-1 sp as in Round 6 of the upper wing.
- Round 6 (picot edge): Finish with the same picot edging as the upper wing, join and fasten off, leaving a 20 cm tail on the top point of each lower wing for attaching to the body.
Butterfly Body (Center Connector)
- With taupe, work 2 sc in MR. (2 sts)
- Round 1: 2 sc in each st around. (4 sts)
- Round 2: [sc, 2 sc in next st] twice. (6 sts)
- Rounds 3-8: Sc in each st around, working even (no increases) — this forms the elongated oval body. (6 sts each round)
- Round 9: [sc2tog, sc] twice. (4 sts)
- Round 10: sc2tog twice. (2 sts) Fasten off, leaving a long tail, and stuff very lightly with a pinch of yarn scraps (not full stuffing) just enough to keep the oval’s shape — this piece stays flat against the skin, not rounded.
- Antennae (make 2): With taupe, ch 12, sl st in 2nd ch from hook and in each ch across to curl the chain into a tight coil, fasten off leaving a 10 cm tail for attaching to the top of the body.
Straps and Underbust Ties
- Straps (make 2): With cream, ch 90 (adjust length to fit your torso, checking against your own shoulder-to-cup measurement before fastening off), sl st in 2nd ch from hook and in each ch across to form a firm corded strap, fasten off.
- Underbust tie (make 2, one per side): With cream, ch 60, work the same sl-st-back technique as the straps to create a thin tie that will run from the outer point of each upper wing around to the center back.
- Neck tie (make 1, optional halter finish): With cream, ch 70 worked the same way, for tying behind the neck instead of over-the-shoulder straps if you prefer a halter silhouette.
Finishing
Block all five motifs (2 upper wings, 2 lower wings, 1 body) before assembly — pin out the points firmly so the lace opens up fully and matches on both sides. Once dry, lay the pieces out to check the mirrored pair line up before you sew a single stitch.
Using the long tail on the left upper wing, whipstitch the inner point of the left upper wing to the left side of the butterfly body, matching the top edges so the strap can run continuously from wing tip to wing tip. Repeat on the right side with the right upper wing. Attach each lower wing below its matching upper wing at the body, angling it slightly outward as in the reference photo so the four wings fan out from the center.
Tack the coiled antennae to the top of the body so they curve upward and slightly outward. Sew one strap to the top outer point of each upper wing; try the piece on before fastening the other ends so you can set your own strap length, then tie or sew them to a back band or crossed X at your preference. Attach the underbust ties to the lower-outer edge of each upper wing and tie them at center back to close the underbust line.
Tips for Success
- Work the transition round (solid dc to tr mesh) loosely — if your tension tightens here the lace will cup instead of lying flat.
- Use stitch markers on the three corner ch-2 spaces from Round 1 onward; on a triangle motif it’s very easy to lose track of which corner is next after a few rounds.
- Make both lower wings back-to-back rather than one after the other — it keeps your gauge consistent between the mirror pair.
- Steam-block rather than wet-block if you’re short on time; cotton lace opens up almost as well and dries in minutes.
- Try the two upper wing panels on (unassembled, just held up) before attaching the body, to confirm placement matches your own bust point.
Common Mistakes to Avoid
- Skipping a corner increase in Rounds 2-4: recount your 3 corner ch-2 sps after every round of the upper wing before moving on, since a missed corner flattens the triangle point.
- Making the underbust ties too short to actually reach center back: measure around your ribcage before cutting the ch-60 foundation and lengthen if needed.
- Over-stuffing the butterfly body: this piece sits flat against the sternum, so a fully stuffed oval will poke forward instead of lying flush.
- Joining the lace shells with a tight join stitch: use a slip stitch pulled to the same height as the surrounding stitches, or the shell round will pucker at the seam.
- Attaching both lower wings at the same angle as the upper wings: the reference shape has the lower wings angled outward more sharply, so check the photo before sewing them down.
Ways to Customize This Pattern
- Swap the taupe accent for a metallic thread on the mesh transition round for an evening-wear version.
- Work the whole piece in fingering weight with a 2 mm hook for a finer, more delicate lace density.
- Add a third, smallest wing tier below the current lower wings for a fuller butterfly silhouette.
- Replace the tie closures with a hook-and-eye or clasp at center back for a faster on/off.
- Work the upper wings one round taller before the lace transition for more coverage.
Frequently asked questions
It’s a lightweight, unlined bralette top — cotton lace has some structure but no built-in support like underwire or elastic. It suits smaller busts or layering over another top best.
Yes — work one or two extra solid rounds (Round 4’s dc pattern) before switching to the lace transition for a larger cup, or stop after Round 3 for a smaller one, adjusting the lace rounds’ stitch count to match the new number of dc.
Count your rounds out loud or log them on paper as you go, and block both panels side by side at the end rather than one after the other, so any small tension differences even out together.
Cotton is recommended because it holds a crisp blocked shape and doesn’t stretch out of shape against skin the way acrylic can; if you substitute, choose a yarn with minimal stretch and block firmly.
The finished Crochet beige Butterfly top