Creamy Flat Leaf Table Runner
Beginner Friendly
Perfect for those just starting their crochet journey, with clear instructions and simple techniques
Single-Day Project
A satisfying project you can complete in a single afternoon or evening.
Handmade Gift
A beautiful keepsake — free forever. Read online or print at home.
About This Creamy Flat Leaf Table Runner
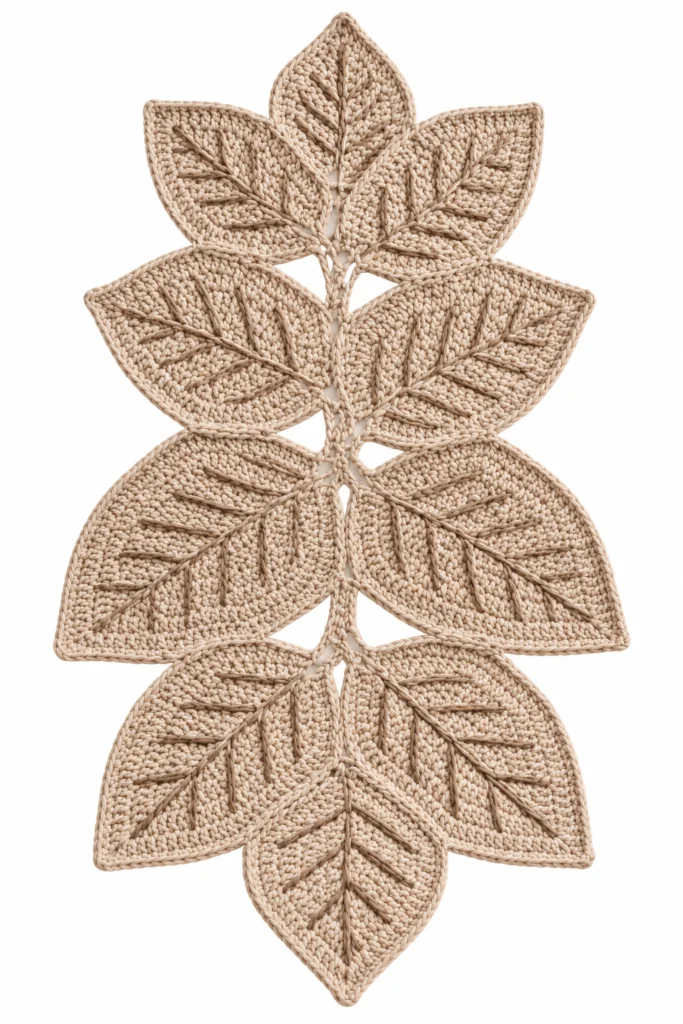
This crochet leaf mat pattern turns ten small leaves into one long, graceful table runner. Each leaf is worked in tight single crochet around a foundation chain, finished with a pale twisted edge and embroidered with darker veins. The leaves are then sewn in pairs along a corded center stem so they overlap like a branch in full growth.
What makes this design distinctive is the repetition of one simple leaf shape in three sizes. Once you understand the small leaf, the medium and large ones follow the same logic with a longer starting chain. The color work is quiet: a sand body, a cream border and stem, and a mocha vein. Together they give the runner an organic, woven-basket look.
Plan on 12 to 16 hours, including the embroidery and assembly. It is an advanced project because of the shaped increases, the three-color finishing, and the careful layout of the leaves. It suits crocheters who are comfortable working tight stitches in the round and who enjoy a long, calm project they can pick up in short sessions.
Materials
- Worsted cotton yarn, Sand about 350 m / 380 yd
- Worsted cotton yarn, Cream about 120 m / 130 yd
- Worsted cotton yarn, Mocha about 40 m / 45 yd
- 3.0 mm crochet hook use a smaller hook if your fabric is loose
- Yarn needle
- Stitch markers at least 2
- Scissors
- Blocking mat and pins optional but recommended
Abbreviations
chchainsl stslip stitchscsingle crochetinc2 sc in the same stitchrev screverse single crochet (worked left to right)st(s)stitch(es)Bbase end of the leaf (first 3 stitches of R1)Ttip end of the leafS1 / S2first and second side of the leafLarge Leaf (make 4)
- With Sand, ch 25. R1: 3 sc in the 2nd ch from hook (this is B). Sc in the next 22 chs (S1). 3 sc in the last ch (T). Turn and work 22 sc in the free loops of the chain (S2). Do not join; place a marker. (50)
- R2: B: inc in each of 3 sts (6). S1: [sc in next 10, inc] x2 (24). T: sc, 3 sc in the center st, sc (5). S2: [sc in next 10, inc] x2 (24). (59)
- R3: B: [sc, inc] x3 (9). S1: [sc in next 11, inc] x2 (26). T: sc in next 2, 3 sc in the center st, sc in next 2 (7). S2: [sc in next 11, inc] x2 (26). (68)
- R4: B: [sc in next 2, inc] x3 (12). S1: [sc in next 12, inc] x2 (28). T: sc in next 3, 3 sc in the center st, sc in next 3 (9). S2: [sc in next 12, inc] x2 (28). (77)
- R5: B: [sc in next 3, inc] x3 (15). S1: [sc in next 13, inc] x2 (30). T: sc in next 4, 3 sc in the center st, sc in next 4 (11). S2: [sc in next 13, inc] x2 (30). (86)
- R6: B: sc in each of 15 sts. S1: sc in each of 30 sts. T: sc in next 5, 3 sc in the center st, sc in next 5 (13). S2: sc in each of 30 sts. (88)
- Sl st in the next st and fasten off Sand. Join Cream with a sl st in any st. Ch 1, rev sc in each st around. Sl st to the first rev sc and fasten off. Weave in the ends.
Medium Leaf (make 4)
- With Sand, ch 19. R1: 3 sc in the 2nd ch from hook (B). Sc in the next 16 chs (S1). 3 sc in the last ch (T). Turn and work 16 sc in the free loops (S2). Place a marker. (38)
- R2: B: inc in each of 3 sts (6). S1: [sc in next 7, inc] x2 (18). T: sc, 3 sc in the center st, sc (5). S2: [sc in next 7, inc] x2 (18). (47)
- R3: B: [sc, inc] x3 (9). S1: [sc in next 8, inc] x2 (20). T: sc in next 2, 3 sc in the center st, sc in next 2 (7). S2: [sc in next 8, inc] x2 (20). (56)
- R4: B: [sc in next 2, inc] x3 (12). S1: [sc in next 9, inc] x2 (22). T: sc in next 3, 3 sc in the center st, sc in next 3 (9). S2: [sc in next 9, inc] x2 (22). (65)
- R5: B: sc in each of 12 sts. S1: sc in each of 22 sts. T: sc in next 4, 3 sc in the center st, sc in next 4 (11). S2: sc in each of 22 sts. (67)
- Sl st in the next st and fasten off Sand. Join Cream with a sl st in any st. Ch 1, rev sc in each st around. Sl st to the first rev sc and fasten off. Weave in the ends.
Small Leaf (make 2)
- With Sand, ch 13. R1: 3 sc in the 2nd ch from hook (B). Sc in the next 10 chs (S1). 3 sc in the last ch (T). Turn and work 10 sc in the free loops (S2). Place a marker. (26)
- R2: B: inc in each of 3 sts (6). S1: [sc in next 4, inc] x2 (12). T: sc, 3 sc in the center st, sc (5). S2: [sc in next 4, inc] x2 (12). (35)
- R3: B: [sc, inc] x3 (9). S1: [sc in next 5, inc] x2 (14). T: sc in next 2, 3 sc in the center st, sc in next 2 (7). S2: [sc in next 5, inc] x2 (14). (44)
- R4: B: [sc in next 2, inc] x3 (12). S1: sc in each of 14 sts. T: sc in next 3, 3 sc in the center st, sc in next 3 (9). S2: sc in each of 14 sts. (49)
- Sl st in the next st and fasten off Sand. Join Cream with a sl st in any st. Ch 1, rev sc in each st around. Sl st to the first rev sc and fasten off. Weave in the ends.
Center Stem
- With Cream, ch 61.
- Row 1: Sc in the 2nd ch from hook and in each ch across. Do not turn. (60)
- Row 2: Work 1 sc in each free loop of the foundation chain back along the other side of the cord. Sl st to join and fasten off, leaving a long tail for sewing. (60)
- Block the stem straight, since it will curl slightly while you work.
Embroidered Veins
- Thread the yarn needle with a length of Mocha. Using a stem stitch or chain stitch, work the center vein from the B end of the leaf up the middle, stopping about 3 stitches from the tip.
- Work side veins in matching pairs angled toward the tip. Make 5 pairs on each Large leaf, 4 on each Medium leaf and 3 on each Small leaf.
- Start each side vein on the center vein and work outward, ending about 3 stitches before the edge. Make the pairs shorter as you approach the tip.
- Keep the embroidery tension even so the leaf lies flat, and weave the ends in on the wrong side.
Finishing
Block every leaf and the stem to the same size before assembling. Lay the stem vertically. Place one Small leaf at the top with its tip pointing up and its base on the stem. Below it, set 2 Medium leaves, one on each side, angled upward and outward at roughly 40 degrees. Next place 2 Large leaves, one on each side, overlapping the tier above. Add the second set of 2 Large leaves lower on the stem and then 2 Medium leaves angled slightly downward. Finish with the second Small leaf at the bottom, tip pointing down.
Pin everything in place and check the overall balance before sewing. Use the Cream tail and a yarn needle to whipstitch each leaf base to the stem with 3 or 4 stitches, then add a few extra stitches where leaves overlap so they do not shift. Weave in all remaining ends and give the whole piece a final steam press.
Tips for Success
- Work tightly and use a hook a size down from what the yarn label suggests. The fabric should be stiff enough to hold the leaf shape.
- Make a Small leaf first as a test. If it measures close to 8 cm long, your gauge is on track for the rest.
- Keep a marker in the first stitch of B at all times. Losing the starting point is the most common cause of lopsided leaves.
- Embroider the veins before you sew the leaves to the stem. It is much easier to work on a single flat leaf.
- Block all leaves at the same time so they dry to the same size and shape.
Common Mistakes to Avoid
- Placing increases in the wrong spot. Check your stitch counts at the end of every round, and if a round is off, rip back and recount before continuing.
- Letting the tip become blunt. The 3 sc in the center stitch of T must stay in the exact middle of the tip each round, so keep that stitch marked.
- Embroidering too tightly. Puckered veins will pull the leaf out of shape, so keep the yarn relaxed.
- Sewing the leaves on without a layout. Lay everything out and photograph it first so you can match the arrangement while stitching.
Ways to Customize This Pattern
- Use deep green, olive and cream for a classic botanical look.
- Make only 6 leaves (1 Small, 2 Medium, 2 Large and 1 Small) for a shorter table topper.
- Make a wall hanging by adding a dowel at the top and tying the stem to it.
- Use thinner cotton and a smaller hook to make delicate leaves for a coaster set or a gift topper.
Frequently asked questions
Yes, but your leaves will come out larger or smaller. Sport weight will give a more delicate runner, while chunky yarn will give a bold rug-style mat. Keep the stitches tight whichever you choose.
A spiral avoids a visible seam line down one side of the leaf. The marker lets you keep the base and tip in the same position every round.
Hand wash in cool water with mild soap and reshape it flat to dry. Pin the leaves into place and press the edges so they keep their shape. Do not wring it out.
The easiest way is to lengthen the starting chain, but the increases would then need recalculating. For a larger runner, use a thicker yarn and a bigger hook instead.
The finished Creamy Flat Leaf Table Runner