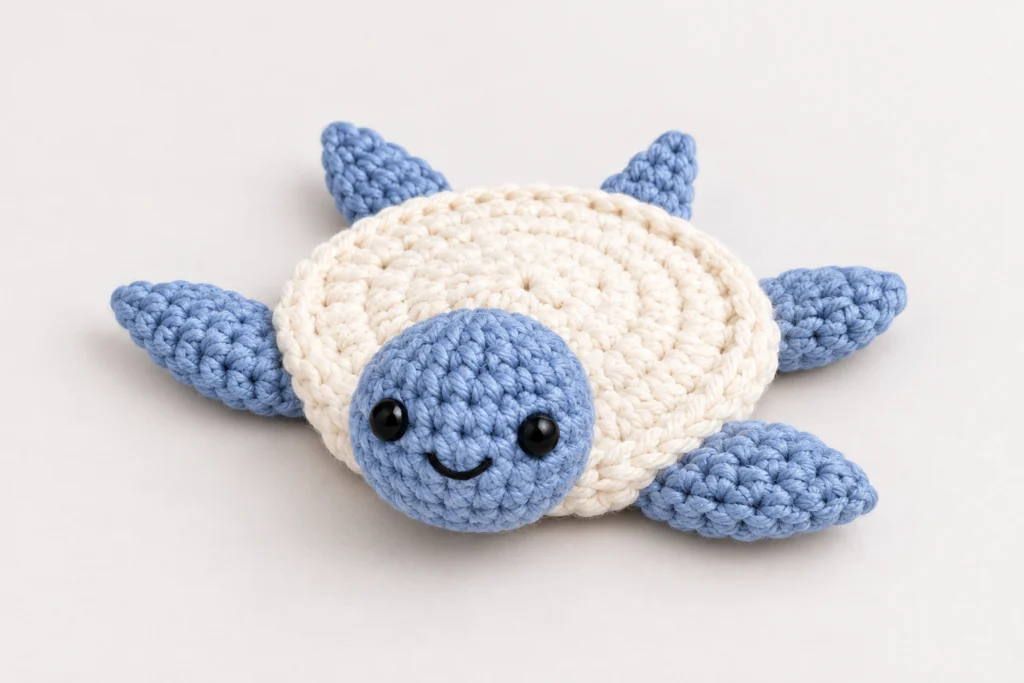
Creamy and Blue Turtle Coaster
Beginner Friendly
Perfect for those just starting their crochet journey, with clear instructions and simple techniques
Single-Day Project
A satisfying project you can complete in a single afternoon or evening.
Handmade Gift
A beautiful keepsake — free forever. Read online or print at home.
About This Creamy and Blue Turtle Coaster
This sea turtle amigurumi pattern builds a flat, huggable turtle from eight separate pieces: two matching shell discs joined into one flat body, a rounded blue head, two front flippers, two back flippers, and a tiny tail. Instead of the usual ball-shaped body, the shell is worked as a flat circle using a specific increase spacing that keeps it lying flat rather than cupping into a dome, then the flippers are sandwiched between the two shell layers as you join them — a technique that gives a much cleaner finish than sewing flippers on afterward.
Expect to spend 5-7 hours from first stitch to finished turtle, most of it split between the two shell discs and the four flippers. This isn’t a first-amigurumi pattern: the flat-circle math, the sandwich-join technique, and getting four symmetrical flippers positioned evenly all take a bit of patience. If you’ve made a handful of amigurumi before and are ready to try shaping and joining beyond a basic sphere, this is a satisfying next step.
Materials
- Worsted weight cotton or acrylic yarn, ivory/cream ~50g, for both shell discs
- Worsted weight cotton or acrylic yarn, dusty blue ~30g, for head, flippers, and tail
- Black yarn or embroidery floss small scrap, for the mouth
- Safety eyes, 9mm 1 pair
- Crochet hook 4.0 mm (US G/6)
- Polyester stuffing
- Yarn needle
- Stitch marker or a scrap of contrast yarn
- Removable stitch markers or pins for positioning flippers before joining
- Scissors
Abbreviations
MRmagic ringchchainscsingle crochetincincrease (2 sc in same stitch)decinvisible decrease (sc2tog)st(s)stitch(es)rnd(s)round(s)sl stslip stitchFOfasten offreprepeatShell (make 2 identical discs, ivory)
- Rnd 1: 6 sc in MR. (6)
- Rnd 2: inc in each st around. (12)
- Rnd 3: *sc 1, inc; rep from * around. (18)
- Rnd 4: *sc 2, inc; rep from * around. (24)
- Rnd 5: *sc 3, inc; rep from * around. (30)
- Rnd 6: *sc 4, inc; rep from * around. (36)
- Rnd 7: *sc 5, inc; rep from * around. (42)
- FO, leaving a long tail for sewing (about 40cm). Repeat all 7 rounds to make a second, identical disc — this one can have a shorter tail.
Front Flippers (make 2, blue)
- Rnd 1: 6 sc in MR. (6)
- Rnd 2: inc in each st around. (12)
- Rnds 3-7: sc around, no shaping (5 rounds even). (12)
- Rnd 8: *sc 4, dec; rep from * around. (10)
- Rnd 9: sc around. (10)
- Rnd 10: *sc 3, dec; rep from * around. (8)
- Flatten the tip so the last round’s 8 sts line up in two rows of 4, then sc across through both layers to close: sc 4. FO, leaving a tail for sewing.
Back Flippers (make 2, blue)
- Rnd 1: 6 sc in MR. (6)
- Rnd 2: inc in each st around. (12)
- Rnds 3-4: sc around, no shaping (2 rounds even). (12)
- Rnd 5: *sc 4, dec; rep from * around. (10)
- Rnd 6: *sc 3, dec; rep from * around. (8)
- Flatten the tip so the last round’s 8 sts line up in two rows of 4, then sc across through both layers to close: sc 4. FO, leaving a tail for sewing.
Tail (make 1, blue)
- Rnd 1: 6 sc in MR. (6)
- Rnd 2: sc around, no shaping. (6)
- Flatten the piece so the 6 sts line up in two rows of 3, then sc across through both layers to close: sc 3. FO, leaving a tail for sewing. Do not stuff.
Head (make 1, blue)
- Rnd 1: 6 sc in MR. (6)
- Rnd 2: inc in each st around. (12)
- Rnd 3: *sc 1, inc; rep from * around. (18)
- Rnd 4: *sc 2, inc; rep from * around. (24)
- Rnd 5: *sc 3, inc; rep from * around. (30)
- Rnds 6-7: sc around, no shaping (2 rounds even). (30)
- Place safety eyes now, between the round you just finished and the next one, spaced 8-9 sts apart and 2-3 rounds up from the neck opening. Check the angle from the front before pushing the backs on.
- Rnds 8-9: sc around, no shaping (2 rounds even). (30)
- Rnd 10: *sc 3, dec; rep from * around. (24)
- Rnd 11: *sc 2, dec; rep from * around. (18)
- Rnd 12: *sc 1, dec; rep from * around. (12) — stuff firmly now, before the opening gets much smaller.
- Rnd 13: dec around. (6)
- FO, cinch the remaining 6 sts closed, leaving a tail for sewing.
Assembling the Shell & Attaching the Flippers
- Hold the two shell discs wrong sides together (both right sides facing out) with the last rounds lined up stitch for stitch.
- Using the ivory tail and working through both loops of both layers at once, sc around the edge to join the two discs, starting anywhere along the edge.
- About a third of the way around, pause. Sandwich the flat base edge of one Front Flipper between the two shell layers, angled forward and slightly outward, and sc through all layers (both shell discs plus the flipper base) for 3-4 stitches to lock it in place. Continue plain joining, then repeat for the second Front Flipper directly opposite the first.
- Continue joining around toward the back of the shell. About two-thirds of the way around, sandwich in the two Back Flippers the same way, angled outward and slightly back, spacing them evenly from the front flippers.
- Before you close the last 6-8 sts of the join, stuff the shell lightly and evenly through the gap — it should stay fairly flat and pillow-like, not round into a ball.
- Finish joining around, sl st into the first stitch to close, and FO. Weave in the end.
Finishing
Pin the head to the front edge of the shell, centered between where the two front flippers attach, and check that it sits level before sewing it on with the head’s tail and a whip stitch through both layers. Pin and sew the tail to the back edge of the shell, tucked centered between the two back flippers.
Embroider the mouth in black yarn with a simple curved straight stitch or backstitch below the eyes — a shallow smiling curve, slightly upturned at the corners, matches the finished piece best. Weave in every remaining end, trim closely, and give the shell a gentle shaping press with your hands so it sits flat.
Tips for Success
- Keep your tension slightly looser on the join round than usual — pulling it tight will make the flat shell cup instead of lying flat.
- Stuff the shell lightly and only right before closing the last few stitches; too much stuffing turns a flat turtle into a ball.
- Pin all four flippers and the tail in place with removable stitch markers before you start sandwiching them into the join round, so spacing stays even all the way around.
- Place a stitch marker in the first stitch of every round on the shell discs — with 7 rounds of increases it’s easy to lose track of where a round starts.
- Check the eye placement on the head from the front, before you push the backs on, since 8-9 sts apart can still look slightly off depending on your yarn’s stitch definition.
Common Mistakes to Avoid
- Shell cups into a bowl instead of lying flat — usually caused by increasing on the wrong rounds. Follow the “sc n, inc” counts exactly as written; they’re spaced specifically to keep this piece flat.
- Flippers curl instead of lying flat — happens when the final round isn’t flattened evenly before closing. Pinch the piece flat with the last increase centered before you sc the tip shut.
- Shell looks like a ball instead of a turtle — comes from overstuffing. Add stuffing lightly and only at the very end, right before the last few stitches close.
- Flippers bunch too close together or sit unevenly — measure and mark placement at roughly even quarter-points around the shell edge before you start sandwiching them in.
- Eyes look uneven or cross-eyed — since the head shaping is symmetric, re-measure 8-9 sts apart centered between rounds 7 and 8 before snapping the backs on; it’s much easier to fix before stuffing than after.
Ways to Customize This Pattern
- Swap the ivory shell yarn for a mottled green or brown for a more realistic sea turtle look.
- Add one contrast-color sc round to the outer edge of each shell disc before joining, for a two-tone shell rim.
- Size it up by adding one more increase round to the shell (Rnd 8: *sc 5, inc; rep from * around, for 48 sts) and adding a round or two to the head and flippers to match.
- Turn it into a bag charm or keychain by sewing a small keyring loop into the tail area and stuffing more lightly.
- Divide the shell into segments with a few straight-stitch embroidery lines running from center to edge, once the shell is assembled, for a subtle shell-plate pattern.
Frequently asked questions
This almost always comes from the increase spacing drifting off the pattern — a flat circle needs exactly 6 more stitches each round, added at the specific points shown. Double check your stitch count at the end of every round against the number in parentheses, and if a disc still won’t lie flat once finished, pin it flat and lightly steam-block it before joining.
Not as written. Safety eyes are a choking hazard for children under 3, so embroider the eyes with black yarn or floss instead, and stitch the mouth on securely with no loose ends a small child could pull loose.
Plan on roughly 50g of ivory for both shell discs together, and about 30g of blue for the head, four flippers, and tail combined — worsted weight cotton or acrylic. Buying a little extra is worth it since gauge and tension vary from crocheter to crocheter.
Not with this exact shell. This design uses flat-circle discs on purpose so the finished turtle lies down like a soft, huggable lovey. A standing, domed turtle would need a sphere-style shell (increase, then work even, then decrease) rather than the flat discs here, which changes the flipper placement and assembly as well.
The finished Creamy and Blue Turtle Coaster