Celtic Knot Christmas Tree Crochet Pattern
Beginner Friendly
Perfect for those just starting their crochet journey, with clear instructions and simple techniques
Single-Day Project
A satisfying project you can complete in a single afternoon or evening.
Handmade Gift
A beautiful keepsake — free forever. Read online or print at home.
About This Celtic Knot Christmas Tree Crochet Pattern
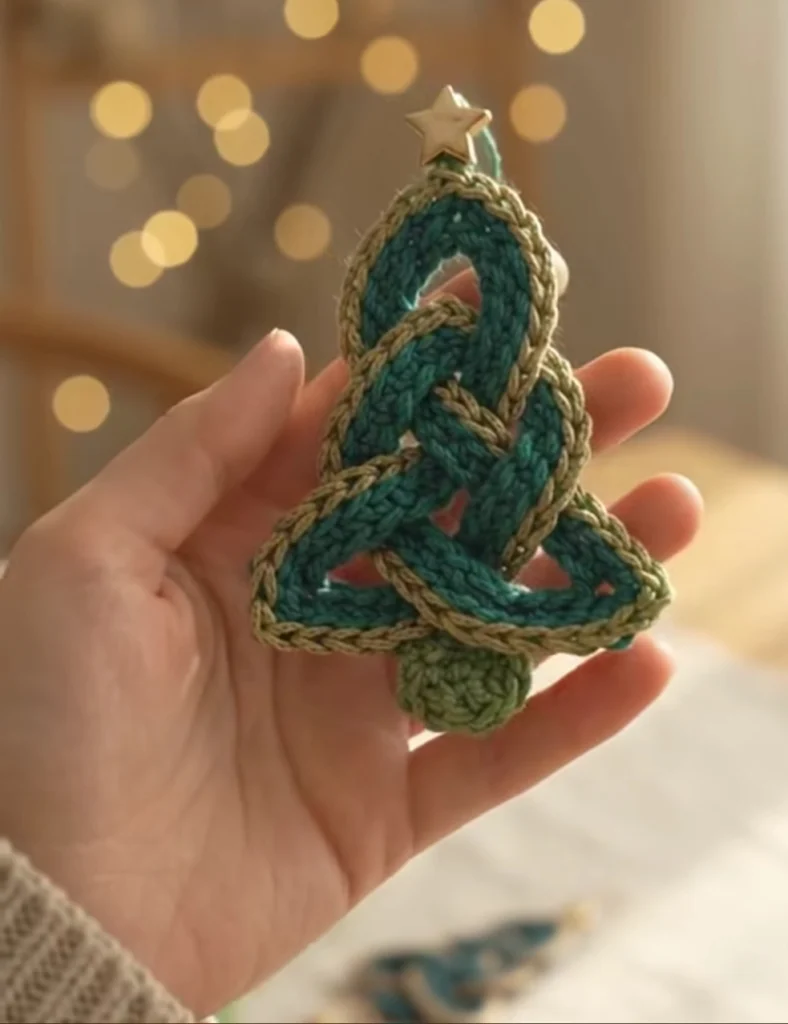
This Celtic knot Christmas tree crochet pattern turns one long teal band and a thread of gold edging into a woven trinity-knot tree that fits in the palm of your hand. The band is tied into a knot so the branches pass over and under each other, with no cutting and no gluing. A small green trunk and a gold star finish it off.
What sets this apart from a flat tree ornament is the construction. You make five separate pieces: the teal band, the gold edging worked around it, a small stuffed trunk, a star, and a hanging loop. The edging is worked in reverse single crochet, which gives the twisted, braided look along both sides. The knot itself is tied, shaped and pinned into a tree rather than sewn together from flat parts.
Plan on four to five hours in total. Most of that is the band and edging, which are simple stitches repeated many times, plus a little time for blocking and shaping. It suits a crocheter who is comfortable working in the round, changing colors, and handling slippery metallic yarn. It makes a good keepsake ornament, and it is small enough to tuck into a card or tie onto a gift.
Materials
- Teal DK cotton yarn about 30 m / 15 g
- Metallic gold DK or sport weight yarn about 20 m
- Light green DK cotton yarn about 6 m / 3 g
- 2.5 mm crochet hook a 2.75 mm hook is optional for the edging
- Stitch marker 1
- Tapestry needle
- Sewing needle and matching thread teal and gold
- Fiberfill a small pinch for the trunk
- Foam board or blocking mat and pins
- Fabric stiffener or diluted white glue optional
- Gold star button about 2 cm, optional instead of the crocheted star
- Scissors
Abbreviations
MRmagic ringchchainst(s)stitch(es)sl stslip stitchscsingle crochethdchalf double crochetinc2 sc in the same stitchdecsingle crochet 2 togetherbloback loop onlyrev screverse single crochet, worked left to right( ) × Nrepeat the stitches in brackets N times[ ]stitch count at the end of the row or roundTeal Band
- With teal and a 2.5 mm hook, ch 161.
- Row 1: sc in the 2nd ch from the hook and in each ch across. Turn. [160]
- Rows 2-5: ch 1 (does not count as a st), sc blo in each st across. Turn. [160]
- Fasten off and weave in both tails. The band should now be about 32 cm long and 1 cm wide.
Gold Edging
- Color change: with the foundation-chain edge facing you and the right-hand end nearest, join the gold yarn with a sl st in the first free loop of the foundation chain.
- Rnd 1: ch 1, sc in each of the 160 free foundation-chain loops [160]. Work 5 sc evenly up the short end, 1 sc in each row-end [165]. Sc in each of the 160 sts of Row 5 [325]. Work 5 sc evenly down the other short end, 1 sc in each row-end [330]. Join with a sl st to the first sc. [330]
- Rnd 2: ch 1, do not turn. Working left to right, rev sc in each st around. Join with a sl st to the first rev sc. [330]
- Fasten off and weave in the gold tails along the inside of the edging.
Trunk
- With light green, 6 sc in MR. [6]
- Inc in each st around. [12]
- (Sc, inc) × 6. [18]
- (2 sc, inc) × 6. [24]
- Sc blo in each st around. [24]
- Sc in each st around. [24]
- Sc in each st around. [24]
- (2 sc, dec) × 6. [18]
- (Sc, dec) × 6. [12]
- Stuff lightly with a small pinch of fiberfill. Keep it soft so the trunk sits flat against the knot.
- Dec × 6. [6]
- Fasten off, leaving a 20 cm tail. Thread the tail through the front loops of the last round, pull closed and weave in. Keep the sewing tail from the beginning of the piece for attaching later.
Star
- With gold yarn, 10 sc in MR. Join with a sl st to the first sc. [10]
- Point 1: ch 4, sc in the 2nd ch from the hook, hdc in the next ch, sl st in the next ch, then sl st in each of the next 2 sc of the ring.
- Points 2-5: repeat the Point 1 instructions 4 more times. You will have 5 points and will have used all 10 ring sts.
- Fasten off, leaving a 15 cm tail. Weave in the MR tail. Steam or stiffen the star flat if you like.
Hanging Loop
- With gold yarn, ch 30. Join with a sl st to the first ch to form a ring. Do not twist the chain.
- Fasten off, leaving 10 cm tails. These tails will tie the loop to the top of the tree.
Tying and Shaping the Knot
- Pin the band flat to a foam board with the right side up and spritz lightly with water. Let it dry completely so it holds its width.
- Lay the dry band right side up. Tie a loose overhand knot in the middle, like a shoelace knot, leaving about 4 cm of band free at each end. Keep the right side facing up throughout; if a section flips over, undo and retie.
- Bring the two ends together and overlap them by 1 cm, right side up. Sew them together with small stitches and matching thread. This is now a closed ring in the shape of a trefoil, with three crossings.
- Slide the band through the knot until the sewn join sits at the bottom crossing, then pin it to the board.
- Shape the knot into a tree. Draw the top lobe up and narrow, and spread the two lower lobes wide and low. Check that the band goes over, under, over, under, over, under as you follow it around the ring.
- At each of the three crossings, tack the layers together with 2-3 tiny stitches in matching thread from the back so the knot keeps its shape.
Finishing
Sew the trunk to the bottom crossing, centered over the join, using the tail from the beginning of the piece. The flat side of the trunk (the piece with the ridge from the blo round) faces the tree. Sew the star to the top of the upper lobe with the gold tail, then slip the hanging loop behind it and tie the loop tails firmly to the top lobe, hiding the knot behind the star.
If you prefer a firmer ornament, brush a thin coat of fabric stiffener over the back only, pin the tree flat to the foam board, and let it dry for a full day before hanging it. Trim all tails and check that every crossing is tacked down.
Tips for Success
- Work the band in a firm, even tension. A loose band stretches when tied and the knot will lose its crisp shape.
- Weave in all the teal tails before you tie the knot; once the band is folded they are hard to reach.
- Work the reverse sc slowly and check that each stitch goes into a stitch of Rnd 1, not between them, so the twisted edge stays even.
- If the band seems too narrow, add a 6th row rather than more stitches; extra rows widen the band without changing its length.
- Block the band flat before tying the knot so it lies smoothly at each crossing.
Common Mistakes to Avoid
- Edging that curls the band inward: it is worked too tightly. Repeat it with a 2.75 mm hook and steam to flatten.
- A flipped or twisted band in the knot: undo the knot and retie it with the right side up all the way through.
- Crossings that do not alternate over and under: check the path around the ring and re-thread the band so it goes over, under, over, under, over, under.
- A stiff, lumpy trunk: too much fiberfill. Take some out through the last opening before you close it.
- Metallic yarn snagging or fraying at the ends: knot it once, dab with clear glue, or weave the tail back through the edging for a few stitches.
Ways to Customize This Pattern
- Change the colors, such as red and cream or white with silver edging, for a different holiday look.
- Make a smaller or larger tree by changing the foundation chain to 121 or 201, and change the edging counts to match.
- Thread tiny gold beads onto the metallic yarn before you begin and place one every few reverse stitches.
- Use a small gold star button instead of the crocheted star, sewn over the loop tails.
- Sew a magnet or a keyring to the back to turn the tree into a fridge magnet or a bag charm.
Frequently asked questions
About 32 cm before edging gives a tree roughly 9 cm tall. If your gauge is looser, chain more stitches, or fewer if it is tighter, until the band measures 32 cm.
Yes. Thinner yarn and a smaller hook give a delicate ornament, while thicker yarn gives a chunkier one. Always measure the finished band length and width, and adjust the chain and edging counts to suit.
No, but it helps. A thin layer of fabric stiffener on the back keeps the crossings crisp and stops the tree from sagging on a branch, especially if you are using a soft cotton.
Working left to right twists each stitch slightly, which makes a rope-like edge that looks braided next to the flat teal band. A plain sc or sl st edging looks flatter and less decorative.
The finished Celtic Knot Christmas Tree Crochet Pattern