Autumn Maple and Oak Leaf Wall Hanging with Acorns
Beginner Friendly
Perfect for those just starting their crochet journey, with clear instructions and simple techniques
Single-Day Project
A satisfying project you can complete in a single afternoon or evening.
Handmade Gift
A beautiful keepsake — free forever. Read online or print at home.
About This Autumn Maple and Oak Leaf Wall Hanging with Acorns
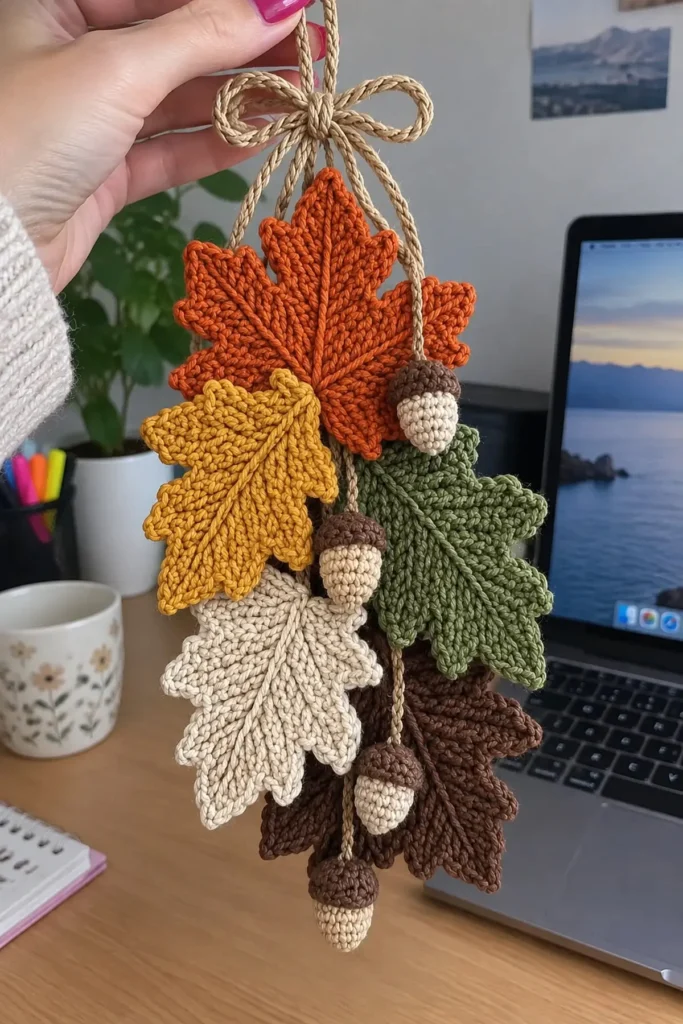
This crochet autumn leaf wall hanging gathers five leaves in rust orange, mustard, olive green, cream and chocolate brown into a loose cluster, with four small acorns dangling on camel-colored cords and a corded bow at the top. It is sized to hang from a doorknob, a cabinet handle, a wall hook or the corner of a shelf, and it is light enough to move around the house all season.
The design uses two different leaf shapes. The maples have pointed lobes worked in short rows with picot teeth along the edges, and come in a large size for the rust leaf at the top and a smaller size for the mustard and cream leaves. The oaks are worked around a foundation chain and finished with rounded, tapering lobes. Every leaf gets raised veins in surface slip stitch, and the acorns have a ridged cap with a front post band that sits slightly proud of the nut.
Expect about 7 to 9 hours: 45 to 60 minutes per leaf, around 30 minutes per acorn, and an hour or so for the cords, bow and assembly. It is a good fit for crocheters who already know amigurumi rounds and want to practice short-row shaping, working along both sides of a chain, and finishing details that make a piece look polished.
Materials
- DK / light worsted cotton yarn, rust orange about 15 g (large maple leaf)
- DK / light worsted cotton yarn, mustard about 10 g (small maple leaf)
- DK / light worsted cotton yarn, cream about 10 g (small maple leaf)
- DK / light worsted cotton yarn, olive green about 10 g (oak leaf)
- DK / light worsted cotton yarn, chocolate brown about 20 g (oak leaf and acorn caps)
- DK / light worsted cotton yarn, sand beige about 10 g (acorn nuts)
- DK / light worsted cotton yarn, camel about 25 g (cords, bow and wrap)
- 3.5 mm crochet hook
- Polyester fiberfill a small handful
- Stitch markers at least 2
- Tapestry needle, plus a sewing needle and camel or brown thread
- Spray starch, blocking mat and pins
Abbreviations
MRmagic ringchchainsl stslip stitchscsingle crochethdchalf double crochetdcdouble crochettrtreble crochetinc2 sc in the same stitchdecinvisible decrease (sc 2 together through front loops)sc2tog / sc3togsingle crochet 2 or 3 stitches togetherdc2togdouble crochet 2 stitches togetherFPscfront post single crochet: insert hook from front to back around the post of the stitch, pull up a loop, finish as scBLOback loop onlypicotch 3, sl st in 3rd ch from hookRround or rowst(s)stitch(es)RS / WSright side / wrong sideLarge Maple Leaf: Center (rust orange, make 1)
- R1: Make a MR. Ch 3 (counts as dc), 14 dc in the ring. Pull tight and sl st to top of ch-3. (15 sts)
- R2: Ch 1, *2 sc in next st, sc in next 2 sts* rep from * 4 more times. Join with sl st to first sc. (20 sts)
- R3: Ch 1, *sc in next 3 sts, 2 sc in next st* rep from * 4 more times. Join. (25 sts) Do not fasten off.
- Mark the groups on R3 counting from the first sc: sts 1–2 stem base, sts 3–6 lower-left lobe, sts 7–11 left lobe, sts 12–16 top lobe, sts 17–21 right lobe, sts 22–25 lower-right lobe. (2 + 4 + 5 + 5 + 5 + 4 = 25)
Large Maple Leaf: Lobes
- Small lower lobes (sts 3–6 and 22–25): For the first one, sl st in st 2 and st 3; for the second, sl st in st 22.
- Small lobe Row 1: Ch 3 (counts as dc), dc in the same st, dc in next 2 sts, 2 dc in next st. Turn. (6 sts)
- Small lobe Row 2: Ch 2 (does not count), dc2tog 3 times. Turn. (3 sts)
- Small lobe Row 3: Ch 1, sc3tog. (1 st) Sl st down the side along the row ends, 2 sl sts in each dc row end and 1 in the sc row end, back to R3. (5 sl sts)
- Large lobes (sts 7–11, 12–16, 17–21): Sl st in the first st of the group. Row 1: Ch 3 (counts as dc), dc in the same st, dc in next 3 sts, 2 dc in next st. Turn. (7 sts)
- Large lobe Row 2: Ch 3 (counts as dc), dc in the same st, dc in next 5 sts, 2 dc in top of turning ch. Turn. (9 sts)
- Large lobe Row 3: Ch 3 (counts as dc), dc in next 7 sts, dc in top of turning ch. Turn. (9 sts)
- Large lobe Row 4: Ch 2 (does not count), dc2tog, dc in next 5 sts, dc2tog. Turn. (7 sts)
- Large lobe Row 5: Ch 2, dc2tog, dc in next 3 sts, dc2tog. Turn. (5 sts)
- Large lobe Row 6: Ch 2, dc2tog, dc in next st, dc2tog. Turn. (3 sts)
- Large lobe Row 7: Ch 1, sc3tog. (1 st) Sl st down the side along the row ends, 2 sl sts in each dc row end and 1 in the sc row end, back to R3. (13 sl sts)
- Work the lobes in order around the center: lower-left, left, top, right, lower-right. Each lobe has an odd number of rows, so you always finish on the side next to the following lobe.
Small Maple Leaves (make 2: 1 mustard, 1 cream)
- R1: Make a MR. Ch 3 (counts as dc), 14 dc in the ring. Join. (15 sts)
- R2: Ch 1, *2 sc in next st, sc in next 2 sts* rep from * 4 more times. Join. (20 sts)
- Groups on R2: sts 1–2 stem base, sts 3–5 lower-left lobe, sts 6–9 left lobe, sts 10–13 top lobe, sts 14–17 right lobe, sts 18–20 lower-right lobe. (2 + 3 + 4 + 4 + 4 + 3 = 20)
- Small lobes (sts 3–5 and 18–20): Row 1: Ch 3 (counts as dc), dc in the same st, dc in next st, 2 dc in next st. Turn. (5 sts) Row 2: Ch 2 (does not count), dc2tog, dc in next st, dc2tog. Turn. (3 sts) Row 3: Ch 1, sc3tog. (1 st) Sl st down the row ends back to R2. (5 sl sts)
- Large lobes (sts 6–9, 10–13, 14–17): Row 1: Ch 3, dc in the same st, dc in next 2 sts, 2 dc in next st. Turn. (6 sts) Row 2: Ch 3, dc in the same st, dc in next 4 sts, 2 dc in top of turning ch. Turn. (8 sts) Row 3: Ch 3, dc in next 6 sts, dc in top of turning ch. Turn. (8 sts)
- Large lobes, continued: Row 4: Ch 2 (does not count), dc2tog, dc in next 4 sts, dc2tog. Turn. (6 sts) Row 5: Ch 2, dc2tog, dc in next 2 sts, dc2tog. Turn. (4 sts) Row 6: Ch 2, dc2tog twice. Turn. (2 sts) Row 7: Ch 1, sc2tog. (1 st) Sl st down the row ends back to R2. (13 sl sts)
Maple Leaves: Stem, Edging and Veins (all three maples)
- Stem: After the lower-right lobe, sl st in st 1 of the last center round. Ch 11 for the large maple or ch 9 for the small maples, sl st in 2nd ch from hook and in each ch back to the leaf, then sl st in st 2.
- Edging, small lobes: Ch 1. Up the first side, 2 sc in each dc row end and 1 sc in the sc row end (5 sc), (sc, picot, sc) in the tip st, sc in each of the 5 sl sts down the other side, sl st in the valley between lobes.
- Edging, large lobes: 2 sc in each of the 6 dc row ends, working a picot between the 2 sc of the Row 3 row end; 1 sc in the Row 7 row end; (sc, picot, sc) in the tip st; sc in each of the 13 sl sts down the other side, working a picot after the 8th sc; sl st in the valley.
- Continue around all five lobes. At the stem, sl st at its base without working along it, and join to the first sc. Fasten off, leaving a 30 cm tail.
- Veins: With a 60 cm strand of the leaf color and RS facing, surface sl st from the center ring along the middle of each lobe to the base of its tip, carrying the yarn back on the WS each time. Add 2 short side veins of 3–4 sl sts on each large lobe, angled toward the picot teeth, and one line down the center of the stem.
Oak Leaves: Foundation and Body (make 2: 1 olive green, 1 chocolate brown)
- Ch 21.
- R1: Sc in 2nd ch from hook and in each of next 18 ch (19 sc), 3 sc in the last ch. Rotate, and working in the free loops on the other side of the foundation, sc in each of next 18 ch, then 2 sc in the first ch (the one already holding the first sc). Join with sl st to first sc. (42 sts) The end where you started is the base of the leaf; the 3-sc end is the tip.
- Stitch map for R1: st 1 base, sts 2–19 side A, sts 20–22 tip, sts 23–40 side B, sts 41–42 base.
- R2: Ch 1, sc in st 1, hdc in sts 2–19, 2 hdc in each of sts 20–22, hdc in sts 23–40, sc in sts 41–42. Join. (1 + 18 + 6 + 18 + 2 = 45 sts)
- Stitch map for R2: st 1 base, sts 2–19 side A, sts 20–25 tip, sts 26–43 side B, sts 44–45 base. Mark the start of each 6-st group on both sides.
Oak Leaves: Lobes, Stem and Veins
- R3: Ch 1, sl st in st 1.
- Side A, small lobe (sts 2–7): sl st in next st, sc in next st, 2 hdc in each of next 2 sts, sc in next st, sl st in next st.
- Side A, large lobe (sts 8–13): sl st in next st, hdc in next st, 3 dc in each of next 2 sts, hdc in next st, sl st in next st.
- Side A, medium lobe (sts 14–19): sl st in next st, hdc in next st, 2 dc in each of next 2 sts, hdc in next st, sl st in next st.
- Tip lobe (sts 20–25): sl st in next st, hdc in next st, (2 dc, tr) in next st, (tr, 2 dc) in next st, hdc in next st, sl st in next st.
- Side B: work a medium lobe on sts 26–31, a large lobe on sts 32–37 and a small lobe on sts 38–43, exactly as on side A, so the lobes taper toward the base on both sides.
- Base and stem: Sl st in sts 44 and 45. Ch 8, sl st in 2nd ch from hook and in each of next 6 ch, then join with sl st to the first sl st of the round. Fasten off, leaving a 30 cm tail.
- Veins: Surface sl st a center vein along the foundation line from the base of the stem to the tip lobe, then add one side vein from the center vein into the middle of each of the 6 side lobes.
Acorn Nuts (make 4, sand beige)
- R1: 6 sc in MR. (6)
- R2: (sc, inc) 3 times. (9)
- R3: (2 sc, inc) 3 times. (12)
- R4: (sc, inc) 6 times. (18)
- R5–R8: sc in each st. (18) (4 rounds)
- R9: (sc, dec) 6 times. (12) Stuff firmly, shaping the pointed bottom.
- R10: dec 6 times. (6) Top up the stuffing, fasten off, close the opening through the front loops and hide the tail inside.
Acorn Caps (make 4, chocolate brown)
- R1: 6 sc in MR. (6)
- R2: inc 6 times. (12)
- R3: (sc, inc) 6 times. (18)
- R4: (2 sc, inc) 6 times. (24)
- R5: sc in BLO of each st. (24) This turns the cap downward and leaves a fine ridge around the crown.
- R6: FPsc around each st of R5. (24) This makes a raised textured band, like the scales of a real cap.
- R7: (2 sc, dec) 6 times. (18) The cap now narrows to grip the nut. Sl st in next st and fasten off, leaving a 30 cm tail.
Romanian Cords (camel)
- To start each cord: ch 2, sc in 2nd ch from hook.
- Turn the work clockwise, insert the hook under the single loop on the left, and sc.
- *Turn clockwise, insert the hook under the 2 loops on the left, sc* and repeat to the length below. Fasten off, leaving a 15 cm tail on each cord.
- Make 1 main cord 80 cm long (hanging loop and leaf spine).
- Make 1 bow cord 45 cm long.
- Make 4 acorn cords: 21 cm, 29 cm, 39 cm and 49 cm long.
Leaf Cluster Assembly
- Pin all five leaves flat, spray with starch and let them dry completely.
- Arrange them RS up: large rust maple at the top center, mustard maple below it on the left, olive oak on the right overlapping the rust leaf, cream maple below the mustard, and brown oak at the bottom right. Overlap each leaf by about a quarter and angle the stems in different directions.
- Turn the arrangement over carefully and tack every overlap on the WS with the leaf tails, keeping the stitches small so they do not show through.
Cords, Acorns and Bow Assembly
- Fold the main cord in half. About 8 cm below the fold, wrap a 60 cm strand of camel tightly around both strands 8 times to form the hanging loop, and secure the end under the wraps.
- Lay the two tails of the main cord down the back of the leaf cluster in a slight V, starting 4 cm above the top of the rust maple, and stitch them to the WS of every leaf they cross. These two strands carry the weight.
- For each acorn, push one end of an acorn cord through the MR of a cap from outside to inside, tie an overhand knot, and stitch the knot to the inside of the cap. Add a pinch of stuffing to the cap, slip it over the nut so the rim sits at about R6 of the nut, and whipstitch the rim all the way around.
- Tuck the free ends of the four acorn cords up into the wrap below the hanging loop and stitch them in place with thread, so they hang over the front of the leaves. Shortest to longest, place them right, left of center, center and left, so the acorns fall in a loose diagonal.
- Tie the bow cord into a bow with loops about 6 cm wide, place the knot of the bow over the wrap, and stitch it on through the back. Trim the bow tails at an angle and secure the ends with a few stitches so they cannot unravel.
Finishing
Hang the piece and check it from a little distance. If one side leans, move the tacking on the spine cords until the cluster hangs straight. Lift any lobe that folded during assembly and press it flat with your fingers, and give each acorn a gentle squeeze so the caps sit evenly.
Weave any remaining tails into the WS of the leaves or into the cords. If you plan to use the hanging year after year, store it flat in a box with tissue paper between the leaves, and give the leaves a fresh coat of spray starch at the start of each season.
Tips for Success
- Mark every lobe group before you start the short rows. A lobe started one stitch early shifts all the others and leaves the stem off center.
- On the oak leaves, work the free loops of the foundation chain with the same tension as the first side, or the leaf will curve like a banana.
- Work the surface slip stitch veins loosely, going up a hook size if needed, so they sit on top of the leaf instead of puckering it.
- Stuff the small acorns more firmly than you think you need to. They are tiny, and soft stuffing shows every stitch gap.
- Make all the Romanian cords in one sitting so they come out the same thickness and texture.
Common Mistakes to Avoid
- Counting the ch-2 on the maple decrease rows as a stitch: the lobe ends up lopsided with a blunt point. The ch-2 never counts; the ch-3 on the increase and straight rows always does.
- Using the wrong set of counts for the small maples: they use the 20-stitch center and 4-stitch large lobes, while the large rust maple uses the 25-stitch center and 5-stitch large lobes. Mixing them changes the leaf size and shape.
- Working the oak lobes in the wrong order on side B: the large lobe ends up near the tip. Side B always goes medium, large, small, mirroring side A.
- Working R5 of the cap through both loops: the cap stays round and floppy instead of turning down. Rip back and work R5 in the back loops only.
- Hanging the leaves from the acorn cords: the cluster pulls apart within days. The two main-cord tails on the back must hold the leaves.
Ways to Customize This Pattern
- Swap the colors for a late-autumn palette: burgundy, copper, dark gold, faded sage and taupe.
- Make a horizontal mantel version by stitching 8 to 10 leaves along a 120 cm Romanian cord, with acorns hanging between them.
- Use a single small maple with one acorn on a short cord as a gift tag or a key ring.
- Add a few sl st lines in a slightly darker shade across the cream and mustard leaves to suggest autumn color changes.
- Replace the bow with a wooden bead or a wooden ring at the top for a more rustic look.
Frequently asked questions
Mixing sizes and shapes is what makes the cluster look natural rather than uniform. The large maple anchors the top, the smaller maples fill in the sides, and the rounded oak lobes break up all the points. If you prefer, you can make every leaf from one shape; just adjust the color layout.
That usually means the second side of the foundation chain was worked more tightly than the first. Wet the leaf, pin it straight along the center vein and starch it. If it is badly curved, redo R1 with a looser hand on the second side.
Yes. The acorns are small and light, and the leaves are tacked to the spine cords, so movement will not pull the cluster apart. Tack each acorn cord to a leaf at one point on the back if you want to keep the acorns from swinging into each other.
You can, but the leaves will be softer and the picot teeth and oak lobes will not hold their shape as well. Cotton gives the clean edges and crisp veins in the photo. Acrylic is fine for the acorns and works for the cords if you keep your tension firm.
The finished Autumn Maple and Oak Leaf Wall Hanging with Acorns